I hope you all had a lovely Christmas and are looking forward to ringing in the New Year in style this evening! Here, half of our family succumbed to the horrible chest infection that appears to be rampant everywhere this winter, including myself. Coughing while 9 months pregnant is no fun!! Anyway, thankfully after lots of antibiotics we are over the worst of it. Quite a bit heavier too, after eating all the food we had bought for visitors who then couldn't visit!
The year would not be complete without my annual collage of favourite projects from the year. It hasn't felt too productive, but I had forgotten that I got lots of nice things made earlier in the year when I was feeling better, and had fun going through my photos.
Happy New Year everyone - I'm hoping that I might see a return to normal production later on in 2013! But first, I have a baby to delivery - I'm hoping I might have some news next week - keep your fingers and toes crossed :-)
Pages
▼
Monday, December 31, 2012
Sunday, December 23, 2012
A little Christmas magic
This year I have been really conscious that I haven't made one Christmas themed thing! Not like me, I normally make something to add to the Christmas decorations every year. But the thought of cutting and sewing pretty much anything in the last few weeks has been too much for me.
Happily, the magic of Christmas decided to sprinkle itself in my direction this week. Some intensive treatment with a brilliant physiotherapist in the last 3 weeks has finally had the desired effect and the basic things like walking and moving have been so much easier this week. Yesterday afternoon, I needed a little headspace and felt up to a little sewing. Having swooned over all the triangle quilts out there online this year, I decided to cut some triangles from my Christmas fabric scraps.
It went along suprisingly quickly, and I managed to finish up this cute table runner this morning. Not too big - it fits our living room coffee table perfectly, or we could use on the kitchen table.
It was a bit of a rushed affair - knowing my back had its limits for sitting at the machine, I rattled through the piecing and quilting without much attention to detail - hence, lots of wonky quilting lines, and the most careless ever machine done binding. But, once it is in use and I am not looking at it from 6 inches away, those flaws will fade into the background and I'll just notice the colour and the lovely little triangles!
I hope you all are ready for the big day, and that the kids are almost at fever pitch of excitement waiting for Santa, like mine are!! I'm not sure if I'll be back posting over the festive season, or into January as I want to spend lots of time with my family relaxing before the new baby arrives - and all the mayhem that will bring.
So I'll sign off by wishing you all a lovely, happy and fun Christmas and New Year, and just to say thank you all for your lovely comments, good wishes and friendship this year. I hope that after baby arrives and settles in a bit I will start to get back to my normal self again :-)
Wednesday, December 19, 2012
Giveaway winner!
Yay! We have 2 winners of the great giveaway sponsored by Fililis.com
First up, the winner of the bundle of 12 beautiful FQs was
Congratulations Michala :-)
The winner of the €20 voucher is:
who is Aisling. Congratulations Aisling!
I will email both you ladies this evening to get your details :-)
Thanks so much to Patricia for kindly sponsoring the giveaway, and don't forget that she is offering a 10% discount to all FairyFace Designs readers through December 25th. To avail of the discount, please type the code FairyLaunch012 at checkout.
First up, the winner of the bundle of 12 beautiful FQs was
who was Michala!
Congratulations Michala :-)
The winner of the €20 voucher is:
who is Aisling. Congratulations Aisling!
I will email both you ladies this evening to get your details :-)
Thanks so much to Patricia for kindly sponsoring the giveaway, and don't forget that she is offering a 10% discount to all FairyFace Designs readers through December 25th. To avail of the discount, please type the code FairyLaunch012 at checkout.
Monday, December 17, 2012
Some crafting for baby
I've slowly but surely been making up some little things for my new baby, which has been great fun. Having decided not to find out the gender again, and looking forward to a surprise on the big day, it was a little challenging to make things and try and make sure they were not too boyish or girlish. I decided to use red and green as my main colours, and worked the rest around that. Not being a big fan of plain white, lemon or pastels for babys, except for a few small things, I went for bright and bold colour. I didn't make a huge pile of things - mostly because I know when baby arrives I will want to use boy or girl colours for him or her.
So here's what I made.
A crocheted blanket for the car seat/buggy using the lovely Ripple pattern on Attic24. This is one of my fave patterns ever, and I just adore this blanket. Its made using Sirdar Baby Bamboo which is a bamboo/wool mix - I normally don't use wool as I can't tolerate it, but the content was low here so it was fine. It will be nice and snuggly and warm for my January baby. The picture above is filtered on Instagram, so this is a better idea of the true colours:
A simple little baby cardigan from Debbie Bliss's book Baby Knits for Beginners. This is a cardi I have knitted loads of times for presents, its perfect for newborns as there are no lacy holes in it for them to get their fingers caught, and the moss rib finishes it off so prettily. If baby is a girl, I might swap out every 2nd button for a cerise pink one as I love pink and green combos.
A swaddle-type blanket made with flannel on one side and cotton on the other - I love wrapping winter babies in a light blanket, not too tightly, but enough to make them feel warm and cosy.
And finally, some burp cloths using the leftover flannel from the blanket as backing - you can see the spotty ones in the picture up the top, I didn't get a separate picture. I also made some boys burp cloths with towelling backing for my sister and friend who both had baby boys in the last few weeks and they went down a treat.
So I'm pretty much all done - I might make a few other bits if the mood takes me in the next week or so, but I think baby will be pretty well outfitted in these :-) With just 3 weeks left to go, its all getting very real now and I can't wait to meet this little person!
PS - If you haven't already, don't forget to enter my giveaway for 12 FQs generously sponsored by Fililis - just go here to enter. Only a couple of days left!
Wednesday, December 12, 2012
Meet my new sponsors - Fililis - and a great giveaway!
I'm really excited to welcome Fililis as new sponsors of FairyFace Designs!
Fililis is a mother and daughter love-for-fabric affair, with a shop based in Waterford, Ireland. It is really great to have another online store selling bright, modern fabrics here in Ireland! Patricia's grandmother is a trained seamstress and her mother Celia learnt to sew at her feet. While Patricia was a late starter - it wasn't until her 20s that she got a sewing machine as a birthday present and took her first sewing steps – her love for everything textile hit her fast and hard!
Her mother, Celia, lives in Spain and she comes up with the most beautiful designs on a daily basis. Like many women in Spain and in their family, she sews anything from clothes to household items. She sews useful things that are incredibly beautiful. Here are some squares of the completely hand sewn life story quilts that she made for Patricia and her step-sister:
You can see the lifestory quilts here and here and I would definitely recommend to all quilt lovers that you check them out, they are intricate, beautiful works of art!
But in Patricia's opinion, Celia’s masterpiece was her wedding dress, sewn with lace that her great-great-greatgrandmother had woven by hand: "She designed, sewed and beaded this beauty, making me the most dazzling bride ever!"
Isn't it fabulous? Such a beautiful dress!!
While Patricia's mother is the inspiration behind Fililis, Patricia combines her degree in Entrepreneurship and her love for fabric to bring to the shop beautiful and bright quilting fabrics. While living in Canada for three years she visited many well-appointed quilting shops and felt the drive to bring something similar to Ireland, where she moved with her (Irish) husband last year.
Fililis has just launched as a shop in November 2012 and while they are still updating their catalogue on a daily basis and some sections of the page are still under development they would like to invite you to have a peak . Patricia is offering a fab 10% discount to all FairyFace Designs readers through December 25th. To avail from the discount, please type the code FairyLaunch012 at checkout.
But what would a launch be without a giveaway? And to celebrate their launch Patricia is very generously offering the following goodies to two lucky winners:
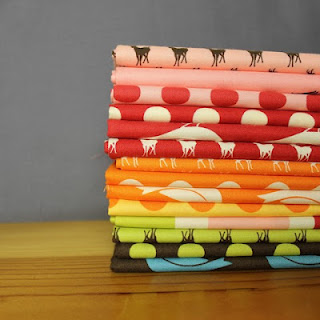
A bundle of 12 gorgeous fat quarters as pictured above (are you swooning? I know I am!) will go to the first name drawn by random number generator.
But if you're not first drawn, you are still in with a chance as there is a €20 voucher for the shop for the 2nd name drawn.
Please note that this giveaway is only open to readers in Europe due to shipping costs.
To enter the giveaway, simply pop over and like Fililis on Facebook and let them know on the wall that FairyFace Designs sent you. Then come back and let me know you did in a comment on this post. For a second entry, pop over to Fililis and have a browse through the fabrics, then come back and let me know in a second comment which is your favourite.
Two random winners will be chosen on December 19th 2012. Please leave your email address in your comments so that I can contact you. If I cannot contact the winner, I will re-draw. The winners' details will be passed onto Patricia in Fililis who will send on the prizes directly.
Tuesday, November 27, 2012
A long overdue thank you!
Anyone out there still reading? I hope so, but I won't be surprised if not. I haven't posted in what seems like an age! Unfortunately the course of this pregnancy is not running very smoothly for me, (although thankfully baby is not affected by all the problems) and the last 5-6 weeks have been...well, difficult. To say the least. And sore, so very sore. With still another 6 weeks to go, I am on crutches with a lot of mobility problems due to physical complications of pregnancy. So very little crafting being done in this house, and most of what is being achieved is small and simple projects with a lot of hand work.
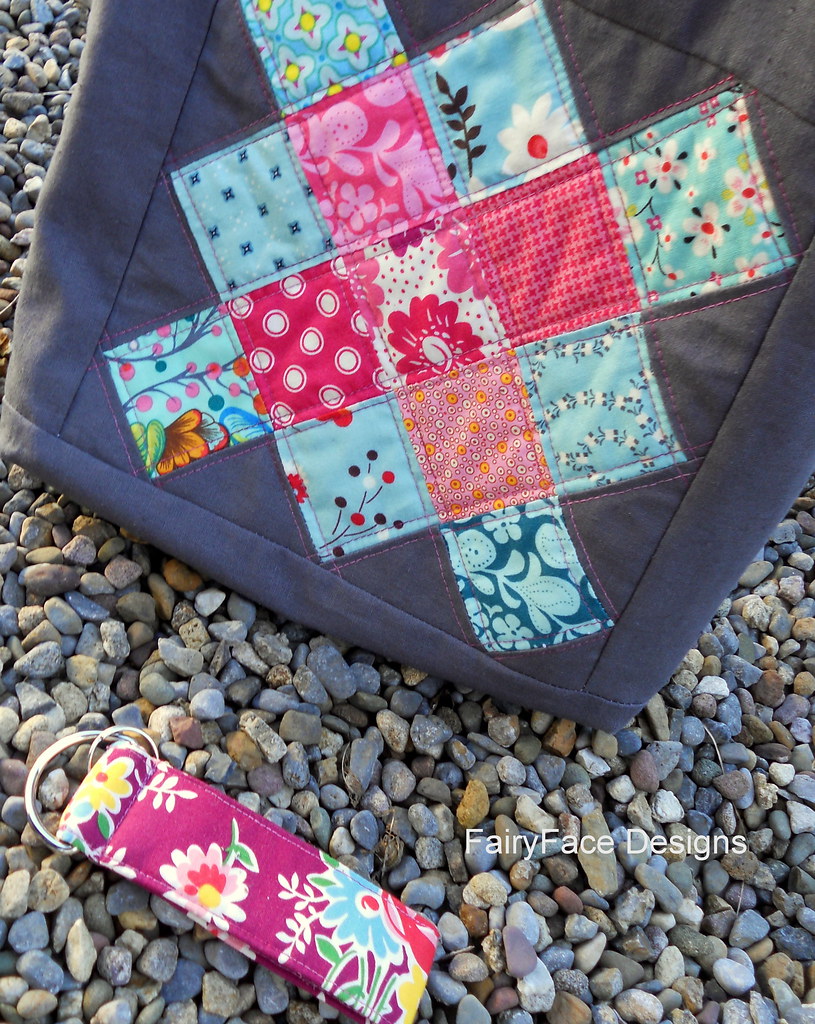
I will have some baby makes to show you very soon - if you follow me on Instagram or Facebook you will have seen some of what I've been working on - but in the meantime I want to post up some pics of the gorgeous bag I received from Kirsten in the Mouthy Stitches swap.
The bag arrived weeks ago and I absolutely adored it from the moment I opened the envelope - so much so that I started using it that day - and with all the other stuff going on, along with the fact that taking photos meant I had to empty my stuff out of it, I didn't get an opportunity to take the photos till recently.
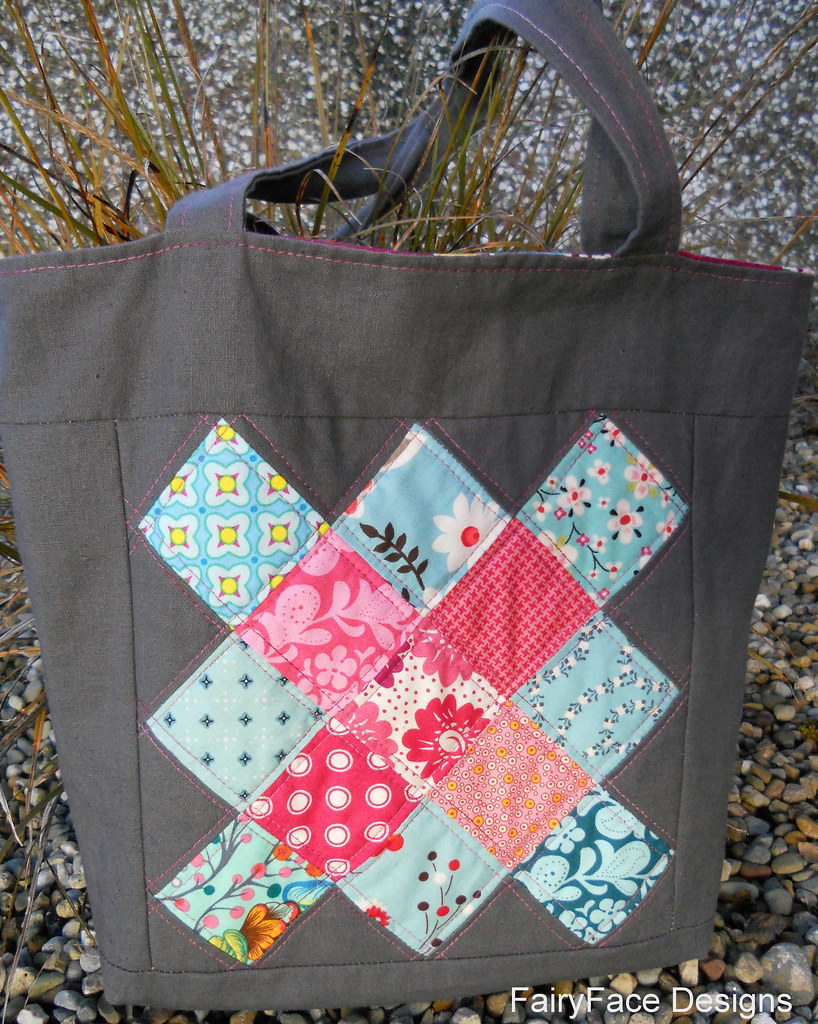
Kirsten had made a fab sewing machine cover for me in a previous round of the Solids swap so when I saw her name on the envelope I was really excited! And I wasn't disappointed - here it is in all its glory!
A granny square pieced front using gorgeous grey linen as the background:
And a pieced feather back.
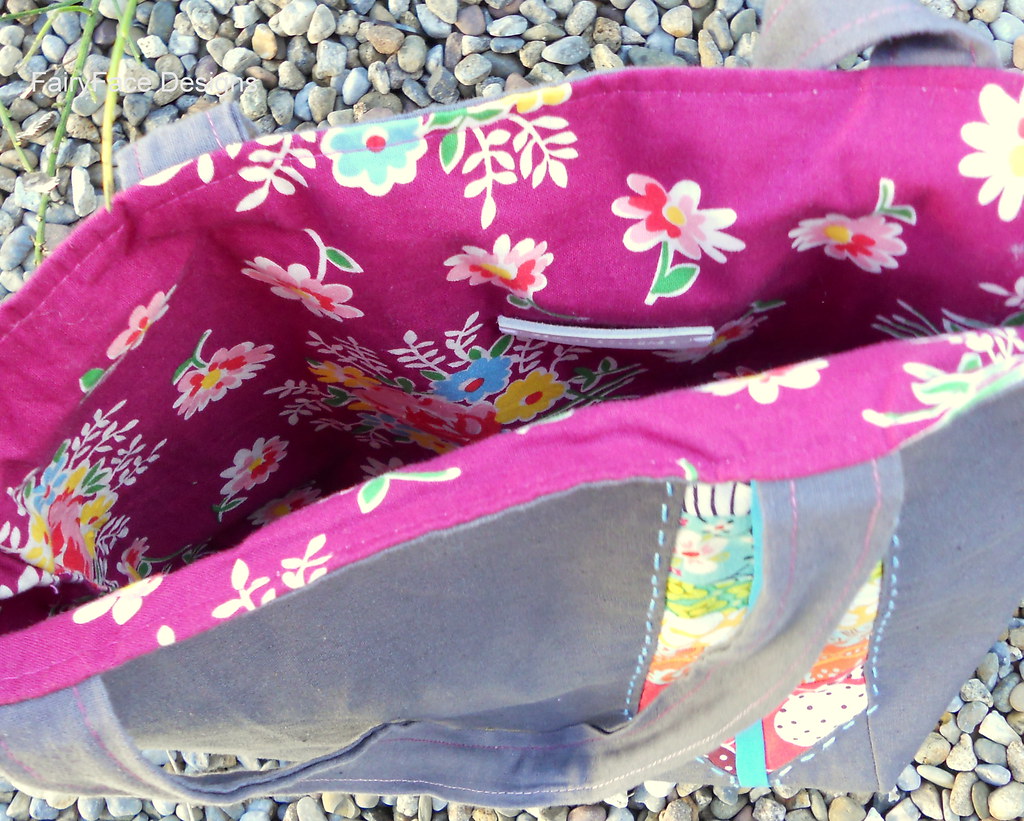
She used fab lining with her cute little label on the inside, and this is easily a reversible tote bag.
They lovely key fob which you can see in the top picture matches the lining .
So I want to say a huge thank you to Kirsten! This bag is used pretty much every single day and I love it to bits. And I'm sorry for waiting so long to show it off.
Tuesday, October 23, 2012
Quilted Tote Bag for Mouthy Stitches
The 2nd round of the Mouthy Stitches swap proved to be quite inspired! Lovely swap mamas Cindy, Hadley and Susan picked a simple tote bag pattern which we all had to make to and it was so much fun. Such an interesting swap to take part in where everyone was following the same pattern.
Once I got my partner details I got down to a little bit of stalking. My mama chose well, because my partner's likes were quite close to my own.
I decided to go with a Drunkard's path pattern and a scrappy look and pulled out some of my brightest and prettiest scraps to work with. I played around quite a bit before settling on this layout which I mentally dubbed the "pacman" look - those incomplete circles really remind me of the game for some reason.
I then pondered how to quilt it, and what type of back to do. Eventually I decided to echo the circles on the back but to change it up a little, placing it within a scrappy square frame.
That decision about the back led me to the quilting decision for the back - echo quilting inside and outside the square, with some hand stitching around the circle.
This in turn gave me my decision on the front quilting - I went with quilted circles travelling outward on the front.
When it came to putting it together, the dimensions worked out better than I could have hoped. The outer circles sat just on the corners on the front (its hard to see in the photo!), and the outer line of quilting on the back sat just on the back corners.
For the lining, I inserted a flush lined zip pocket (thanks again to The Bag Making Bible) using a strong teal fabric with contrast orange for the pocket lining. I carried the lining fabric through to the straps, to finish off the scrappy look for the exterior. All in all, I was pretty happy with this bag!
Last thing to be done was the little key fob. For this, I decided to do a mini circle in a circle and handquilt around. I found a scrap of one of my favourite prints and used a variegated perle cotton to finish it off.
The package is gone off in today's post and I'm hoping my partner will love it as much as I do....all that remains is to watch obsessively for the postman now to see what I get in return!
Monday, October 1, 2012
Some more swapsies
My friend Geraldine and I decided back in August to do a little private swap, for a little fun. She made a doll quilt for my little lady, and I made some placemats for her kitchen table.
Geraldine went for a pink theme for my pink-mad little girl. When this arrived in the post, E was utterly thrilled. She never let it go all day and went to bed with it that evening. It gets used the whole time in her games and is never far from her. While she loves its colours and the fact that it has her name on it, I love the clean lines, bright colours and the beautiful stitching - the pebble quilting is fab and its just gorgeous as a mini quilt. It really appeals to my taste in design and colour! So thank you Geraldine, it really was and is a big hit!
In return, I made some placemats for Geraldine. I mused over what to go with design wise - I knew brights would be a hit, and I wanted 2 pieces that were complimentary but not the same. I found some linen/cotton mix in my stash and decided to piece it in alternate strips with some colourful prints, one warm colours and the other cool. I used paper to piece the linen in a similar manner to piecing a string block as I was afraid it would distort too much with all the pressing and it worked great.
In addition to light machine quilting in the linen, I did a row of hand quilting in matching perle cotton in it too and felt that it really lifted the whole thing.
I backed them in some complimentary prints and used Kona solids for the binding. I love the backs as well to be honest, I think they could be used this side up too!
These have gone off to their new home where I think they are very happy :-)
Friday, September 21, 2012
Need some more Oh Deer??
Are you in need of some gorgeous, colourful Fat Quarters? Some Oh Deer Fat Quarters to be mhttp://www.blogger.com/blogger.g?blogID=3499681090658403618#editor/target=post;postID=277675852602174218ore specific?
If so, you need to head over to my good friend Cindy's Fluffy Sheep Quilting blog where she is giving away 4 of them this week :-)
If so, you need to head over to my good friend Cindy's Fluffy Sheep Quilting blog where she is giving away 4 of them this week :-)
Good luck!
Monday, September 17, 2012
Small is beautiful!
I have been trying to concentrate on small and easy projects in the last few weeks, seeing as my energy to sew is a little thin on the ground - the sort of projects that are not too taxing and are fun to make. In the last week, I managed 2 ( a major achievement, although it mighn't seem like one!) little projects in full, and finished off another small project too (more about that later this week) So here are the first two - both made in less than an hour each, but which made me smile.
First up - I needed a small extra to go with my pouch for the PLP5 swap. After dithering a bit about what to do (I seem to spend a lot of time dithering at the moment - which project to do, which fabric to use - its very frustrating and very unlike me! I think its because my sewing mojo is half asleep at the moment.) I decided to make a fabric basket using Ayumi's tutorial, as I have one that Kirsten made me in a swap last year and I use it all the time and love it. Even if my partner might have some already, they are something you will always have use for in my opinion!
I wanted something whimsical and I found a couple of leftover charms from the Japanese charm swap I did last year that I was saving for the right project. I fussy cut some 2" squares out of them and they worked exactly as I hoped they would.
I was pretty happy with the basket, so my package is now on the way to its destination.
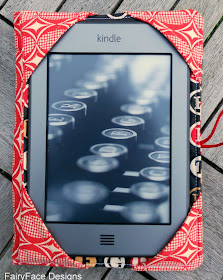
I also made a bit of an impulse Kindle buy over the weekend - figuring that if I couldn't sew, then I might as well get back reading again. Reading used to be my fave hobby until it took a back seat to sewing, and its pretty achieveable in bed and on the sofa! Of course, having bought it I needed a cover. I found a good tutorial by Whipstitch and loved the design.
This literally took about 40 minutes to run up - it was super simple. I could have taken a little more care if I wasn't in such a hurry to get it done before the new series of Downton Abbey started last night (wasn't it fab?) I actually didn't dither over the fabric for this one, believe it or not. The typewriter fabric kind of fell out of my fabric box and I knew instantly it was perfect! When I was halfway through making it, I brought in the Kindle to check for size and had a moment of serendipity when I realised that the screensaver had turned to the typewriter keys - so I just knew it was going to turn out perfectly.
What I love about this design is that there is room to hold the Kindle for reading.......and there is also an internal pocket to keep it safe inside when you're not using it, giving an extra layer of paddig to the screen.
I really had fun with this one, but I also am looking forward to making a few other covers just for variety. I have lots of ideas on this one so you might see a few more covers in the coming weeks.
First up - I needed a small extra to go with my pouch for the PLP5 swap. After dithering a bit about what to do (I seem to spend a lot of time dithering at the moment - which project to do, which fabric to use - its very frustrating and very unlike me! I think its because my sewing mojo is half asleep at the moment.) I decided to make a fabric basket using Ayumi's tutorial, as I have one that Kirsten made me in a swap last year and I use it all the time and love it. Even if my partner might have some already, they are something you will always have use for in my opinion!
I wanted something whimsical and I found a couple of leftover charms from the Japanese charm swap I did last year that I was saving for the right project. I fussy cut some 2" squares out of them and they worked exactly as I hoped they would.
I was pretty happy with the basket, so my package is now on the way to its destination.
I also got my fab package all the way from Australia - from the lovely Gina
- Happy Go Lizzie on Flickr. I was so thrilled with this pouch. Gina included the jewel tones I said I was loving right now and lots of hand stitching - I just love it and the extras - look at that cute mini pouch and the pincushion! Thanks so much Gina :-)
- Happy Go Lizzie on Flickr. I was so thrilled with this pouch. Gina included the jewel tones I said I was loving right now and lots of hand stitching - I just love it and the extras - look at that cute mini pouch and the pincushion! Thanks so much Gina :-)
I also made a bit of an impulse Kindle buy over the weekend - figuring that if I couldn't sew, then I might as well get back reading again. Reading used to be my fave hobby until it took a back seat to sewing, and its pretty achieveable in bed and on the sofa! Of course, having bought it I needed a cover. I found a good tutorial by Whipstitch and loved the design.
This literally took about 40 minutes to run up - it was super simple. I could have taken a little more care if I wasn't in such a hurry to get it done before the new series of Downton Abbey started last night (wasn't it fab?) I actually didn't dither over the fabric for this one, believe it or not. The typewriter fabric kind of fell out of my fabric box and I knew instantly it was perfect! When I was halfway through making it, I brought in the Kindle to check for size and had a moment of serendipity when I realised that the screensaver had turned to the typewriter keys - so I just knew it was going to turn out perfectly.
What I love about this design is that there is room to hold the Kindle for reading.......and there is also an internal pocket to keep it safe inside when you're not using it, giving an extra layer of paddig to the screen.
I really had fun with this one, but I also am looking forward to making a few other covers just for variety. I have lots of ideas on this one so you might see a few more covers in the coming weeks.
Sunday, September 2, 2012
Pretty {little} pouch done!
This weekend I managed a little bit of sewing. Top on my list was my swap items for Geraldine and my pouch for Round 5 of the Pretty {little} pouch swap.
I'm not showing any pictures of my WIP on Geraldine's goodies as I want them to be a surprise. But suffice to say I made a lot of headway and hope to get them in the post to her early this week. I already received her doll quilt but will keep the reveal until I can show mine too.
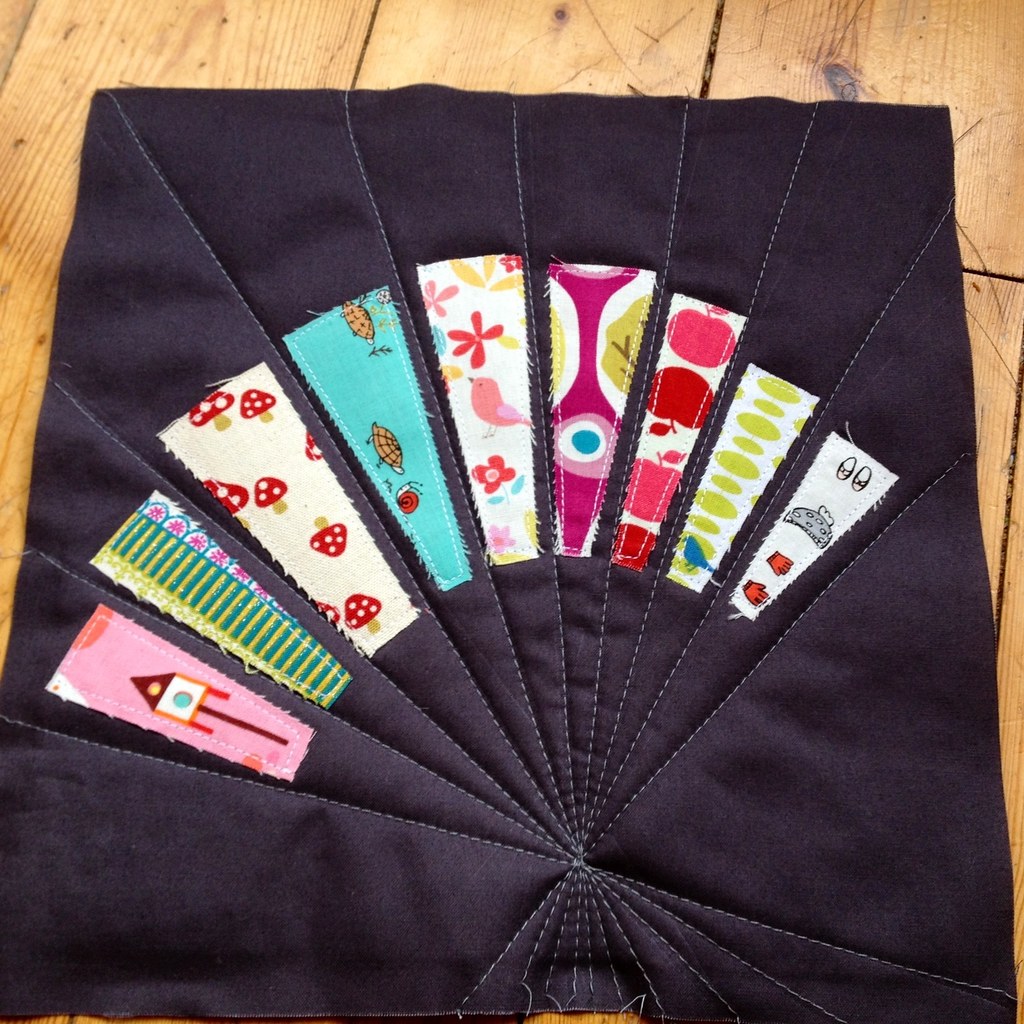
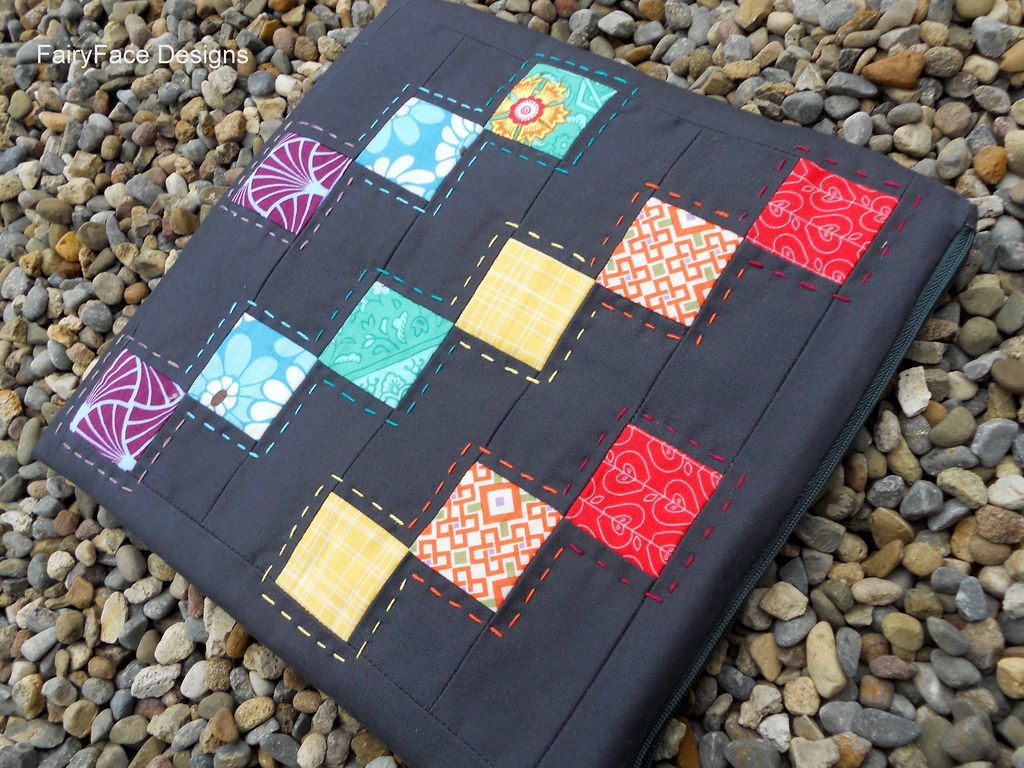
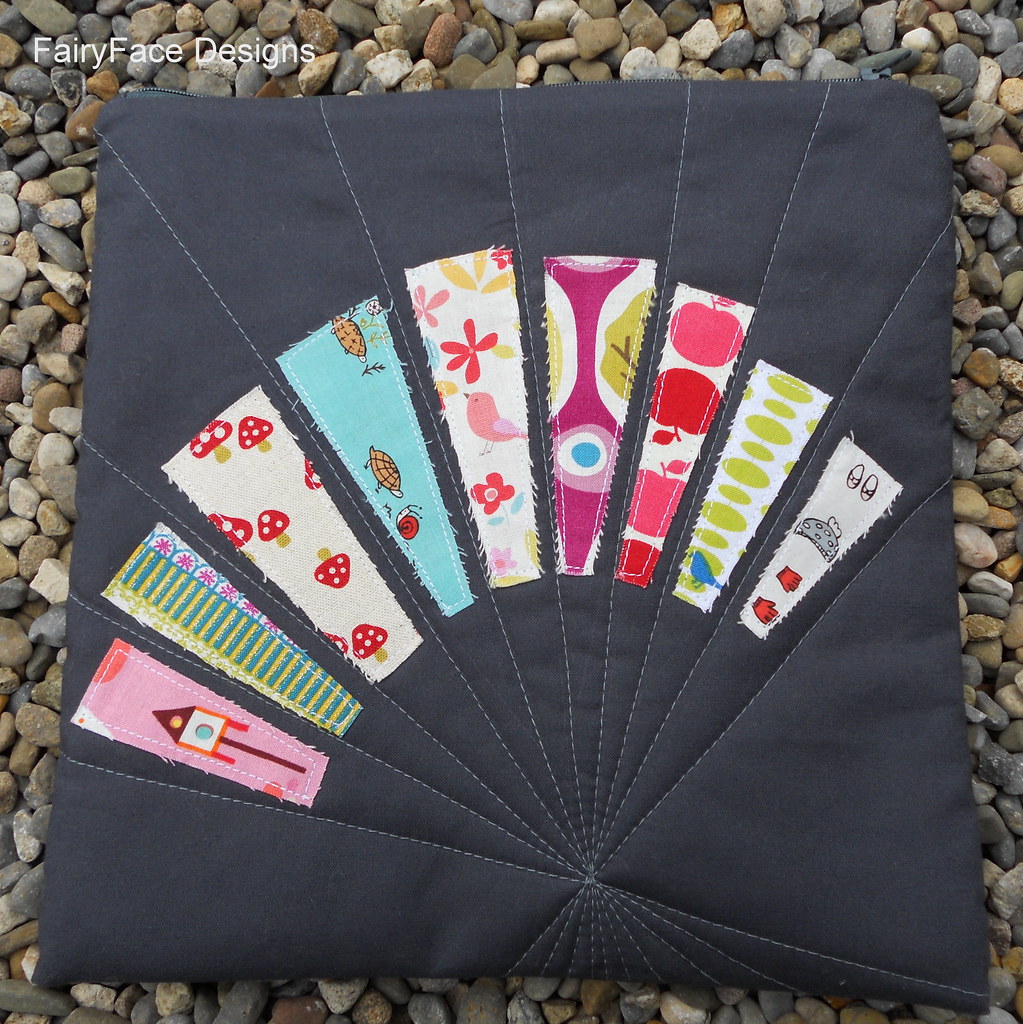
I also managed to get finished my pouch. I had the front and back done last week so it was a case of getting the lining finished and the pouch assembled. For the back, I wanted to do something less structured and traditional patchwork than the front to give a more whimsical look. I played around with lots of different ideas before deciding on this semi-circle of raw edge applique. The quilting was an after thought, to be honest, but I love how it gives a shell shape and how it "ties" at the bottom.
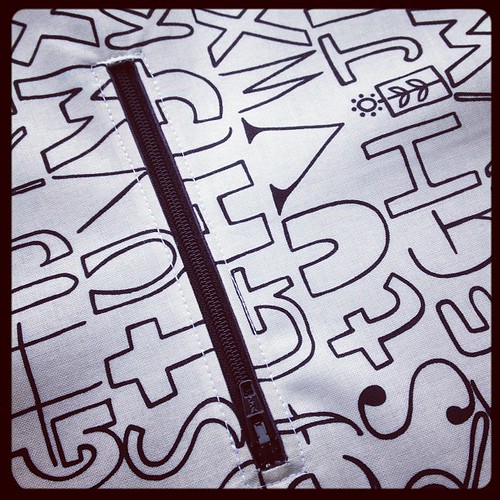
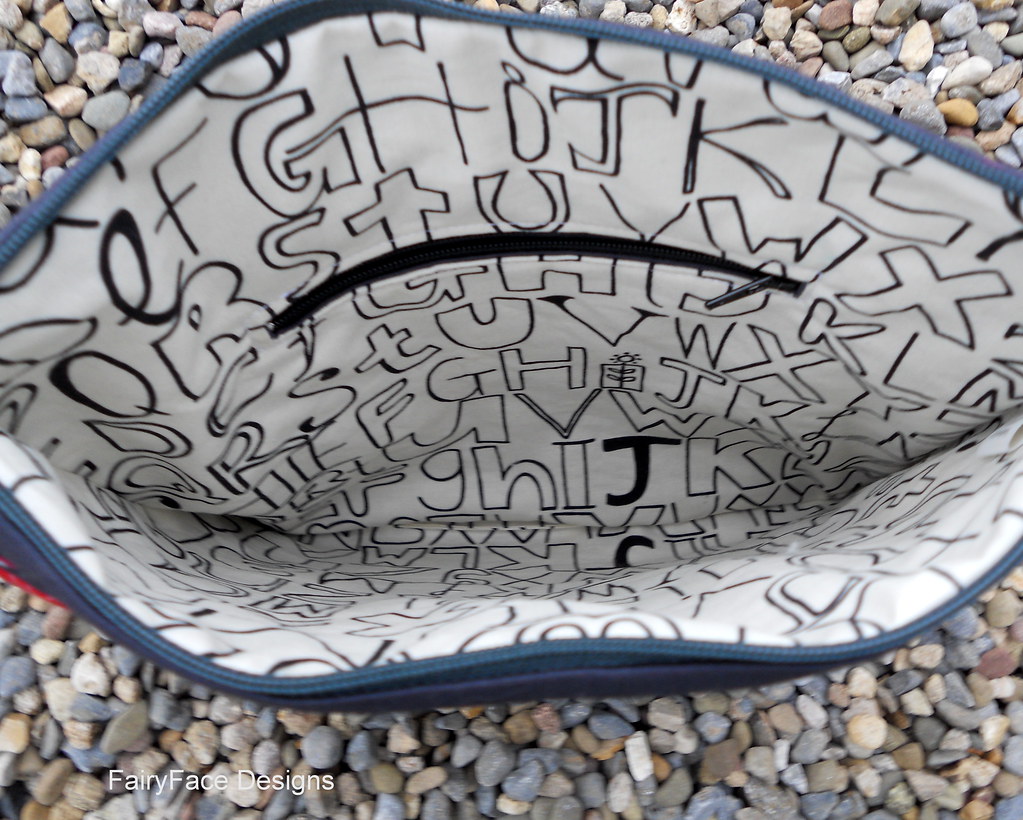
For the lining, I really wanted to do a zip pocket in it, to give a secure storage place for needles, scissors, thimbles etc so that it would be really practical for use for hand-sewing or crochet projects. Finally realising that my brain was not really functioning too well (combination of hormones, back to school this week and a rotten head cold) I decided to go to the expert, and I took out my Bag Making Bible book, where, of course, the ever-reliable Lisa had a set of instructions for exactly what I had in mind.
Hers were for a bigger bag so I did adjust them slightly but they worked perfectly - which was lucky as I didn't have enough of the alphabet fabric for a 2nd try! It gives a nice big roomy pocket, lined in the same Kona Charcoal as the bag exterior. I really like how the alphabet Summersville works as the lining - its a real contrast to the exterior.
Lining successfully done, all I had to do was run up the seams to complete the construction and ta-dah! It was done.
I'm really delighted with this pouch - I love how it is essentially double sided and that it is practical too. I tried to incorporate a lot of things she listed as "likes", so hoping it hits the mark. Its winging its way away from me next week and I hope my partner will love it :-)


