Showing posts with label half square triangles. Show all posts

Thursday, May 10, 2012

{Sew} Get Started: HST Mini Quilt tutorial


Can you believe this is the penultimate week of the {Sew} Get Started tutorials! No, me either! Today I am really pleased to welcome my lovely Australian friend Kirsten to FairyFace Designs. I first "met" Kirsten last year through Flickr and we chatted lots on email. Then, to my delight, I was her partner for the Solids swap last year, when she made me a beautiful sewing machine cover and HST mini quilt, both of which live permanently in my kitchen and make me smile every day. Kirsten blogs over at Gemini Stitches and you should definitely pop over and say hi - she makes the loveliest thing! I love the HST warm - cool mini quilt she made me so much that when it came to the tutorials, I asked Kirsten if she would do a tute for making one of these. Half Square triangles are so versatile and definitely an essential skill for quilters to have!


This is part of the {Sew} Get Started: Beginner Sewing Tutorials series. For more information and links to past tutorials please click on the button to link to the master page.

FairyFace Designs


So Kirsten, its over to you!


Hi everyone! I would really like to thank Sarah for inviting me to do this tutorial which uses half-square-triangles (HST's) to make  a mini-quilt which finishes up at about 16 inches square.


You will need: 
18 pieces of patterned fabric cut into 3.5 " squares (I have used a variety of red, green and blue fabrics)
18 pieces of a solid fabric cut into 3.5" squares
a piece of backing fabric approx 18 inches square
piece of wadding at least 17 inches square
fabric for binding


1. Lay a piece of patterned fabric on top of a solid square right sides together.


2. Using your ruler, draw a pencil line along the diagonal from corner to corner. Do this for all 18 pairs of patterned/solid squares.


3. Stitch 1/4" seam on each side of the drawn line.


4.Cut apart on the pencil line which is halfway between your 2 rows of stitching.


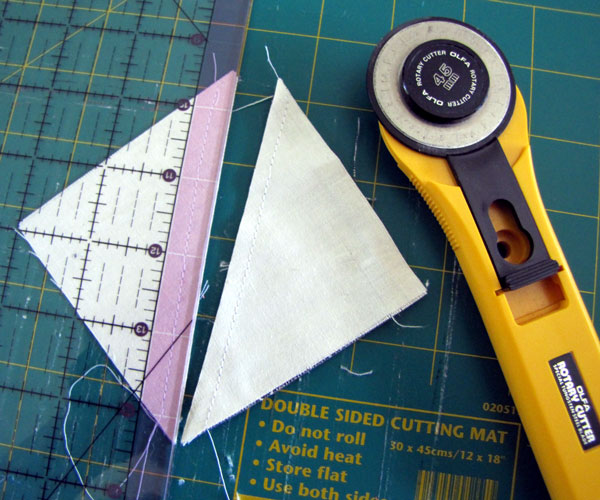
5. Press seams - you can press them toward the dark side or open.


6. Trim all of the HST's back to 3 inches square


7. You will get 2 HST's from each pair of patterned/solid fabrics so you should end up with 36 HST's.


8. Place the HST's in a 6x6 arrangement - I am doing a pattern similar to this :


There are many design ideas for HST's though - here are just a few other options using the same amount of HST's (36):


9. Once your HST's are laid out in the desired pattern, pin and sew the rows together using a 1/4 inch seam (refer to Sarahs post for more information).


10. Press seams to one side - alternating directions between rows. (ie. Press row 1 to the left, row 2 the right, row 3 to the left , row 4 to right, row 5 to left and row 6 to right).


11. Pin and sew the first 2 rows together - by pressing then seams to the left and right, you will be able to "nestle" your seams so they lie flatter.


12. Continue joining the next set of rows (3 and 4)  together, and then rows 5 and 6. Then sew the 3 pairs of rows together to complete the quilt. Press the seams to one side and trim the quilt top back to square - it should be almost 16" square.


14.  Making the quilt "sandwich" - place the backing fabric right side down (mine is navy so it is a bit hard to see here), and put the wadding on top.  Lay your quilt top right side up over this and smooth out any wrinkles.


15. Baste your quilt to keep the layers in place - I have used special quilting safety pins but you can also use spray. 


16. Quilt as desired - I have just done echo quilting along the edges of the patterned HST's.


17. Once it is quilted, trim back the edges of the wadding/backing and bind. Binding has already been covered in these tutorials so please refer to them here

18. Step back and admire your finished mini quilt! 


I made up a couple of minis in different designs - pinwheels for this one, quilted in straight lines:


And then Chevrons which I have handstitched in perle cotton:


I hope you have enjoyed this tutorial and if you have any questions please leave a comment and I will get back to you. 

Kirsten.


Thanks so much Kirsten! I juts love those minis...they are all gorgeous! If you make a HST mini quilt, please add to the Flickr group. And don't forget to pop back next Thursday for our last tutorial where I will show you have to do a little bit of freestyle embroidery to wrap up our series. 

Sunday, October 16, 2011

Double Trouble: Baby Boy Quilt Finishes

Frogs and Snails and Autumn Baby quilt together hanging 

The best things come in pairs right? Quilts are no different and I seriously was not joking last Sunday when I proclaimed that I was in a super productive phase right now! So I'm going to post lots of photos here - just because I actually got a sunny morning to take pics and took loads, all of which I love! I'm really pleased with these two. **If you're looking for the ticket giveway for the Knitting and Stitching show Dublin, it's here**

Frogs and Snails quilt front

First up - the Frogs and Snails quilt is done! This one was made for my MIL and is a gift to my husband's cousin who has a new arrival and I love the freshness and crispness of the triangles. I decided to free motion quilt it rather than quilt the diagonal lines and love the effect.

Frogs and Snails folded on chair

I had some tension issues on the back (and had to rip back about 1/3 of the quilting, eek!) but got them sorted by actaully adjusting the tension successfully (a major achievement for me, I am usually a "don't touch the manufacturer's standard tension" kinda girl) and flew through it.

Frogs and Snails Quilting detail

I used a very soft blue and white gingham on the back and love how the quilting pattern shows up on it.

Quilt Back Frogs and Snails

I found this little hearts fabric in my local store - its a really lightweight cotton and perfect for binding, I'm really pleased with it.

Frogs and Snails binding

All in all a successful make.

Frogs and Snails triangles in a row

Quilt Stats:

Name: Frogs and Snails baby quilt
Made For: Baby J, a new arrival in our extended family
Fabric: A wide variety from my stash - mostly from my scrap basket. Including Riley Blake's Hooty Hoot, Wheels, All Star 2, Saffron Craig Beetle Bugs, Moda Just Wing It, Ann Kelle's Urban Zoologie Owls and Whales, and Ready Set Go, and lots more!
Batting: Warm and White
Measures: 37" x 46" approx
Quilting: Meandering stipple by me
Pattern: Simple half square triangle design

Autumn Baby quilt front

Next up, the Autumn Baby quilt. This is one my friend A asked me to make some time ago and she was pretty clear on the colours she wanted - greens, browns and oranges. I have had this quilt in my list for a few months now, but wanted to wait till we hit autumn to make it - those colours being so seasonal and autumnal and perfect for a new baby arriving this time of year. I really was inspired by the falling leaves in the countryside around me and when baby F arrived a little earlier than I had expected last week, I was ready! And delighted, as originally I had planned it to be a gender neutral quilt but now I had a great opportunity to use some complimentary boy fabrics I had. I cut my fabric, did the layout and ran up the quilt top in the 2.5 hours I had free on Wednesday morning when E was in playschool. I basted it very quickly and last night I was just in zone and got it quilted completely (plus finished the Frogs and Snails one). The binding went on this morning (you know I love a machine bound quilt!) and I rushed out to get the pictures in the October sunlight, seeing as how it was the first sun we have seen for about 2 months here. So, like its friend above, its not all crinkly after washing and drying but its on its way to that right now :-)

Autumn Baby quilt on chair


I stuck to a simple 6" square design to let the fabric do the talking. This quilt came mostly from my stash too - there are some really precious fabrics in there - my 1001 peeps, the Spring Street, the Ann Kelle cars, my prized Saffron Craig Beetle Bugs and my last big pieces of Michael Millers Hedgehogs. I really love the interaction of the colours and how autumnal and natural it all looks.

Autumn Baby quilting detail 2

I free motion quilted this one too with Gutterman cotton thread - the 919 colour which is a natural, ivory type shade. At first I wasn't sure about it over brown blocks but as I went on, it really grew on me.

Autumn Baby quilting detail


I backed in it a piece of Amy Butler fabric from the Love range called Bali Gate. Not only was the colour perfect for what I wanted, but the feel of the pattern had that lovely natural, slightly bohemian type of feel to it that complimented the front. I appliqued  on the baby's name in some of the leftover brown fabric - and handstitched to secure. The handstitching gave a bit of texture around the edges of the letters, giving them a slightly "distressed" look which I like.

Quilt back Autumn Baby

(For the curious, that's an Irish name pronounced Fee-un-awn -the Fee is a very short sound, emphasis on the last syllable!)

The binding is another lightweight cotton from my local store in a tan colour - not a colour I'd normally go for, but I wanted a neutral and a darker brown would have been too heavy against the rest of the quilt and overpowered it. I wasn't sure about this one till I put it on but am really loving it now.

Autumn Baby quilt binding

So this one has been washed and is drying now, ready to be parcelled up and posted off to A in Germany tomorrow.

Autumn Baby side view

Quilt Stats:

Name: Autumn Baby quilt
Made For: My friend A
Fabric: As above - a total mix!
Batting: Warm and White
Size: 36" x 48"
Quilting: Free Motion quilting
Pattern: Simple squares

So, there you go. Two quilts in two weeks. And I'm working on a third, plus the Christmas table runner, no wonder I can't figure out where the weeks are going ;-)  Don't they look all squashy and lovely together on the chair?

Frogs and Snails and Autumn Baby folded on chair

I also did get to my Drop Art FMQ practice for Cindy but just couldn't get to post it over the weekend, with laptop trouble. So I'll save it and post it with next week's. Plus, I'm sorry I've been a bit flaky about visiting blogs, commenting and replying to comments the last couple of weeks - I'm spending so much time staring at a screen in work these days I'm finding it hard to turn on the laptop in the evenings, particularly when its being so temperamental. And I've been trying to clear the decks a bit sewing wise, and when I'm online, I'm not sewing! But another week or so and that should improve! And lastly, by popular request, I'll be starting up a Winter Sewing plan & linky in the next 2 weeks so get started thinking about what's on your lists and start preparing your posts :-)

So, having 2 quilt finishes, you can be sure I am going to be doing some serious linking up this week. Watch out for me hanging out with some really talented ladies over at Sew Modern Monday, Manic Monday, Fabric Tuesday, (buttons all here) and also I'm entering my Autumn Baby quilt in Celebrating Colour over at Stitched in Colour:

Celebrate Color

Sunday, October 9, 2011

Frogs & Snails, Free Motion practice and other random sewing news...

This is a bit of a mixed bag (and a lucky bag for one super lovely bloggy friend) of my sewing news for the last week. Bear with me, its all a bit random!


First up, another weekend, another quilt top! I'm not getting a whole pile of time to spend sewing these days, but when I do get to it I am being super productive. No faffing about, just the very model of efficiency! So, here is the latest sewing result - my Frogs and Snails quilt for a new baby boy. I'm making this one for my MIL who wants a present for her grand-nephew. Its a small, cot size quilt and a little bit akin to an I-Spy quilt, as a lot of the half square triangles have interesting detail for a baby boy. There are owls (of course!), cars, traffic lights, buses, whales, bugs, kangaroos, spots, stripes, stars and of course a frog and some snails :-) No puppy dog tails though!


I could have gone a number of different ways with my HSTs in terms of layout, but after playing around for a little bit yesterday afternoon with different combinations, I thought this worked best and I really like it. I have a lovely soft piece of blue and white gingham print fabric for the back and i nf the gods smile on me, I might even get it basted tonight.

I'm also working on cutting two other quilt tops - one for a baby girl in red, pink and aqua with these lovely fabrics:


And one for a baby boy in these lovely orange, brown and green fabrics!

 
Also on the agenda this morning was catching up on Cindy's free motion practice-along so I could link up to Free Motion Friday, even if I am a little late. I watched the video and got my little scraps of fabric and batting ready. And then I almost collapsed laughing when I saw the result.


Bloody, horrendously awful. You know I like to show you my craft fails from time to time, this one is definitely up there in the rankings - serious wobbling, stitch length all over the place, rubbish tension (look at the pic of the back) and general crapness.


I even made a 2nd attempt.


Its a little better, but not by more than about 2%. And that's because I moved the fabric around at the end of each wave so I was working towards myself, to give me more control. And I remembered to breath! Still didn't work :-)  Moral of the story? Need to practice!!! Now, I do think I should probably go a little bigger on the fabric I'm using - there's not much scope for control on a scrap this size. And I need to look at my tension issues, so the manual will have to come out for next week. But it was definitely fun and I can't wait to try this week's drop art. Think I will have to go reading up a little before tackling it. Because, imagine if I could do it? How cool would it be!

In other news, I am getting started with my stalking of my partner for the Modern Christmas table runner swap. I pulled out my stash of Christmas fabrics from last year - aren't they nice? But I might need to add some to them to get a colour palette my partner LOVES, off to do my research this afternoon.


And I got CeLynn's fabrics for October in Sew Bee Blissful. She wants us to make these super cute owl blocks, I can't wait to get started on them. Really love her fabric choices:


Last, but by no means least, I want to say thank you to everyone for linking up to my Summer Sewing wrap up! It was amazing to see what you all got done, isn't it the best feeling to look back at all your achievements? I've had a few requests for a Winter sewing list to keep you all on track - are you interested? If so, I'll get working on it and post it sometime in the next week or so, just let me know in a comment. Now, back in May I did promise a little giveaway for people who participated and I have consulted with Mr. Random. I had 7 people complete from start to finish (love you all!) and of these he picked:

 who is my lovely bloggy friend Susan! Susan, I've emailed you :-) If you haven't checked out Susan's blog before, you are missing out. She is super talented, and very funny, and she is swap mama to the above mentioned Modern Christmas Table Runner Swap, which is an inspired idea. Go get over there and say hi!

So, there's my random news. Hope you're having a lovely weekend!