

Hi and welcome! I'm so pleased you're joining me for my block in the 12 Days of Christmas Sampler Quiltalong. I'm so pleased that Sara asked me to take part and contribute a block for this. I love Christmas and even though it hasn't felt much like Christmas this last few weeks, doing this block and my modern Christmas table runner has all of a sudden gotten me in the Christmas spirit!!

This block is a very straightforward make and you should have lots of fun with it. You can make it as simple or as decorative as you want, depending on your taste. In this tute I will show you some ideas you might want to use, or you could, of course, combine them as I have here. I'll be looking forward to seeing how you'll interpret it! Don't forget to upload your pics into the Flickr group :-)
This tutorial is for a 12.5" square unfinished block.
Materials Needed:
Light coloured background fabric cut to 10" square
Contrasting fabric for border strips - approx 14" x 10", more if it is a directional print. Cut 2 pieces (10" x 2") and 2 pieces (13" x 2").
Fabric scraps for Christmas stockings
Fusible web (I used Bondaweb)
Christmas Stocking templates (link here. If you are having trouble downloading the PDF, email me at fairyfacedesigns (at) gmail (dot) com and I will send it on to you. Please check your print settings before printing and make sure your Page Scaling is set to "none" in order for it to print at the right size).
Optional:
Approx 5" x 11" of tear-away interfacing/fabric stablizer
Buttons & trimmings
Top tip - please remember that you will be switching between a number of different stitch types making this block. Do not do as I did and forget to change your presser feet where necessary - a recipe for broken needles (2, in the space of an hour!) After each stage, make sure to check your machine settings and adjust accordingly.
All seams are 1/4".
So, let's get started!!
1. The first thing we need to do is to sew the line to hang the stockings from on the central 10" square. This is a great opportunity to use one of the decorative stitches on your machine. This is where you will need the tear away interfacing/stablizer to stop your machine chewing up your fabric, but if you don't have any, you could skip this step and add in the line when you are quilting. It would look great handquilted with perle cotton, or machine quilted. However, assuming you have your fabric stabliser, iron it on to the back of the top half of your 10" square following the manufacturer's instructions and sew a curved line across the square. Make sure before you sew your line to try out your chosen stitch pattern on a piece of scrap fabric so that you can check its width, direction etc. I chose a cute heart stitch in a red Gutterman Sulky thread which has a lovely sheen to it. You could also use ribbon or selvedges for this line - ensure they are properly secured to the fabric and won't fray if you do.

Once you have finished, tear away a small strip of the interfacing/stablizer at each edge of the square (about half an inch at each side so you can piece your border seams without problem) but leave the rest as you will need it later on.
2. Next, take your border pieces and sew them to the sides of your 10" block, right sides together, shorter strips first, then longer. Press your seams to the darker fabric. Then square up your block to 12.5".

3. Trace your stocking templates onto the outside (papery side) of your fusible web. Note that these templates are reversed from how they will look when finished so if you want your stockings facing in the other directions, you will have to reverse them again. I did 2 big and 2 small stockings as there are 2 adults and 2 kids in my house, but feel free to play around with the number and placement to suit yourself! Cut around your traced line (not on it, leave about 1/8" all the way around). Remember not to use your fabric scissors for cutting your fusible web, a good pair of craft scissors should be used.

4. Now for the fun part - making each stocking! There are a number of techniques you could use. I did two patchwork stockings, a fussy cut one and an embellished one.
Stocking 1 (Small): Tiny Squares
From your fabric scraps cut 9 (1.5" x 1.5") squares, and audition the placement of the fabrics. I went for a simple 2-print combination.

Sew together each of the 3 columns using a 1/4" seam, and press your seams so that the middle column seams goes in the opposite direction to the outside columns. Match and pin your seams to sew the columns together - I find pinning directly on either side of the seam and sewing over my pins gives me perfectly matched points.

When I had the columns pieced together, I pressed those seams open and once I had them reasonably flat, I gave them a few shots of steam (while pressing, not ironing, to minimise distortion) so that they would lay flat as possible for the applique.

Place one of your small stocking templates sticky side down on the wrong side of your patchwork block and press with an iron for 8-10 seconds (or follow the directions for the product you are using). If the template edges extend over the edge of your block, trim them back to avoid getting the sticky stuff all over your ironing board!

Then cut around the lines to give you your first lovely stocking! Take care cutting where seams meet so as not to fray the fabric. Set aside for the moment.

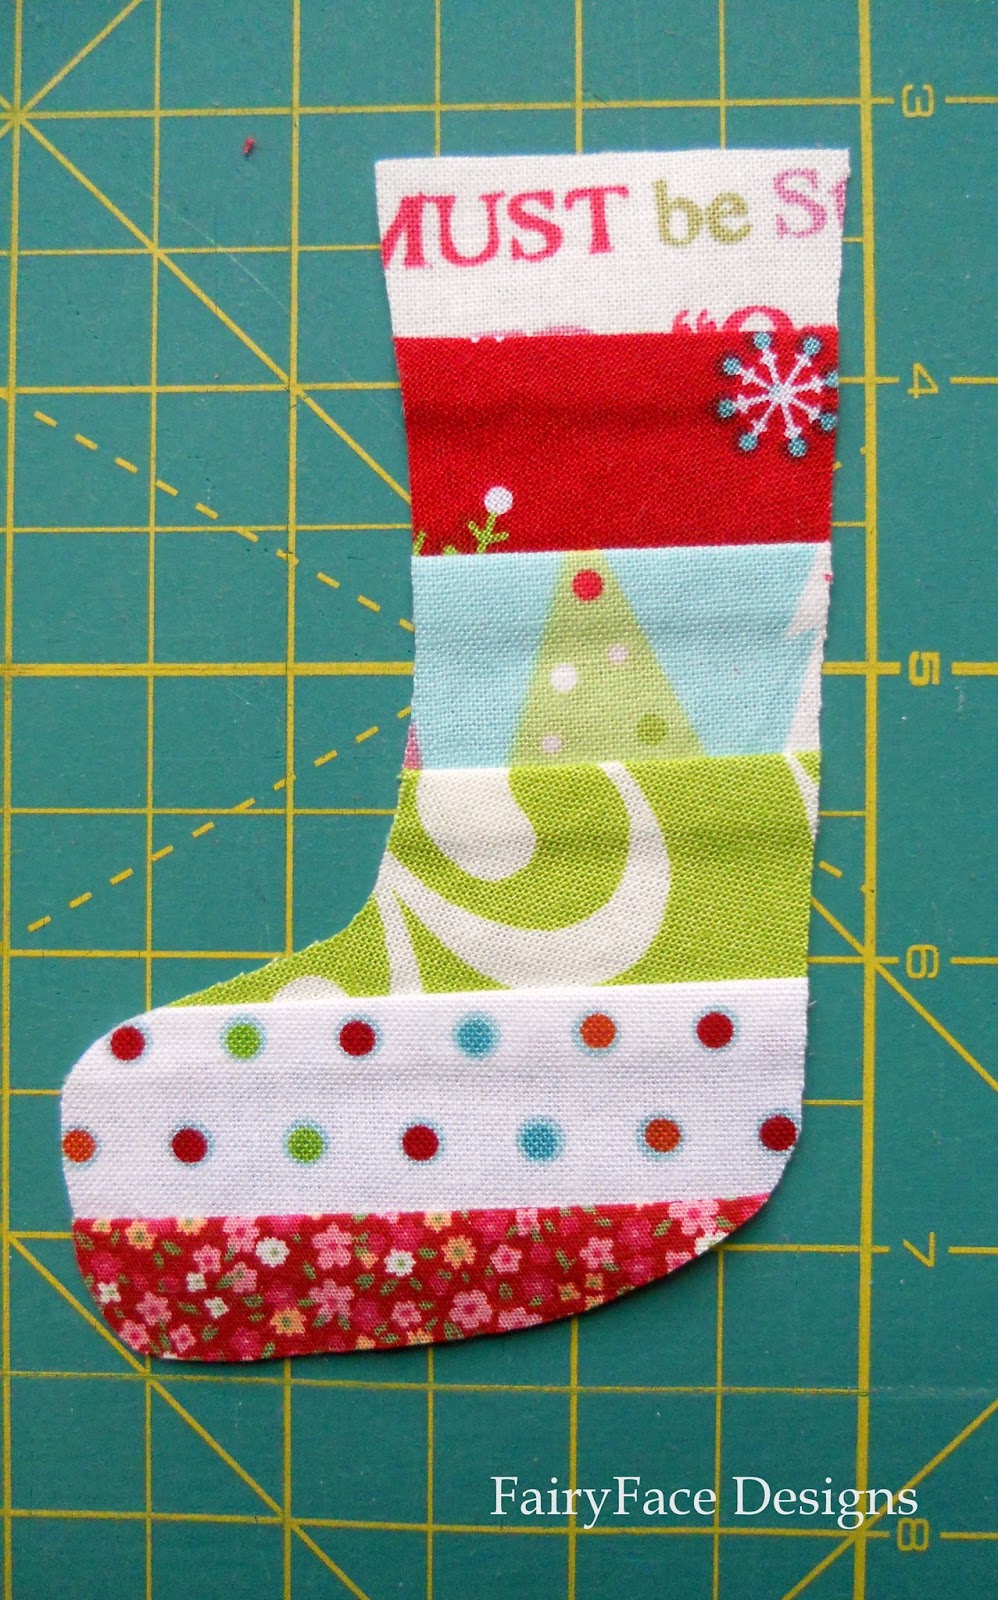
Stocking 2 (Large): Strip pieces
Cut 5 (1.25" x 3.5") fabric strips and audition their placement. Piece together using a quarter inch seam. Then follow the instructions for Stocking 1 to press your seams, fuse your stocking template and cut into the correct shape.
Set aside for the moment.
Stocking 3: (Large) Fussy Cut:
Audition your fabric to find a nice piece to fussy cut for your stocking. Remember that your template is backwards, so you will need to place it wrong way round to ensure your placement is accurate to how it will look when done.

Once you have done this, follow the same procedures as previously to adhere your stocking template and cut to size.

Set aside for the moment.
Stocking 4: (Small) Embellished stocking
This one was the most fun for me! I pulled out my ribbon and button boxes and tried lots of ribbons and ric rac against my fabric before deciding what to go with. So I would advise you audition various combinations of ribbons, buttons and other trimmings until you find something you love. I recommend using a fabric that is not too busy so that your embellishments stand out.

If you are using ribbon/ric rac/selvedges, sew down to secure. I sewed a straight line through the centre of each line of ric rac for this stocking:

If you have other fabric embellishments, add them now, then, following the instructions above, cut out your stocking.

I did not add my buttons at this stage - I would advise waiting till you have finished quilting your block before adding .
5. Now that you have your 4 stockings completed, it's time to add them to your block and finish it off. Decide on how you want to place them within your block. You might want to stick to something like I've done or you might do something different. They might escape into the borders, or stay within the central block - use your imagination, it's up to you!! I advise doing this stage at your ironing board. Once you are happy with the placement, peel off the outer layer from the back of your stocking, place back on your block in the desired position, and press with an iron following the instructions for your fusible web.

6. The next step is to sew the little tags which on which your stockings are hanging from the line. This is why you left the interfacing/stabliser in place. I used a heavy stitch setting and joined each stocking to the line. Pull your threads to the back of the fabric and knot before clipping to give a nice finish at the front. (I use my seam ripper -carefully - to do this.) Once you have done this, tear away all the stablizer/interfacing from the back, taking care to place a finger or two on your stitches to stop them ripping/distorting before you commence the next stage.

7. Now, using a small zig zag stitch, sew around the edges of each stocking to secure and prevent fraying. I used white thread to match my background fabric. Make sure to check your presser foot before starting to zigzag and change if necessary! Follow the instructions above to bring your threads to the back, knot and clip back.

Ta-dah! You're done!! I hope you have a lovely block and can't wait to see them turn up in the Flickr group. Don't forget to add your buttons when you're finished the basting and quilting process. I also think that some buttons or beads sewed into the bottom of the background fabric, or the border strips would bring a little extra to this block :-)
If you're not taking part in the quiltalong, this block would also make a lovely wall hanging/table topper as a handmade Christmas decoration if you want to make it on its own!
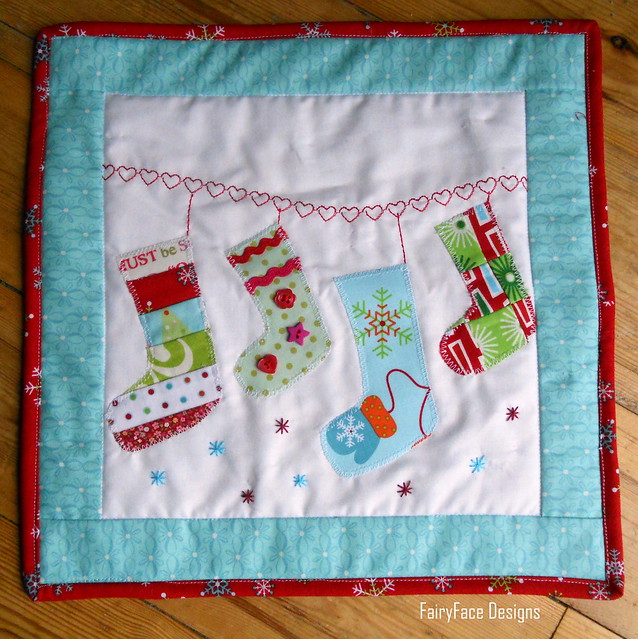
Updated: I finished this as a mini quilt - you can find the info here. And here's a little pic!
I hope you enjoyed making the block and found it easy to complete. If you have any questions, please let me know in the comments or email me directly. Don't forget to check in for the final quiltalong blocks next week - the schedule is here.
Thanks again to Sara for asking me to take part - it's been so much fun!! And don't forget to check back for a giveaway celebrating reaching 1000 GFC followers the first week of December :-)
15 comments:
Ohhhhh that's a lovely block - now if Christmas could be postponed for about 6 weeks, I'd be sorted to get everything made!
xxx
Cute stockings! Jxo
Love the block but wonder where on earth you find the time to keep all these balls in the air. You are superwoman!
Love the block and thanks for a really clear tutorial!
Very cute, love the wee buttons
The heart clothesline is darling and adds such a cute element. Also liked that you added the buttons, too.
Very pretty little block. Love the variety between the stockings. I can't believe how cute and varied all the blocks in the quilt-a-long are!!!
great tute! love those stockings!
So cute!!
Very cute!
Awwww! I love these!!!!
Cute idea. Thanks.
Two things, you can use dryer sheets as a stabilizer.
Maybe I'm reading the pattern wrong but you have a 10 inch square and add 2 inch strips you will only end up with a 11.5 inch block, right? Or did I miss a step? Which could be totally possible!
Crap, I'm so sorry. You are sooo right. I didn't add BOTH sides!!
Again I'm sorry. I feel sooo bad that I questioned your tutorial in the comments when you had obviously worked hard and had DONE the block. I just keeping thinking about it. I'm sorry.
Post a Comment