Showing posts with label beginner sewing tutorial. Show all posts

Thursday, May 17, 2012

{Sew} Get Started: Freestyle Embroidery Hoop

I can't believe that we have reached the final tutorial in the {Sew} Get Started series. It seems like a long time since I started them in January and I know from the comments and emails I have received that there are a few people who have gone from complete beginners to accomplished sewists over the last 5 months, which makes me very happy. This series would not have been possible without the generosity of my wonderful bloggy friends, so many of who gave their time to put together great tutorials to share with you. I want to thank each one of them very sincerely for all their time and for sharing their talent.


So it's on to the last tutorial. For this tutorial, I am re-posting a tutorial I wrote for Karen earlier in the year but haven't published on my own blog. This finishes the {Sew} Get Started: Beginner Sewing Tutorials series.

For more information on previous tutorials, and links to each one, please click on the button to take you to the master page.

FairyFace Designs

 Today I have a quick and easy tute for you to help you bring a little handmade touch your interior decor. Have you ever made a hoop to hang on the wall? They are quick, easy and versatile - they can be as simple as stretching a favourite piece of fabric in the hoop or free embroidering a little picture or design. You can embellish them with buttons, beads, ric rac, ribbon etc - really, they are an endless source of entertainment!

This tutorial however shows you how to make one using freestyle machine embroidery - a technique that is really useful and can be used to embellish all sorts of items. If you've never done freestyle embroidery on your machine before, you might want to do a test piece to practice before you try the real one, so you can get the hang of stitching freestyle. This hoop was made to replace a more babyish picture on my daughter's bedroom wall and so I put it together with her in mind.

Here's what you need for something similar:


1 embroidery hoop - size up to you!
Piece of solid fabric for background (I used a very light blue)
Fabric scraps
Ribbon
Buttons
Fabric glue

Small piece of fusible web (I used the stuff for repairing hems, it was perfect) and a piece of tear-away stabilizer (I used Vlieseline Stickvlies). If you have a fabric gluestick you could use instead of the fusible web.


To Make:

1. Decide what picture you want to make and how you will compose it. My daughter loves balloons so I decided to do a little picture of her outside a house with lots of balloons in her hand. If it is a complicated one, you might want to draw a sketch first - for this I didn't need to.

2. Press your fabric, then press the stablizer to the back of it (it will "stick" to your fabric but is not permanent)

3. Take your interior hoop and lay it on the fabric and trace around the outside edge to give you a guide. I used a Hera marking tool, you could use the blunt edge of a scisssors, a water soluble pen or a light coloured pencil.
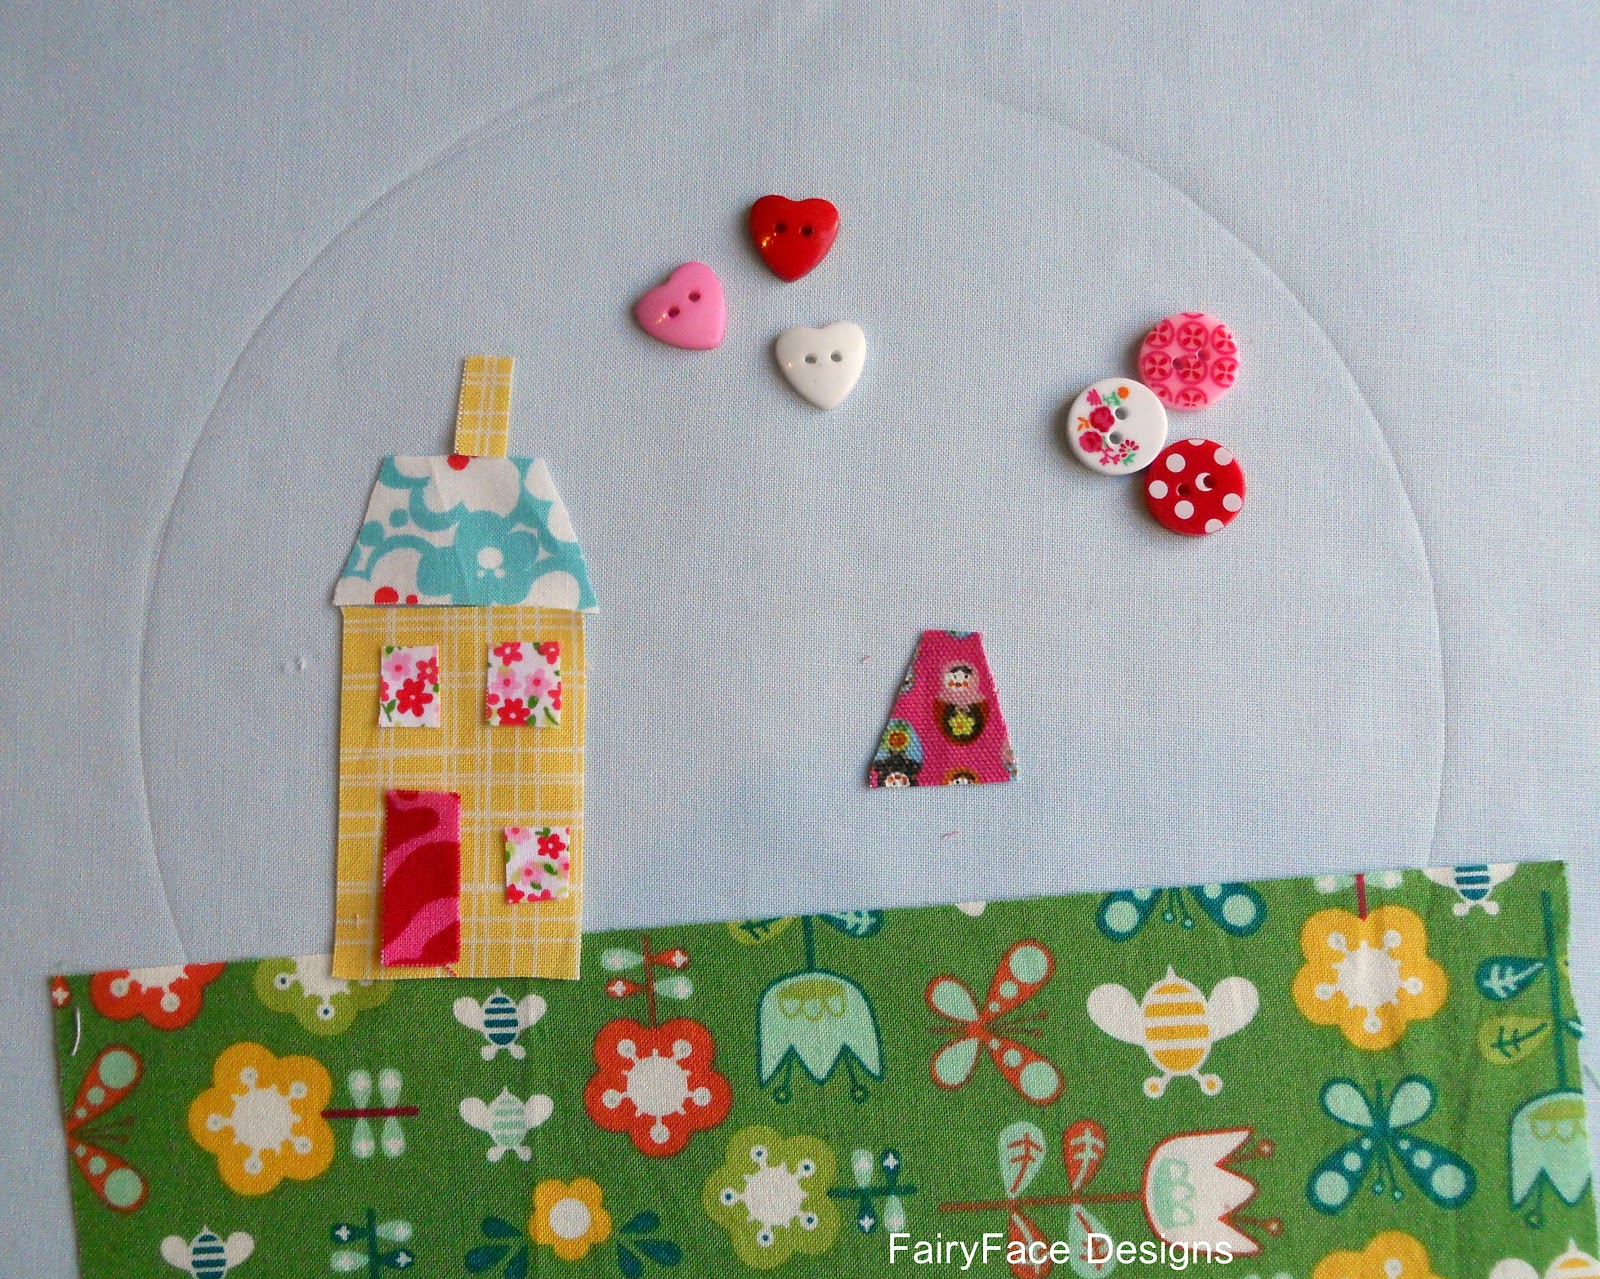

4. Now take your fabric and scraps over to your ironing board, lay your fabric flat and cut and arrange your scraps as you want them. Be sure to include any embellishments you are using.

5. Once you are happy, cut tiny bits of the fusible web, place on the back of your fabric scraps and press with an iron to fix your scraps in place with it, I just put a dot in the centre of each piece, enough to stop it moving when I was sewing it. (If you are using a gluestick, this is where you use it to fix your pieces).

6. Mark where any buttons/beads will go with a pencil dot and then set them aside for the moment.


7. Put your free motion foot on your machine and drop your feed dogs. Technically you should adjust your stitch length to 0 - I don't find the stitch length makes much of a difference on my machine, but see what works for you. Using a black thread, sew around each of the scraps to outline each part. This is supposed to look a bit wonky and quirky so crooked lines etc are fine! (If you are doing a practice run first, you are trying to get your stitches reasonably consistent in length - as you can see above, mine are very tiny which is not perfect, but better than a very long stitch length which won't secure your fabric as thoroughly as you would like.)  I added a spiral line of smoke to my chimney. I then used my machine to "draw" legs and arms, a head and some hair for my little girl figure. I changed thread to do the balloon strings. Remember to backstitch to secure your lines of stitching at the start and end each time. Leave a decent tail of thread each time you stop to make it easier to sew in your threads, it will look very messy before it is done! (I forgot to get a picture of this bit, but just imagine the picture above with lots of thread tails hanging out everywhere I stopped sewing!) Be careful to move them aside when you are sewing each bit so as not to get them caught up in the line you are stitching.

8. Once you are done with the outlining, take a hand sewing needle and bring all your thread tails through to the back of your piece. I then knotted my threads to secure and snipped them close to the knot. You can see this in the picture further down.


9. Sew in your buttons and any embellishments. I added eyes and a mouth to my girl's face using perle cotton. The mouth was a little bigger than I intended so just go slowly and carefully and check regularly to see when you are done.

10. Place your fabric over the interior hoop and then put the exterior hoop over and tighten closed. Make sure your fabric is stretched nice and taute, but not distorted. I left my stabilizer on the back of my fabric - you could tear away if you wanted, but it helps stop any threads at the back showing through a light coloured solid.


11. Trim around the hoop - enough that you can glue it to the inside of the hoop, but not have it wider than the hoop itself. Then trim the stablizer right back to the hoop to reduce the bulk, being careful not to cut your fabric.


12. Using fabric glue, carefully glue the raw edges to the inside of the hoop, you will get a bit messy doing this and might need to hold in place for a minute or two to get it to stick.


As I was making this for my own house and it would be hung on the wall, I didn't bother covering the threads at the back. However, if you were giving it as a gift and wanted the back to be nice and tidy, cut a piece of felt or fabric to fit inside the hoop and just covering the raw edges that you have stuck down and use a little glue to fix in place.

13. Add a ribbon tie and ta dah! Your hoop is done. Hang and admire :-)


As I said, you can do lots of different things with hoops - just to get you thinking and planning, here are a few more I made last year.

This was made with appliqued circles, and hand stitched with perle cotton:


And this very simple Christmas hoop was made with a few scraps of fabric and some hand stitching:


I hope you enjoyed this tutorial and if you make any hoops, please add to the Flickr group. Thanks once again for following my series of tutorials and happy sewing!

Thursday, April 5, 2012

{Sew} Get Started: Fabric Wallet Tutorial


Today I'm pleased to introduce you to my sleepy namesake who has a great tutorial for making a fabric wallet. Sarah is a super funny blogger as well as being a very talented lady. She's currently hosting the Stained QAL (which I am shamefully behind with) and makes gorgeous things. She also has Elliecat who often appears to be more than just a cat.....  Anyways, I am thrilled she is joining me today. Just look at the Solids Swap package she sent off to her lucky partner! Go say hi on her blog if you haven't been there before :-)


This tutorial is part of the {Sew} Get Started: Beginner Sewing Tutorials series. To go to the master page with a full list of tutorials and links to past tutes, please click on the link.

FairyFace Designs

So, Sarah, it's over to you!

Sarah Fairy Face has invited me, Sarah Narcoleptic in a cupboard, to join in with all the amazingly talented bloggers doing a tutorial for her wonderful {Sew} Get Started project.  I'm thrilled to be let out the cupboard (dangerous...), a little nervous to be in such talented company (understatement), but hoping that I've come up with a simple project you may like - no zips - the fabric Wallet!


I was a bit worried about all the layers that need sewn through, but taking it slowly (and not sewing over any needles) and my machine didn't complain at all.  This may not be the prettiest wallet design out there, but it is quick and easy, and it works!    My man can testify to that as he's been trying out the prototypes....  This one has had a few outings now, didn't embarrass him at the pub, and of course, survived being sat on....

Requirements :

Wallet exterior and first interior fabric   9 1/2" x 4 3/4"
Fusible wadding / fleece  9" x 4 1/4"
Firm fusible interfacing 9" x 4 1/4"

Cash divider fabric  9 1/2" x 8"
Firm fusible interfacing 9" x 3 3/4"

Card pockets fabric 9 1/2" x 18 1/8"
(optional clear PVC pocket is 9 1/2" x 4" folded in half along the width)

Closure tab fabric 2 x  2 3/4" x 1 1/2"
interfacing and fusible wadding 1" x 2 1/4"

Popper / snap fastening


Starting with the card pockets, take a marker (a Hera marker is perfect for this) and mark out the following sections.


The extra 1/8" accomodates all the folding, every time I tried with just 18" one end would be short...  just make sure when you come to the last fold and are ready to press the concertina as a whole, match up the two bottom edges first.  

Using these lines as your guide, and an iron to press as you go, fold up like a concertina.  You remember, fold then flip over, fold then flip over etc.  (It helped me to remember that each pocket is only just deep enough for the card to sit in, its not going all the way down!!)


Once you've given that a good firm press so it all stays put, you now need to mark out the card pocket widths.  You want the pockets to be good and tight around the card.  That way, when your man takes his wallet out at a busy supermarket checkout, all the cards don't fall out and scatter.... (prototype one was not too successful...)

Starting with a line marking the centre (width is 9 1/2" so your centre line is at 4 3/4") then do a line half an inch either side.  Then, with the centre line as your starting point, do another line 4" to the side to make your card slots.  Once you've marked these lines out, pin your fabric together in a few places so there's no shifting, and sew along your marked lines.  I found it very helpful to do this stage with a credit card handy to check each time that my pockets were still wide enough, but a nice neat fit.  
If you are adding the PVC pocket, then you'd want to position it on top (cut edges together in line with the bottom of the card pockets fabric folds).  A Teflon sewing machine foot is usually advisable for sewing through plastics, but these are just a few short lines, so taking things slowly it went okay.


Card pockets ready to sew


Cash pocket and closure tabs ready to iron

Now lets take our cash pocket section.  Fold in half length ways, and place your firm interfacing up to the fold, still leaving a 1/4" clear around the remaining 3 sides.  Iron on following manufacturers instructions. Iron your interfacing and fusible batting to your two closure tab pieces, and to the exterior and interior pieces. 


Interior and Exterior pieces ready to iron.

For the wallet exterior you have the option to do anything - piece a couple of mini blocks together, cross stitch, embroider....  In the interest of getting this done (I could take forever playing about with the exteriors...) I went for something very simple but I think kinda cool.   I used a black solid, and stitched a few simple lines in different coloured threads on it.  If you want to try this too, this is what happened..


I drew some random lines on paper to follow (I wanted straight lines, and without something to follow that was never gonna happen...) and I marked the corners of the wallet fabric just so that I knew where the edges would be.  I pinned the paper to the batting side (fused to fabric in last step) and followed my lines, putting different coloured threads in the bobbin each time.  


Carefully tear away all the paper and tidy (tie) the thread ends and that's the exterior done.  


Take the two closure tab pieces, right sides together, and sew round 3 sides.  Turn right way out, press and top stitch around the sewn edges.  


Now to assemble all the parts!  Interior down first, right side up.  On top, always lining up the bottom edge, next place the cash divider piece (folded edge to top!), then place the card pockets piece right side up.  On the right hand side, place the closure tab with the cut raw edge to the outside as diagram above.  On top of all that place the exterior wrong side up.  Carefully pin it all together.  
Now you need to sew round the edges, remembering to leave a gap (about 3" should do it, room for turning out).  I found out its easier to leave the gap a the top where you aren't sewing through ALL the layers.... 
Turn right sides out and hand stitch the opening closed!


Starting with the sticking out half of the popper snap fixing, (okay so I have no idea what you are supposed to call it) sew it on the inside end of the closure tab.  Reason we're starting with the "outie" bit is cos it means that you can use it to mark the position of where you need to sew the other bit...  Just close up the wallet, pull the closure tab over to closed position, and press down hard on the back of the popper you just sewed in.  That should leave a mark, which now shows you exactly where you want to sew the other half of the popper snap fixing.


You want to stitch them tight, and you also want to check you have them the right way round first....  
Et voila!  Fabric wallet done.  


Wow! I love this wallet, a brill gift for my hubbie for Father's Day later on in the year. Thanks so much Sarah :-) If you make a wallet, please add to the Flickr group. And don't forget to pop back next week for Felicity's Round (Wonky) Potholders. 

Thursday, March 29, 2012

{Sew} Get Started: Pot Holder Tutorial


Today I am really excited to introduce you to my friend Sheila! Sheila has a lovely blog at bluepatch quilter and is a very accomplished lady.  She teaches classes in quilting in real life so I thought that it would be great to have her contribute a tutorial so we could benefit from all her knowledge! Sheila makes both modern and more traditional quilts and I love looking at her projects. This recent quilt with Little Apples is just gorgeous!


This tutorial is part of the {Sew} Get Started: Beginner Sewing Tutorials series. To go to the master page with a full list of tutorials and links to past tutes, please click on the link.

FairyFace Designs

So, Sheila, it's over to you!

Hi everyone, my name is Sheila and I blog over at bluepatchquilter. Thank you Sarah, for asking me to contribute to your [Sew]Get Started series, I hope you are all enjoying it.

My project derives from Somerset Patchwork and doesn't involve a whole lot of sewing - this technique was something the Victorian ladies would do but my version includes a few up to date tricks.

These little pot stands are fun to put together and make good gifts. You can use them perhaps as a teapot stand or for  placing a potted plant.

So - here is what you will need.

3 fat quarters, say one solid and two patterned.
Some fusible web, (you know, the sort folks use to take up their trousers when they don't want to sew.)

It is possible to use just 2 fat quarters but I have opted for three today to accommodate the smaller US fat 1/4 size and also to give a bit of contrast. I used my solid white piece for the foundation layer onto which we will build our mat, and for some of the folded pieces. I used a print for the other folded pieces, and then the second print for the borders and backing. There is no need to use any wadding/batting for this project as it is quite thick when finished.


Cut the solid fabric into - 1 x 9.5" square & 4 x 4" squares
1st print - Cut 8 x 4" squares
2nd print - Cut 4 strips, 2.5" x 10"
& 2 pieces, 5" x 10".


Fold and press the 9.5" square in half, in both directions.


 Fold all of the 4" squares in half, diagonally & press. A bit of steam helps here, but watch your fingers!


This is the fusible web I mentioned, a little advantage we have over those Victorian ladies. Cut some small squares of web.

Next, we want to fold down the two outside corners of the folded squares, to meet the bottom corner.


 And this is where I use the addition of a small square of fusible web, to hold down the sides.


Pop in the square of web, fold and press. Take your time here and concentrate on trying to achieve a neat folded point - this might be at the expense of the raw edges being a tad uneven, don't worry.


and repeat until all 12 squares have been folded and pressed. Now it's assembly time.


Place 4 of your print squares onto your foundation square. All the folded points come together in the centre and the folded edges will align with the creases in the large square. Now, on reflection, I think it would be a good idea to pop another square of fusible web under each quarter and lightly press. 


Pin in place and then tack (baste) around the edges either by hand or by machine. To machine tack, choose as big a stitch length as your machine will allow.


The next layer will be the 4 solid squares. When you look at the four of these laid down as in the above pic, you can see they form a loose square together, but it has been set on point. All the folded points are still towards the centre, this time the centre folds of each little square aligns with the creases........now this is the stage where you have to do as I say and not as I did because you will see quite clearly that my left and right squares do NOT align too well. This has either been sloppy placement, or the squares moved when I machined them down. Once again, use a wee bit of fusible web to help you position, pin carefully and tack (baste) all round. If yours ends up a wee bit wonky like mine, never fear, it all adds a bit of character!!


Now, you might be forgiven for thinking you have morphed into a different tute, but when I was sorting and editing the photos I was gutted to find I had missed the third layer from the photo shoot!! Luckily I had an older version on file so I hope you will forgive me. The third layer returns to the 1st print and is placed in the same orientation as the first layer. You are aiming for even spacing and once again, use a bit of fusible web and some pins and tacking stitches to hold. We are now at the actual sewing stage!!


Take one of your 2.5" x 10" strips, lay it across your mat, aligning the top of one long edge with the edges of the last two squares you laid down. The strip should be right side down. Pin, and stitch along the long edge. If you have a walking foot, it might be useful to use it at this point as there is a bit of thickness to get through but I managed without. Take it slowly. These strips could have been cut to a more accurate length but cutting all four to 10" allows a bit of leeway, extra padding and room for squaring up later....The seam allowance can be whatever happens when you keep the edge of your foot to the edge of your seam.

Press the strip open and away from the centre.


Repeat for the opposite side. Press open, and away from the centre.


Repeat for the other two sides and give it all a good press, with steam. If you have revealed any of your tacking stitches, these can be carefully unpicked. Now it all looks a bit rough at this stage doesn't it? In previos mats, I have trimmed excess fabric before placing the strips but I think leaving them alone can be an advantage as the extra bulk is a good thing in a pot stand isn't it?

But, we do need to square this baby up.


I like to line up a vertical line on my ruler with the centre vertical line on the mat. I have carefully chosen my pink ruler so that you have difficulty seeing it in the photo!!

I started with the 4.5" line and adjusted until the right side edge could be trimmed neatly. It was 4" in the end. I then turned the mat so that this newly trimmed edge was at the bottom giving me a nice clean edge to trim from. I lined up the 4" vertical line on the vertical centre line of the mat but also lining up a horizontal line on the ruler with the cut edge. Trim. Now I have two trimmed edges running at right angles
.

Then, out came my 9.5" square up ruler and I positioned the bottom right corner of the mat onto the 8" marking on the ruler. Then I was able to trim the left side edge and the top edge. If you don't have a square up ruler you will be able to square up using the markings on your cutting mat.

Now to back this mat.....almost there.

Fuzzy picture alert!!

Place your backing pieces right sides together and sew along the long edge, using a 1/4" seam - leave a gap in the seam in the middle, of about 3".

Open and press seam to one side.


Now place your mat, right sides down onto the right side of the backing piece, position centrally, pin and then stitch all the way around the edge of the mat, using a 1/4" seam.(or thereabouts)


Trim all around and cut across the corners - see pic - being careful to avoid the stitching. This will result in lovely corners in a minute.......


Turn thro the opening in the back, I always think of this as the birthing moment. Use something pointy, like a chopstick, to poke out your corners. I can take wonky fronts, but I like a neat corner!

Hand stitch the opening to close.


Now it just needs a final press............


 and a plant....


or a teapot!

I do hope you will try this.

Thanks so much Sheila for a great tutorial - I love this and think it would make a perfect pressie for my mum who has about a million pot plants in her house!  If you make a pot holder, please add to the Flickr group :-) Don't forget that next week Sarah is doing a tutorial for a fabric wallet so pop back next Thursday for that.