Showing posts with label Ann Kelle. Show all posts

Tuesday, February 15, 2011

Fabric Splurge!

I love love love fabric! So, I was super excited today when no less than 3 packages arrived from the US for me! I ordered a heap of new fabrics and some old favourites last week and couldn't wait to get them home and have a proper look.

I ordered layer cakes for the first time - It's a Hoot by MoMo which I've seen a lot of in blogland and is a gorgeous collection of fabrics (I can think of so many things to make from it) and Origins by Basic Grey which I bought just because I love the colours and fabrics in it - it doesn't match anything in my house and I can't think of what I'll do with the quilt I'll make from it but its all MINE!!! I got a Hideaway charm pack too, love this line, its really cute!


I also ordered some fresh yardage for my baby blankets and bunting. Aren't these lovely blues and greens? I love the snails!


And I was SO excited to get my hands of some of Ann Kelle's new line Ready Set Go (the trains and the cars) which is extra special being organic cotton. I also love the 2D zoo, the teal, navy and green is so vibrant, and the dino print is perfect for a baby boy's blanket. I found the Amy Schimler owls in a blue colourway and couldn't resist!


I also got some gorgeous fabrics for the baby girls! More Amy Schimler owls, some Alexander Henry Willow on green and I love the Riley Blake umbrella tops in vibrant pinks.


I managed to find more yardage in the cute cats too - this fabric is getting very hard to find! I also got some pretty Riley Blake fabrics from the Quite Contrary and Sweet Divinity ranges - these are very fresh and I am really happy with them :-)


So its been a big week for supplies shopping here. I spent Saturday afternoon flitting around between my 3 local craft shops picking up essentials and spent a pile of money on thread. My kids love looking at thread displays in shops and seeing all the colour shades, and when I lined up my new thread purchases this evening my little boy was over like a shot to have a good look. Aren't the colours pretty?


Time to get sewing again, now that I'm restocked and ready to go!

Saturday, February 5, 2011

Picturebox Quilt Top


Picturebox Quilt Top

What a week its been here in the FairyFace household! I don't think I've put down as hard a week since the time D was in hospital a couple of years ago. We had both children sick, one with a very high temperature and the other off form and increasingly lethargic and distressed for a few days until she was finally diagnosed with a pretty bad infection in both ears. I have been suffering from the "mother guilt" ever since, because the first day I suspected she was resenting the attention D was getting with the high temp and playing up as a result :-( Bad mammy moment! And my poor little lady, it turned out, was in a lot of pain - by Thursday afternoon she couldn't sit still or get comfortable, she was so sore. But antibiotics are a great thing and she is well on the mend now and almost back to her cheery self.

In addition to the stress of minding both of them when sick and not getting much sleep what with being up with both of them every night, juggling our jobs took its toll. Its awful have to take unplanned days off from work, you feel like you're letting people down (even though there's nothing you can do - the kids need to be minded when they're sick) and you get so behind and end up working late at night on all sorts to try to catch up. We sent out a cry for help on Thursday and both my and T's parents galloped hastily to our rescue, providing dinners, entertainment for the kids, childminding and other essential services. We're just so lucky to have great backup, I know so many families who can't do that and it really makes life easier when a little help is around.

So, with all that there was not much crafting done in my house at all this week. However, I did get finished the quilt top I am doing for a special boy and want to show it off because I'm so happy with how it turned out.


This is the first quilt I have really "designed" in more than a simple straightforward squares or stripes template. So I'm really proud :-) I found it pretty challenging to figure out the measurements for the different pieces (Maths never having been a strong point of mine) and I must admit that it is quite different to how the original idea was planned. When I laid out the original design template after cutting my fabric, it just didn't work. I don't know why, it looked great on paper, but it just didn't flow! So I went back to the drawing board, took what I had cut and spent a long time playing around with combinations until I came up with this. Then I had to sit down and re-work out the measurements and cutting requirements and happily, it seemed to flow better.

I have seen "design walls" on a few blogs and I really need to figure out a way to set one up on some wall space in my house. I currently do all my layouts on a white sheet laid over my big bed, which works fine from a functional sense. But I like to leave designs/fabrics laid out and come back to look at them and tweak them over and over until I'm happy which isn't really feasible when I need to get to bed! I end up clearing up and then laying out again the following evening which is a terrible waste of time.

I had the big panels sewn up last weekend and when I was at home this week those few days, I left my machine set up at the kitchen table. The side columns were a perfect size for sewing up very quickly so if I got 5 minutes at all during the day, I sat down and sewed one up. Its amazing what you can get done with 5 minutes here and there, it seemed slow doing them one by one but in fact, I had the columns done in no time and then was able to sew up the sashing and put it all together one evening when the kids were in bed.


And doesn't it look cute? My inspiration for this quilt started with two of the prints I use in the big panel - the Jungle Friends and the Hooty Hoot Kangaroo.


I was thinking a little of the "I Spy" type quilts too and imagining a little boy exploring the fabrics seeing all the different animals and bugs and birds. Sort of like pictures really and from there the idea of framing the prints came. I used a simple green/blue on white print to frame up each big panel and then used strong colour scraps around this for an extra layer of detail. I love those picture frames that hang vertically with 3 to 5 photos in them and that is where the idea for the columns came from. I have mostly used animals and birds in this quilt, but threw in some "Wheels" fabric for a little extra charm. The sashing is a Kona solid in Ivory and I really love how it makes the prints stand out.


So, now I have my two quilt tops done and I have my backing pieces ready - next stop, basting! I have to admit I'm not a lover of this stage so I think I will bite the bullet later on and just do both in one huge basting session. Take all my punishment at once, so to speak :-) And then I am going to quilt both with lengthwise straight lines. Can't wait for that part!

I'm featuring this quilt top in some great crafty linky parties:


     Lovely Crafty Home Photobucket


**PS - I have to apologise (again) for the fact that my pictures aren't nearly as good as I would like. What with the still lost good camera, the grey light and the fact that its lashing rain outside, all I could do was try and snap some in front of the playroom patio doors. Otherwise there would be no blog posts at all!
** Also - it being Saturday morning and trying to get as much done as possible, I was too lazy busy to iron the quilt top again before taking the pics - so please excuse all the creases and stray threads!

Friday, January 28, 2011

Scrappy Crochet Hook Roll Tutorial


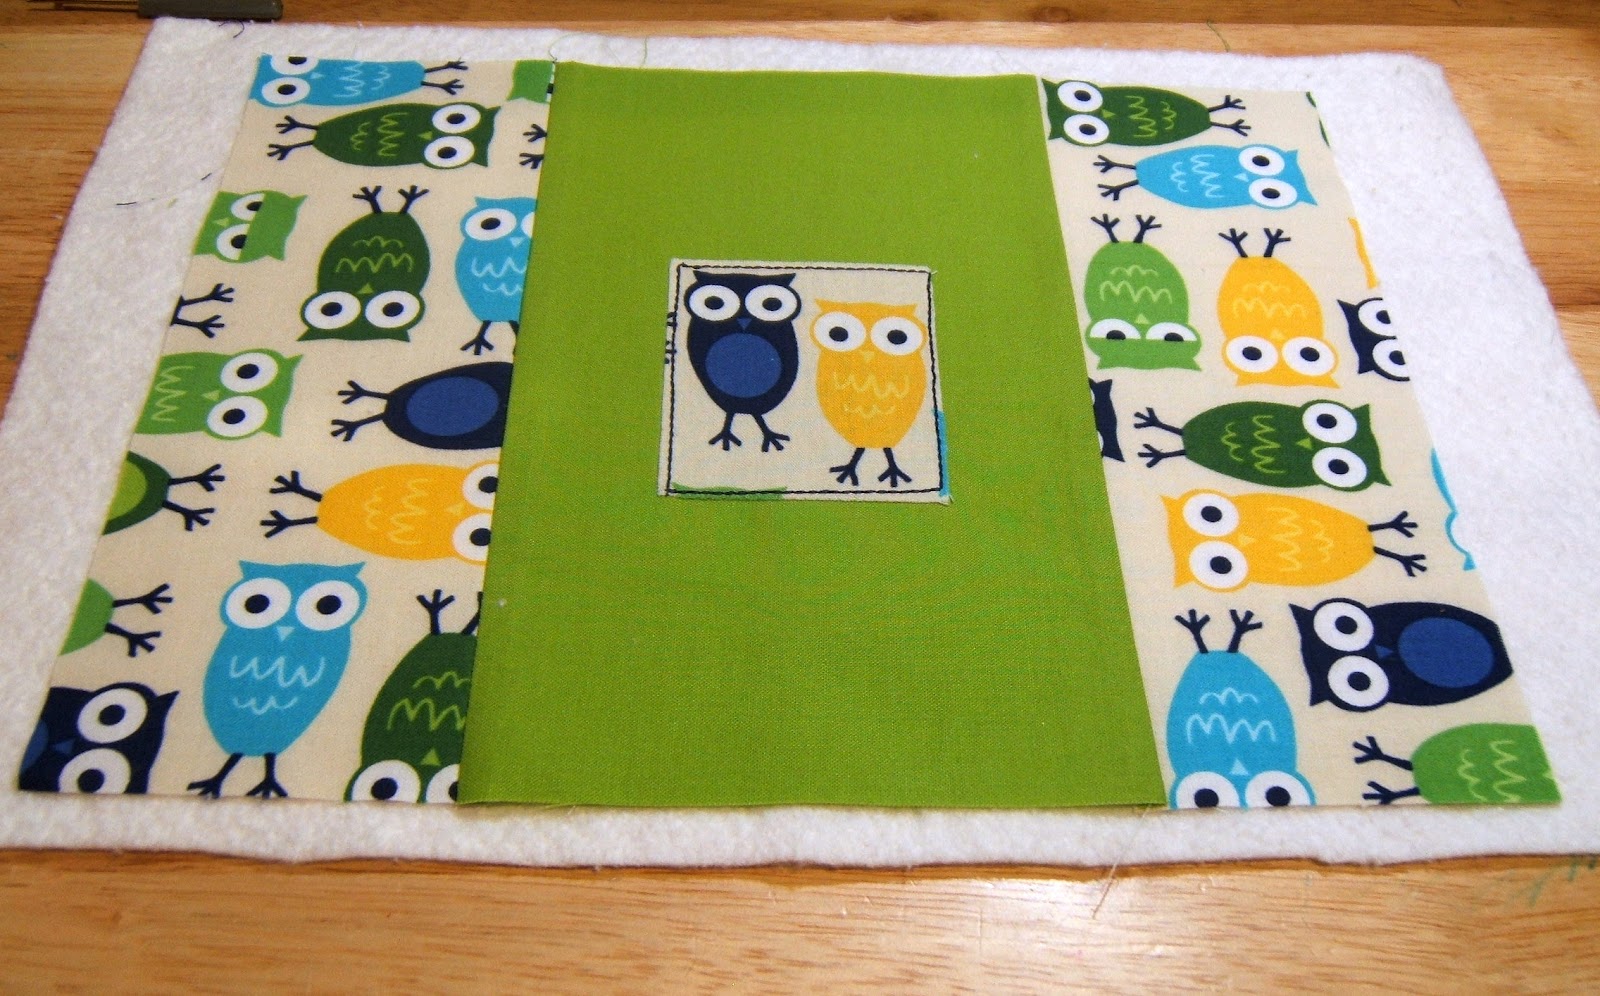
I made this quirky crochet hook roll this week from my very favourite fabric - Ann Kelle's Urban Zoologie Owls. I thought that a straightforward tutorial might be of interest to some of you so here goes, my very first tutorial!


Materials Needed:
Large scraps of the following fabrics - 1 feature fabric, one complimentary solid, 1 contrast solid for binding.I used Ann Kelle's Urban Zoologie Owls and Kona Solids - a lime green and a navy.
Large scrap cotton batting
24" of matching ribbon
Small square Bondaweb or similar
Matching threads


Seam allowances are 0.25" unless otherwise stated.

Cutting List:

Front - from main solid - 5.25" x 8.5"; from feature fabric -  2 pieces measuring 3.25" x 8.5".
Front - fussy cut small detail piece from feature fabric - size dependent on pattern but approx 2.5" x 2.5".
Back (main panel)- from feature fabric, 11" x 8.5"
Back ( folded panel) - from feature fabric, 1.5" x 11"; from main solid, 1 piece measuring 2.5" x 11" and 1 piece measuring 7.5" x 11".

Assemble front:

1. Using Bondaweb or similar, seal fussy cut small panel to main solid front panel, centering carefully.


2. Using thread to matching contrast binding colour, stitch around edges of applique leaving raw edges. I used a triple straight stitch (topstitch) setting on my machine to emphasise the stitching. Stitches do not need to be perfectly square, slightly wonky lines add to the charm!


3. Pin feature fabric front pieces to main solid & stitch carefully.


4. Iron seams to darker fabric side.


Assemble back:

1. Pin feature fabric between solid pieces and sew, iron seams to darker side.


2. Fold in middle to give piece measuring 5" x 11" and iron.

3. Line up folded piece with main back piece and pin in place


4. Decide how far apart you want your lines for your hooks and mark in place.


I marked the edge seams 0.5" in from raw edge, and marked a number of wide lines at 1" each, then smaller spaces for narrower hooks at 0.5" each. I use a Clover Hera marking tool which marks a sharp crease on the fabric. I love this tool, it's one of my best buys ever! You could also use tailor's chalk or a water soluble pen.


5. Stitch lines as marked. Work from middle of fabric down to bottom.


Quilt front:

1. Place front piece on batting scrap leaving excess batting on all sides and pin in place.


2. Starting by stitching in the ditch of one of the seams, quilt using straight lines on the feature fabric out to the edge. I set my stitch length to 4.0mm and, using the side of my presser foot as a guide and moving needle position, spaced the lines differing widths apart for interest. Some are very close, others wider.


When first side is done, do same on other side. The centre panel of solid fabric is not quilted.


3. Trim excess batting using rotary cutter.


Binding:

For this roll I used double fold binding. If you need detailed instructions on binding check out great tutorials on Jaybird Quilts or Oh, Fransson!
Using contrast solid, cut strips for binding. I cut on the straight grain to a width of 2". Cut 2 strips of approx 24" and join using 45 degree seams.  


Fold in half, wrong sides together, and iron.


Assemble Roll:

1. Line up back piece on top of front piece, matching raw edges, and trim any excess fabrics.


2. Pin binding in place, matching raw edge of binding to raw edges of roll.

3. Fold ribbon in half and pin on one side of roll, between binding and fabric. The folded edge should line up with the raw edges of the binding and fabric.


4. Stitch binding in place all the way around, making provision for mitred corners.

5. Fold binding over to back of roll and pin, ensuring mitred corners are lined up correctly and machine stitch close to the edge of the bindgin. Ensure that your stitching is picking up binding on the opposite side. (Or handstitch if you prefer)

6. Apply Fray Stop or similar to the ends of your ribbon to seal. Alternatively, turn the edges of your ribbons under and stitch to seal the end and prevent fraying.

You're done!


Fill with your crochet hooks, roll up and admire!! Alternatively, you could use this roll for makeup brushes, just adjust the width  of the stitched lines.


I hope that this all makes sense, let me know if you have any questions. And I hope you enjoy making it!

Tuesday, January 11, 2011

Progress Report! And opinions please!

I've been quiet on the blogging front this week - for 2 reasons. I have lost my good camera. Disaster! And I've been really busy working on 3 quilts. I finished the quilt top for the little girl's one tonight. (Sorry the pics aren't better, luckily I was too lazy to Freecycle my old camera before Chrismas so at least I could get some!)


I used 7.5 inch squares for most of it, with a small number of squares pieced from smaller squares. The dominant colours are shades of red and green (although some of the cooler green shades are coming up with a blue tone in this photo), but I used a range of bright, cheerful colours and prints to give it a vibrant, colourful look. The quilt top needs borders and I hope to baste it tomorrow/Wednesday and get it quilted by the weekend. I'm going to quilt it lengthwise in wide, wavy lines in keeping with the modern, contemporary look. I can't wait to see how it looks when its finished, there is such a difference between mid project and the finished object!

It took quite a long time to get the squares laid out in an arrangement that I was happy with, balancing colours, sizes of prints and dark/light shades. I really missed my camera here, I usually take pics of various layouts and then look at them on screen which I find very helpful. But I think I managed ok! I pieced the 8 rows yesterday and then this evening, pieced all the rows together. I'm pretty happy with how it turned out. I'll use a solid colour to bind it as the top is so busy.


 I've used a very eclectic combination of fabrics for this quilt. There are lots of Ann Kelle prints - the bright butterflies, stripes, the owls, the argyle print. Also some of the Bliss collection by Bonnie and Camille. Some lovely Michael Miller Ta-Dot and Daisy prints, Amy Schimler cat and owl prints, Riley Blake's Love Birds, Summer Song & Rainy Days collections and even a lovely Kokka Russian Doll print. Plus a few others too!


More detail here:


 I love this arrangement of the owls and the hedgehogs:


So I am pleased to be making progress. I need to measure it again tomorrow night and decide on whether to add sashing or not, if I do it will be solid white. I'm thinking either a solid red or a solid green for the binding - I'd love to hear your opinions! So please leave a comment if you would have a preference. I know what red I would use - one similar to the red dots in the photo just above, but if I go with a green I could use either a lime green shade, or a grass green. I think the darker shade would probably be better but still thinking about it. I'm veering towards the darker green if I'm honest as there's a lot of red in the quilt top, and also to bring out the green tones more.

I'm cutting the pieces for the boys quilt this week too. I'm using a different design for that one which I'm not going to attempt to explain at this time of night!

Finally, in my little report, remember this Bliss charm pack which I picked up at the Knitting and Stitching show?


It's now looking like this:


As you can see, I'm still in the middle of quilting it and there are pins everywhere! I couldn't get a decent picture of the whole thing due to the light/camera issue (plus the fact that Himself was watching something very important and not as willing to come out and hold it up for photos as he was for the other quilt). I am using Kristie's McKinley quilt pattern with some adjustments to make it slightly bigger and really enjoying it. I picked up the sashing fabric at the Knitting and Stitching show too and wasn't sure how it would work but its actually really nice against the Bliss squares - a picture in daylight would show the effect much better than the above pic - its not as mottled as it looks here. It's quilted on the edges of the square and the sashing in straight lines, quite close together. I have the horizontal quilting lines almost done and need to do the vertical ones next. Then just bind it and its done! Yippee, it will be lovely on our sofa as a throw and will fit in perfectly in our room. I found the basting a little tricky because the backing fabric was pieced with some stripes but got there eventually.

Ok, so that's my report. I'd love to hear your thoughts on the binding for the first quilt and keep your fingers and toes crossed my camera turns up!

Saturday, October 16, 2010

Supplies

So, today being Saturday, and my lovely hubbie taking himself off to Limerick for the Munster match, I decided that a day doing housework would be highly overrated and took myself and my two monkeys off to town. I had a few things to pick up and reckoned that the promise of pizza and ice cream in Milanos (or "Bilamos" as E so endearingly calls it) would be enough to bribe the kids to behave. And it worked!! We went to Hickeys and picked up lots of cotton tape for bunting, more cute, shimmery ribbon, some thread, some wadding, and some more Bondaweb (having had a traumatic end-of-roll moment during the week). E stayed in the buggy for most of the time and D attempted to drill into every shelf he could find with the cheap plastic drill that came with a comic but there were no tears and only a few (quite effective!) threats on my part.We moved on to Vibes and Scribes (via a fair bit of running around on the streets and a breakaway attempt when they spotted a toy shop :-)) where I picked up some cute chunky yarn to make a winter hat and scarf for E, and some turquoise fabric with white polka dots. The yarn is 100% acrylic - I would have loved to pick up some wool/wool mix but I'm too afraid to after spending last winter at the doctors trying to sort out my asthma. Its a shame really, I love the really luxurious wool yarns but they irritate my lungs unbelievably :-( I also got a gadget for making bias binding (I'm sure it has a proper name but I can't think of it right now!) which I am looking forward to trying out.

I managed to keep today's shopping very practical after splurging on Etsy earlier this week. I'm currently expecting 3 packages from the USA - one of Minky and the other 2 of cotton prints. A mix of Anne Kelle for Robert Kaufman  (cupcakes, owls, hearts, butterflies, flowers), Riley Blake (kangaroos and owls) and Amy Schimler (cats and owls). I have lots of baby blankets to make and these will be perfect. I sense a recurring theme of owls - they are just so damn cute on the fabric!! So I made myself stay as far away as possible from the lovely Amy Butler fabric in Hickeys for fear my resolve would weaken. And I resolutely did not look at the o-so-gorgeous Sirdar Flirt yarn in Vibes and Scribes. I'll be counting down the days till Friday when I think the parcels will arrive.