Showing posts with label Greek Cross. Show all posts

Thursday, February 27, 2014

An old favourite (Across the Sea nostalgia, anyone?)

Last week I was off with the hubbie and kids for mid term break, and in the course of not having to get up before 6:30am, lazing around the house in the mornings and generally taking it easy and having fun, I appear to have found my "sewjo". My brother in law had asked me to make a couple of quilts for him to gift to good friends who had babies recently and when I was trying to figure out what to make for one of them, I was hit by a genius idea.


I got cutting, then I got chain piecing. Almost overnight, I had a quilt top and before I knew it I had a quilt. An Across the Sea quilt. Swoon, swoon, swoon.

I was surprised at the wave of nostalgia I got in comments on Instagram about this one - I think it was a lot of people's first quiltalong, or even their first quilt. I had a bit of a trip down memory lane myself.


This is such a quick and easy block to make, and so striking too. It allows the fabrics to shine, which I always love, and I had lots of lovely FQs in my stash to use for this quilt. Like the retro flowers one, it just came together effortlessly in terms of fabric selection - I always think that's a giveaway as to when you are in possession of your sewjo - when it's absent, fabric selection seems like such a massive hurdle to get over and nothing flows.


I really am happy at how the two amber coloured prints worked with the rest of the colours, they just keep it fresh and vibrant.

I backed this one in some red flannel I had in my stash and I absolutely LOVE it as backing. It's snuggly and soft and the quilting shows up so nicely on it too. I will absolutely be investing in flannel again for backing, its wonderful. It did have a LOT of shrinkage though - I was glad I prewashed, which was more for the red colour than the perceived shrinkage.


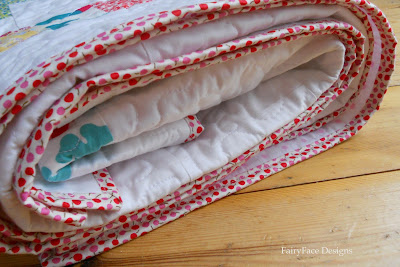
 The binding is a fabric from Marmalade which marries the front and back nicely with the pinks and red. I did a stipple quilt on this one using white Aurifil thread.


And all rolled up in squishy perfection!


 All ready to go off to its new home :-)


If you want to make an Across the Sea quilt, Jennifer and I did a quiltalong for it a few years ago, you can find all the pattern posts here. I'll be linking this up to Finish It Up Friday at Crazy Mom Quilts, and don't forget to come back here tomorrow to link up your February scrappy projects in the Put Your Scraps to Work challenge.

Monday, October 3, 2011

Across the Sea Quiltalong Finish!!


Today is the big Ta-Dah day for our Across the Sea quiltalong. It seems like a long time since myself and my lovely friend Jennifer announced our Quiltalong back in August. I'll never forget the morning we posted it, waking up so nervous wondering if anyone would join us!  We quickly had some great peeps on board and it has just grown and grown since then, with over 100 people in the Flickr group - 100 people!!!!! It has been inspiring and amazing watching you all interpret the design, give it different looks with your fabric and layout choices and make it truly your own.

Today, I am really proud to be showing you my own finished version. Apologies for the quality of the pictures - they were taken in a misty drizzle this morning which is the best weather I have had in the 8 days since I finished it up. (I'm so jealous of peeps across the small pond in the UK who have had a glorious week of weather. Yes, I mean you Hadley and you Susan and you Nicky - I am completely jealous of your beautiful pics!!!) Despite the moaning I'm still going to bore you with lots of photos, just because I love it so much :-)

This quilt is for my beautiful new niece R who is just a few weeks old. I used a FQ bundle of Momo's Just Wing It for Moda, and mixed a few other fabrics in there for a little colour balance including the owl print from Its a Hoot, and a yellow print from Dream a Little Dream with Me by Keri Beyer for In The Beginning. I really love how the colours worked. It is girlie without being too pink and the aqua and green and touches of brown give it a nice depth of colour. I love Jennifer's cross block design and think she was inspired to include the scrappy border, it really ties it all together for me! I went superscrappy on my border because I just love that look, but I do wonder if it would have been even nicer with the longer border strips.


The back was my design and I really appreciate all the people who kept faith and made it - I know how strong the temptation is to not bother with a pieced back when you have the quilt front done, so thank you! I hope you feel it was worth the extra trouble - personally, I am very happy with it. I really love the bordered cross block, and I love how the other crosses just float there - particularly that cute little baby cross. Here's my finished back:


I used a white fabric with a baby pink polka dot for my backing - its hard to see here (thank you, crappy light conditions) but it really does add to the quilt and looks very nice.


When it came to the quilting, I went with an all over meandering stipple, a little larger than I normally stipple. I will definitely be using this sort of scale in the future, it was much quicker and looks just as nice - I was definitely over-quilting before!


You saw my binding last week - I'm still in love with it. I used to have some of this fabric in a blue/green colourway and I'm heading back into my local fabric shop this week to see if I can find it, its absolutely perfect for binding.


So there you go, I can't believe its all over! I'll be so sad that our little quiltalong crew is disbanding, but I know that I've made lots of new friends and discovered lots of great blogs in the course of this process.

I want to say a huge thank you to Jennifer, my partner in crime! She's just the best and we had lots of fun doing this, despite the challenges of being in two completely different time zones.
So, a really big reminder that you need to have your finished quilts posted in the Flickr group by tonight to be eligible for the giveaway this week. Winners will be announced on Wednesday. Also, instead of doing a linky of finished quilts which might be hard to manage between two blogs, I have set up a thread in the Flickr group for linking up your quilt finish posts - I hope you all go round and visit the blog links and spread the quilt love. That thread is here.


So, last but not least, here are my quilt stats in summary:


Quilt Stats:

Name: Across the Sea quilt
Made For: My niece R
Fabric: Just Wing It by Momo for Moda + some additional fabrics
Batting: Warm and White
Size: 46" x 58"
Quilting: Meandering stipple by me
Pattern: Mine and Jennifers quiltalong pattern.

Ok, and after all that I'll be doing a bit of linking myself! Linking up to Sew Modern Monday, Manic Monday and Fabric Tuesday with this one :-)

Sew Happy Geek
{Sew} Modern Monday at Canoe Ridge Creations          Fresh Poppy Design

Thursday, September 15, 2011

Piecing your Back Cross Blocks : Across the Sea QAL


Hi everyone, we are moving on today to piece the small number of cross blocks for the quilt back. If you're looking for the Kona solids giveaway it's here. The cross blocks for the back are very straightforward so lets get working!

First grab your fabric for each block:


Take your Block 1 fabric and make up as per the cross blocks for the front of the quilt, and trim back to 12.5" square.


The fabric for Blocks 2 & 3 each contain 4 longer strips from the background fabric. For each block, set aside the longer strips and make up crosses as per the method for the first cross block, again using scant quarter inch seams. Block 2 will make up to 6.5" square, and Block 3 to 9.5" square. Once you have each of the inner blocks completed, add on your background sashing strips to bring the squares up to 13". Add the shorter strips to each side first and press your seams, before adding the final strips. (For people making the lap size quilt, you will need to make an extra Block 2)


 Each block should then be trimmed back to 12.5" square.

 
Last we need to make the bordered cross block. This block makes up to 12.5" square, not 13" so it is important to piece this accurately. Please make sure you use a scant quarter inch seam - this is really important, it comes out exactly right if you do. Also, on this block, your seams should all be pressed open.

Firstly, divide out your fabric pieces so you can see clearly what you have.


Start by sewing your cross arm pieces together. First sew your 4.5" x 1.5" background and border fabric pieces together along the long edge, then sew your cross arm piece to these:


Do this for all 4 cross arms. Next, piece two of your "arm blocks" to the central piece to give your central row.


So far, so good, right? Next are the corner blocks.

Start by chain piecing all the pieces as follows.

Take your set of 2.5" x 1.5" pieces (12 border fabric pieces, 12 background pieces) and piece 4 sets together, short ends together as on the left of the picture below. Then sew the other 8 sets together long sides together as on the right of the picture.


Then take the 1.5" square border pieces and piece each to one of the 3.5" x 1.5" background pieces, as in the picture below. (I swear, that seam is straight its just the way the fabric is lying underneath!!)


Press all your seams open, they layout your pieces to assemble your corner blocks as follows:


First, sew together the two central pieces as shown below:


Then, sew the top strip to the central piece, right sides together. It's important that your seams are matched here. I like to match the seams, then pin very close on either side. I leave the pins in when I'm sewing so it doesn't shift at all. 3 years of sewing over pins and I've only broken a needle once!


Now, sew the bottom strip on to the other side of the central piece and hey presto, you have a nice little corner block!! Repeat this for the other 3 corner blocks.


Iron all your seams open. You are now ready to assemble your block!

Sew together the corner blocks to the middle "cross arm" blocks on each of the top and bottom rows. Match your seams carefully when doing this. I normally don't pin much when I am piecing, but you do need to pin these seams carefully to make sure the fabric doesn't shift around.


Finally, sew all three rows together. Again make sure to match your seams and pin carefully before sewing. Take your time and make sure your seams are lying flat as you sew. Ta dah! Your bordered cross block is done. Isn't it cute? If you're making the lap size one, go make a second one now :-)


Have fun and I'll see you Monday when we'll assemble our rows to finish our quilt backing. Woohoo!!

If anything is not clear, please let me know in the comments or email me to fairyfacedesigns@gmail.com

Monday, September 5, 2011

Piecing your Borders: Across the Sea QAL


Have you decided on your block layout? There are great options turning up in the Flickr group and I love seeing the different interpretations everyone has of their blocks.

Today is all about putting together your borders, so head over to Ellison Lane Quilts where Jennifer is all ready to show you how. As you can see, I went for the super scrappy look in my border! I'm totally in love with this baby girl quilt - hope you like it too!

Monday, August 29, 2011

Piecing your Blocks {Across the Sea QAL}


So, I hope you have all been busy cutting your fabric for our quiltalong? Are you all ready to get started piecing? Jennifer has the instructions over at Ellison Lane Quilts today so pop over there to find out how to get started!


I've been busy piecing my blocks ready to show you my layout tips on Thursday. I love to chain piece for projects like this and find it a really quick and effective way to complete my blocks quickly. I started with the arms of each cross, piecing the cross and background fabric for each block, winding up with a little pile of pieced rectangles like this:


I then spent a little time at the ironing board to end up with these:


From there on its super simple to chain piece the rows and complete the blocks!


If you haven't chain pieced before, there are some tutorials listed in the Flickr group to get you started, you'll find them here.


I can't wait to see your blocks appear in the Flickr group. Happy piecing everyone!Link

Wednesday, August 24, 2011

Wednesday WIP update


Another week gone, where does the time go? August is always a busy month, this year more than ever. Can't believe that my little boy is off to school next week. He is all kitted out with his uniform, his books, and his schoolbag. He looks so grown up with the uniform on! I am torn between excitement for him moving on to this new stage in his childhood and wanting to cry that he is growing up so quickly when I see him!

So here's the progress this week:

Completed this week:

I finished my mug rug for the Haiku themed scrappy mug rug swap and posted it off last Friday. I don't think my partner will receive for another few days, and I don't want to spoil the surprise, so here's a little sneak peak of the front:


And the back:


I must admit to shamelessly stealing the idea for this card from Susan who sent me a similar one with our little fabric swap a few weeks ago. I loved it so much, I've made a few versions for friends, and as I did a rainbow theme for this mug rug, I thought it fit in quite nicely. Inside the card was my (pretty amateurish) Haiku -
"Rainbow of colours
Like a smile after the rain
To brighten your day."

Which pretty much sums up my sentiments about this mug rug. I will reveal all later in the week.

I also finally sat down and pieced my Bee blocks for August - they're here. I really liked this double pinwheel block, once I got over the fear of messing up, and I even had enough leftovers to do 2 nice 6" blocks for the back for Jenna.

In Progress:

Besides the mug rug and the Bee blocks, this week was about two things for me - our Across the Sea QAL, and my solids swap item.

Across the Sea Quilt-Along

We are cutting the fabric for the quilt front this week for the QAL and next week, the fun really starts with the piecing. I really love the simplicity of the block and the way it lets the fabric shine through. Here's my trial block - I just love this print from Just Wing It!


I also made good progress on my For the Love of Solids swap.


My partner has liked some improv blocks showing up in the group pool so I have tried to piece some for her.


In addition to this first one which got a lot of comments at the weekend, I have pieced 2 more. This is going to be a mini quilt, with a Kona coal background. The 4th block element I can't show as I think my partner would realise immediately it was for her.


This is my first venture into improv piecing - I don't really know what I'm doing but I think it looks ok. Would love your feedback :-) I'm sorry about the pics which were taken indoors and the lighting isn't great. There are nine different shades of Kona blues in these blocks, and they do create contrast all by themselves, but I really like the pop of cerise/hot pink.

Last but not least, I'm guest blogging today over at Sara's fab blog Sew Sweetness about essential sewing supplies.


So if you are new to sewing and you want to know what you need in your sewing basket to get you started, head over right now and find out more!

I'm linking up to WIP Wednesday over at Freshly Pieced where I know I will be in some super talented company, so head on over there and have a look!

WIP Wednesday at Freshly Pieced

Thursday, August 18, 2011

Across the Sea QAL Schedule

I'm super excited at the response to our QAL - thanks so much to everyone who has signed up so far. There's still time, if you are thinking about it, we are not starting to cut fabrics till next week.

For those of you who were having problems grabbing my button for your blogs, here's a working version:

Across the Sea Quilt-Along

Jennifer and I have also set up static pages on both of our blogs (see the page list at the top under the banner header) where all the information including links to each blog post will be available, in case you come to the QAL a little late.

That done, here's the important stuff - the schedule! We will be posting twice a week, Mondays and Thursdays to cover all the instructions. Tutes and blog posts will alternate between mine and Jennifer's blog, so make sure you are signed up to follow us both! I will link to Jennifer's the days she is doing the tutes, and vice versa to make sure you don't miss anything. We will kick off the action with the fabric cutting instructions next week over on Jennifer's blog. Excited yet? I know I am :-)

Schedule:

Week 2 (starts 22nd August) - Cutting fabric for the front

Week 3 (starts 29th August) - Block Piecing tute & Design Layout

Week 4 (starts 5th September) - Border piecing tute & assembling quilt top

Week 5 (starts 12th September) - Cutting & piecing the back including block tutes

Week 6 (starts 19th September) - Basting and Quilting

Week 7 (starts 26th September) Binding and Finishing your Quilt

Week 8 (starts 3rd October) QAL finish - showcase the quilts & announce giveaway winners!

As you can see, there is plenty of time there for all the steps. The Quitalong officially finishes on Monday 3rd October and your finished quilt needs to be posted in the Flickr group by the end of that day to be eligible for the lovely giveaway prizes. By finished, we mean basted, quilted (whatever way you prefer) and bound.

Don't forget to pop over to our QAL sponsors Sew Fresh Fabrics if you need fabric! Remember to enter FAIRYLANE in the Notes to Seller upon checkout to get your free domestic/ half off International Shipping on orders totaling $35.00 or more. They will refund the shipping via paypal upon shipment.

Any finally, a quick reminder to join the Flickr group where people are already posting up their fabric choices.

Any questions? Let me know!