Showing posts with label modern quilting. Show all posts

Sunday, February 5, 2012

Modern Quilt Guild of Ireland: Launching!

After a lot of discussion in the last few months, myself and Cindy have launched the Modern Quilt Guild of Ireland!

Modern Quilt Guild of Ireland

You can't imagine how excited I am about this! Since I started quilting last January, having a modern quilt guild in Ireland is something I aspired to and thought about. While there are 2 very active organisations already in existence - the Irish Patchwork Society, and the Quilter's Guild of Ireland (of which I am a member) - I absolutely loved the thought of a community of quilters dedicated to the modern aesthetic and interested in having some fun with it.

We have set up a dedicated blog, a Flickr group and Facebook page, and I would just love if you came over and joined us. If you are based in Ireland and you are interested in modern quilting, please come and take part. We have an introductory post here with a registration form and information about modern quilting here, if you are not sure what we are talking about!

One of the things I love most about modern quilting is how it is accessible to both the experienced or the novice quilter. I also love the bold use of colour, modern fabrics, the clean lines, the simplicity. I love how you can make a stunning quilt from lots of negative space, with a few pops of colour. I love how it draws on traditional patchwork, but modifies and interprets it for a modern look. I love how it throws the rules out the window for one quilt, and yet draws on and embellishes those rules for another.

So you might have guessed by now...I just love modern quilting! Do you love it too? Want to have some fun? Want to try and set up local meetings with like-minded folk? Please, please, join us!

Friday, November 4, 2011

Am I allowed mention the "C" word?

You know...Christmas? Well, what else did you think I meant :-))

Block 2


So, I've been pondering my table runner for Susan's Modern Christmas Table Runner swap. This runner was probably the worst hit of all my projects when my sewing mojo deserted me a few weeks ago. Inspiration was not coming to me and I was starting to really freak out about the fast approaching swap date. I did some sketches a few weeks ago but discarded them. Then I did a few random wonky Christmas tree blocks. I liked them individually but they just weren't singing for me.

Block 1

This afternoon, in a stormer of a bad mood, I pulled out my fabrics and started cutting triangles. Aggressively. Lol! It made me feel much better. Then I did a bit of sewing. Then I realised it was pretty close to the very first sketch I did. Doh! All that angst for nothing.

Minimalist trees progress

I did have a little freak out trying to get my trees to all sit in a straight line. It involved some swearing and a lot of seam ripping. Or maybe, I should reverse those. A bit of seam ripping and a LOT of swearing :-))) I made sure to send the kids out of the room so they thankfully missed the worst of it. But eventually it all worked. And I smiled. To everyone's relief!!

Then, after putting the kids to bed, and never one to pass up some sewing when inspiration finally strikes,  I decided to do a skiny scrappy border. Its a little wobbly but I'll sort that out with the quilting. And now, as if my magic, the quilt top is done. And I think it looks really nice.

Minimalist Christmas Trees top finished


It appeals to the modernist in me. I love the clean lines, the simple shapes. Love the border and how it pulls it together. Love that it is Christmassy without being twee. So, now I'm happy. The question is, what does my partner think? I hope she likes it. If she doesn't, well, I have already tried it out on my coffee table and it will work perfectly there. So, now, having got that all off my chest I'm off to enjoy a little bedtime glass of red wine.

Sunday, May 29, 2011

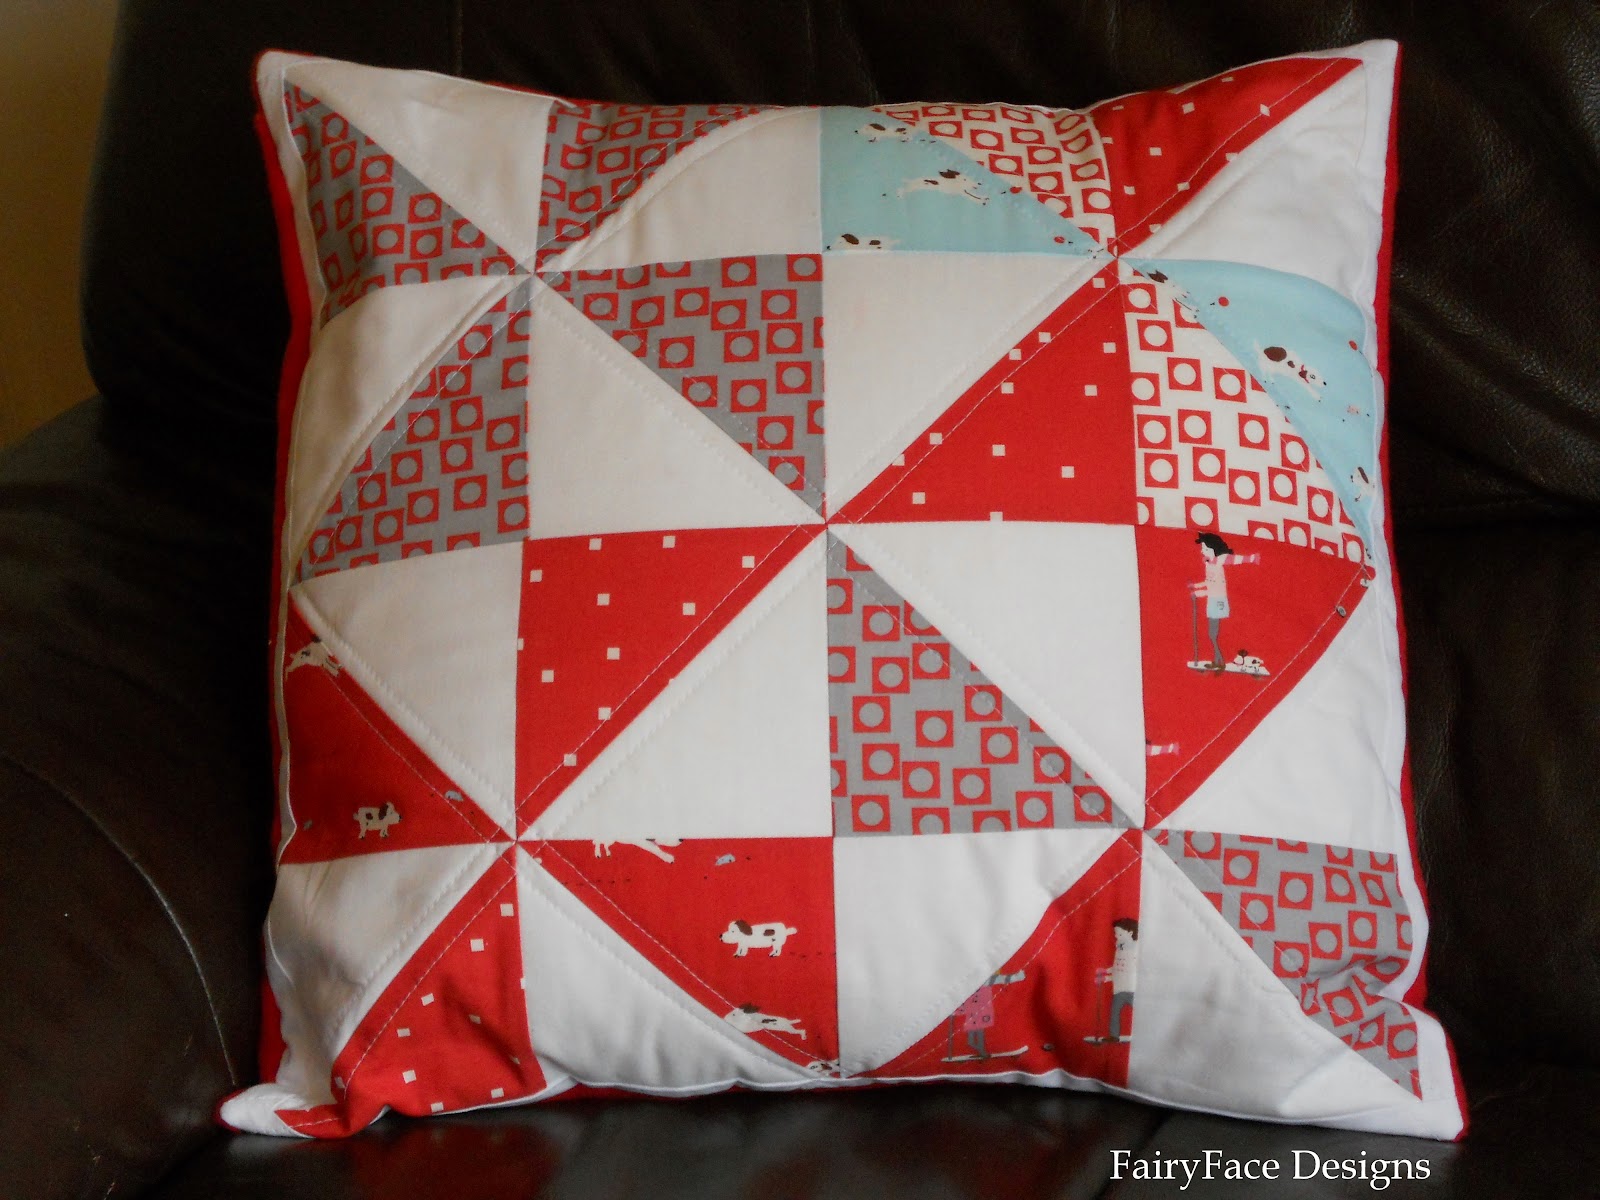
Pinwheel Pips Quilt finish


Another quilt done - that's 5 this year so far, not including the minis. Pretty good going for me, I'm really happy with that! So, without out further ado, here it is, Pinwheel Pips!


This quilt was made for my 3 year old daughter E. She loves dogs, scooters and swings, so the Sherbet Pips fabric was a perfect choice for her. She has asked every single day for a month if it was finished yet, so I was really pleased to hand it over to her today. It makes a perfect cape for Super Lady, her current favourite imaginary persona.....


I have mixed feelings about this quilt really. I enjoyed piecing it and I think my accuracy in cutting and piecing has improved hugely since earlier this year, and it shows here. When I was sewing together my rows of pinwheels, the vast majority of them matched up perfectly!


There are a few that didn't, they don't worry me too much, and one that was completely off that I had to unpick 6 or 7 times to get it remotely close. But overall I am happy with the piecing. My job is so stressful that I like not to stress about quilting, and everything lining up perfectly and tend to go with the flow once it looks ok, I know some quilters would hate this approach but it works for me!


I also did my first attempt at a pieced back - a very simple one. I used one leftover block, put some borders on it and pieced it in the centre of the backing. I did an ok job of matching it up, one side is perfect, the other is slightly off but the quilting through it looks ok, so I'm happy with that.


I quilted it on the diagonal lines, 3/8" on either side of them to give a double line. I found the quilting harder than I anticipated -I'm not sure if the seams were stretching a little, being on the bias (or is that my imagination, I would have thought they wouldn't move once the quilt top was sewn together) and even though I basted it with pins a little closer together than normal, it seemed to move around a little on me and I have a few puckers. It was hard to keep the lines dead straight at some of the intersections because of the bulk of the seams meeting even though I had done a lot of work to make them lie flat. This is the first time I've quilted something this lightly and I think I really do prefer the more densely quilted look, although I like the squashiness of this.


I used a flat sheet for the backing, having seen other quilters do this and I'm kind of regretting it already. I bought a sheet on sale and I know it was cheap, and its polycotton, but I threw it in the wash last night and its bobbled already. Now, I use polycotton sheets quite a bit here when I can't get cotton, and I've never, ever, had a sheet bobble on me before, no matter how little I paid for it or how much it was used or washed. So I'm pretty annoyed and feel its taken the sheen off my quilt :-( I even, in a mad moment this morning, considered unpicking the binding and the quilting and requilting it. Hmm. I'm actually still considering that one. I just put so much work into the quilt top that I'm a bit disappointed that I'm not totally loving the end result.

I bound it with the remaining half yard of Its a Hoot eggs fabric, the gray colour compliments the colours in the quilt really well I think.


But, looking on the positives, E absolutely loves it and I have a cushion/pillow to match it for her so its a lovely set for her to snuggle in watching DVDs, or to drag around the playroom for her games.


Quilt Stats:

Name: Pinwheel Pips
Made For: my daugher E
Fabric: Sherbet Pips half layer cake (won in a giveaway thanks to Kristie at OCD) and 1 additional yard
Batting: Warm & White
Size: 51" x 51"
Quilting: Straight line quilting on the diagonal seams
Pattern:  Simple pinwheels & border

This is another one to mark off my Summer Sewing list!  Yay!


I'm linking this up to {Sew} Modern Monday, Fabric Tuesday  and some other great blogs - check out my sidebar for a full list of links ------>>

Friday, May 13, 2011

Walk In the Woods (It's a Hoot) Quilt Finish!


Here it is, my biggest quilt to date! If you're a regular reader, you'll already be familiar with the story of this quilt so feel free to skip the next little bit and enjoy the photos! If you're visiting my blog for the first time from the Blogger's Quilt Festival (or elsewhere!), welcome and I hope you pop back to visit often! Here's a little info about it.


This quilt is made for my goddaugher's First Communion. F is the eldest daughter of my oldest, childhood friend and I wanted to make something special for her to mark the occasion. I wanted something fresh and pretty, but not too pink and girlie, as I wanted it to be something that she would be happy to bring with her and use as she grew up. I spent some time browsing through fabric before deciding to use Moda's It's A Hoot - which is whimsical, colourful, full of lovely prints and quite girlie in an understated kind of way.

I drew up my own pattern for this quilt and it is made using two simple block types. One is a simple four-patch with a border, the other is a larger charm framed with a double border. The prints were so lovely they were crying out for fussy cutting techniques wherever possible and I think I managed to make the best use of the layer cake for the various squares.


I used white sashing to make the squares pop, and an additional skinny sashing block made from the scraps left over from cutting the frame borders around the outside edge. I'm pretty happy with how it turned out.

This is my 4th quilt ever and (I think!) my favourite so far! It's the first time I've made a quilt entirely from one line/range of fabric. Normally I mix and match elements I like from different lines, and I found it a little strange (and maybe a teeny bit limiting!!) to work totally within one line. It makes for a lovely quilt although I did miss the challenge (and those moments of utter satisfaction when something just works) of putting together my own coordinates more than I thought I would.


I used free motion quilting for the first time on a quilt for this one. Its not perfect by any means, but I'm very happy overall with it, even if it was a little challenging! I love the crinkly texture from the quilting :-) Because it was a special quilt I used backing from the same line - the Owls in raspberry


I went with the Marshmallow dots for the binding. I think I'm in love with the binding actually! The dots are much more striking than I thought they would be. And happily, I have a half yard left so I'll be saving that for binding for another quilt.


In summary -

Name: Walk in the Woods quilt
Fabric: Moda - It's a Hoot by Momo layer cake + yardage for sashing & backing/binding,
Batting: Warm & White
Quilting: First time free motion meandering
Measures: 69" x 56 "
Pattern: My own!


I'm linking this quilt up to the Blogger's Quilt Festival over at Amy's Creative Side. As this was a huge project for me, you might also see it linked up on a pile of other great blogs ;-) including {Sew} Modern Monday, Fabric Tuesday, Sew Cute Tuesday and more- check out my sidebar for these links! If you'd like to see other quilts I've made, check out the tab link at the top of the page "Quilt Finishes 2011".

Amy's Creative Side | Bloggers' Quilt Festival


Saturday, May 7, 2011

10 things I "learned" about Free Motion Quilting today!


Today, I started quilting my Walk in the Woods quilt. It's the first time I've done free motiong quilting (FMQ) on a bed sized quilt. I learned a few things!

1. You need to get a flow going to get the meandering motion you want. This is not aided by small children's constant demands for juice, milk, water, chocolate, croissants, pins, needles, bread rolls, "arts and craps" sets, painting, scisssors, crayons, measuring tapes to use as skipping ropes, assistance with jigsaw making, help with toileting, more painting, more juice, crackers, biscuits (the European types!), lunch (at 10am), new toys....hmm, I think I've covered at least half of it there.

2. When you finally do get a flow going, your thread breaks. You get it going again and the bobbin runs out. This repeats itself for a while.

3. When you get it going again after point 2, your almost-5-year old demands help setting up a Wii game. You then get distracted playing silly skiing games on the balance board. Your flow is now shot to pieces.

4. You read all the instructions & tutorials about how to do FMQ but you really hate those bicycle clips for keeping the quilt rolled up and abandon them, leaving you to wrestle your quilt around the machine and the kitchen table.

5. You detach your quilting extension table after approximately 15 minutes because its driving you insane. It's so useful for straight line quilting, you can't believe how much it interfers with FMQ.

6. It takes a long time to get used to moving the quilt around when you are used to letting the machine pull it through for straight line quilting.


7. You discover you are incapable of working in rows and end up just going with the flow, meaning when you finish you reckon there's about 1/3 done but its so haphazard its hard to tell.

8. Your stitch length is all over the place. Now, you know the 8 year old recipient of the quilt will not notice but you do!!

9. When you finally, eventually start to make real progress you look at the clock and realise its 2pm, everyone is still in their pyjamas and no one has had lunch yet.

10. But, when you pack away your stuff, you realise how fast the FMQ was and how nice it is looking despite lots of mistakes. You are happy!!!


Wednesday, April 13, 2011

WIP Wednesday #9


I can't believe we're at Wednesday again already! It seems like about 5 minutes since I was writing last week's WIP report. This week has been a dramatic improvement on last week (it wouldn't be hard!) and I'm feeling much more energised. Maybe the prospect of being on annual leave from work from Friday afternoon for 10 days is helping :-)

Completed this week:


I had one finish this week, my Floating Away mini quilt . I love this little one and it seems, from all the comment love in the last few days, that you all did too! Thanks so much for your lovely comments, I'm so inspired by them all and it gave me such a boost after a really exhausting few weeks to get such a great reaction to a truly improvised piece. I have now hung it on the wall over the staircase and even Himself approves!

Work in Progress:

My It's A Hoot quilt. I have all 20 blocks done now, some of them are a little off but I will be able to fix up any little errors when I join the sashing between the blocks. I constructed a makeshift design wall on my kitchen wall this evening with an old flannel cot sheet to lay it out and after playing with lots and lots of combinations of the blocks, this is what I think I'm going with:


I'm sorry the picture quality is rubbish, the only space I had to do this layout is under some spotlights and I had to use the flash to get any kind of focus (and it's still not good) - but still, it gives the idea of the layout. What do you think? I found it a bit tricky getting the colour balance right, this is the closest I've come. I'd love any feedback you might have!

I've been thinking about what colour to use for the sashing between blocks. I was tempted to use an Ash gray type colour, but I've finally decided to stick with white, I'm not sure how it would work in the gray and I'm not sure that my 8 year old goddaughter would like it! I might use up some of the scraps left over to do a little detail in the border, I need to measure it to see if I'll fit it in. And I need to order the backing fabric for it, and fabric for binding. I think I'll use one of the brown or gray dot fabrics for the binding, but still need to decide on the backing.

My Lily's Quilts QAL dresden block:


I was planning on piecing the inner and outer circles for this on Friday night as I've signed up for Friday Night Sew In over at Handmade by Heidi. But I now think that I'm not going to be able to do this as my mum and dad are visiting for the weekend. Hopefully I might do Friday night sew in on Sunday night instead!

Other Stuff:

I have a few projects hanging around waiting for some time - the Cosmo bag, the curtains, a 2nd matching mug rug for one I did a few weeks ago. I also have a few projects I need to get started. I'm hoping next week when I'm off work, I'll get some quality sewing time in to catch up :-)
And finally....my Sherbet Pips giveaway fabric arrived - over half a layer cake of it and its GORGEOUS!! Thanks so much to Kristie over at Obsessive Crafting Disorder. I'm thinking of using some of it to make this quilt in the hope that one of my pregnant friends will have a baby girl!

So, for this week, that's all folks! I'm linking up as always to WIP Wednesday over at Freshly Pieced.

Thursday, March 10, 2011

PictureBox Quilt pattern/tutorial


This isn't a tutorial in the strict sense of the word, but, finally, here is the pattern for my PictureBox quilt. I hope you enjoy making it! If you do, please link up to my new Flickr group for projects made from my tutorials/patterns. I'd love to see them!!!


A couple of small things:
- Please link up to follow me on the sidebar if you make a quilt from this pattern :-) I'd be so thrilled if you did.
- Also, as with most tutes and patterns, it's intended for your own personal use or for gifts but is not for commercial use. Please do not sell quilts made from this pattern.


Ok, so here goes. Please read pattern fully before starting! If you have any questions on any aspects of it, or it doesn't make sense, feel free to ask me any questions via the comments or by email fairyfacedesigns@gmail.com I will answer any questions on the pattern in the comments section rather than back to you via email so that everyone can see the answers.This is the first quilt pattern I've written so please bear with me! And my apologies that I don't have better photos of various stages, I hadn't anticipated doing it as a pattern when I started making it. I also want to say a huge thanks to my friend Fi over at Patchwork Delights who did a sense check on it for me and had some great advice!


The finished quilt measures approx 60" long x 53" wide, slightly wider than cot bed size but not full twin bed size. It is a perfect size for using on a baby's cot bed and then layering over other covers when he/she moves to a twin bed.


Fabric Requirements:
  • 3 Fat Quarters of large scale prints for the feature panels
  • Fabric scraps for outside "frames" - variety of colours, shades & prints.
  • Assortment of fat quarters & large scraps for the small squares - you will need approx 5 FQs or equivalent.
  • 1 FQ small scale print/solid colour for framing feature panel
  • Approx 1 yd white cotton for sashing ( I used Kona Ivory)
  • 1/2 yard solid colour fabric for binding (I used a soft mid-blue shade)
  • Backing fabric
  • Cotton Batting - I used Warm & White cut off the roll, it was 60" x 64"
  • Cotton thread for piecing and quilting. I used Gutterman cotton thread, colour 5709 (white)
  • Rotary cutter, cutting mat and quilting ruler


Cutting List:


  • From each of the feature fabrics cut a large panel measuring 16" x 10.5". (UPDATED MEASUREMENT) Decide on where best on the FQ to cut to get the best focus for your panel.


  • From the FQ of small scale print/solid for framing cut 6 1.5" x 18" strips and 6 1.5" x 10.5" strips.


  • From the smaller scraps cut the following, varying fabrics, shades, colours and prints:
          18 pieces - 4.5" x 3.5" (A)
          18 pieces - 3.5" x 3.5" (B)
          12 pieces - 2.5" x 3.5" (C)
            6 pieces - 5.5" x 3.5" (D)
            6 pieces - 6" x 3.5" (E)

  • From the FQs/large scraps cut 36 5.5" squares (F) and 12 3.5" x 5.5" rectangles (G).
  • For the sashing, cut 8 strips 2" x 27.5" (H) , 6 strips 2.5" x 18.5" (I) and 12 strips 2" x 18.5" (J)

Layout and Piecing Instructions:

Use 1/4 inch seams throughout.

1."Frame" the 3 large feature panels as follows:
Attach the small print strips to each side of the large panels by placing right sides together and sewing with a quarter inch seam. Press seams open (or to one side if you prefer). Now take top and bottom strips and sew to the panel & side border piece and press seams open.


2. Decide on the layout of the large panels from top to bottom. Once you have decided how to order them start arranging your small scrap pieces to form the 2nd layer of border frame for each panel.


Each side border should consist of following pieces: [1 x A, 2 x B, 1 x C] and each top/bottom border should consist of following pieces: [2 x A, 1 x B, 1 x C, 1 x D, 1 x E].


How you lay out the scraps for the borders is up to you; I suggest that you move around the composition on each line so that each line does not have exactly the same layout, otherwise it may lack in movement. Consider light and dark shades, colours, pattern etc. and how the bottom and top borders interact with the border on the panel above/below them.


3. Layout the side columns using pieces F & G alongside the large framed panels, leaving gaps where your white sashing will be. Each panel should have 2 pieced columns on either side. Each pieced colum consists of 3 x F and 1x G. I alternated the order/layout in each one, the top and bottom piece in each column should be a square, but I alternated the layout of the 2 middle pieces in each column.


4. Move the fabric around and tweak the layout until you're happy! I find it very useful to take some pics of the layout on my phone/camera and look at them during the process, it gives me a good "big picture" perspective of how pieces interact with each other. I don't follow any particular "rules" (I don't even know if there are any!), I tend to trust my eye in relation to colour and layout.


5. Assemble the pieces ready for sewing in an order that makes sense to you and that you will find it easy to sew with. I ususally pin groups of fabrics for each strip from either top to bottom or left to right and stick a post-it on top of each "pile" numbering them. Taking a picture before starting this process may help you later if any parts get mixed up.


Start piecing! Remember to iron all pieces beforehand and press seams open/to the side after sewing each set of seams. I use a quarter inch foot to get an accurate quarter inch seam.


6. Start with the big panel scrap borders and sew your border strips together. Start with the side borders, piecing the scraps together in a line until done following the layout you decided on. Sew to the sides of the feature panel right sides together. Do the same with the top and bottom borders until your large panel blocks are finished. Set aside for the moment.


7. Piece each of the side columns. Set aside.


9. Sew sashing pieces I to either side of each feature panel block.


10. Sew sashing pieces J to each side of each of the outside columns. Then join the "inside" sashing piece to the outer side of the inner column to make a large column block.


11. Now join each of the large column blocks to the feature panel block sashing, matching up the correct sides.


This leaves you with 3 large horizontally laid out blocks running the width of the quilt top.


12. Take the 8 sashing pieces H and divide into pairs. These will form the horizontal sashing. Join each pair along one of the short edges using a half inch seam.


13. Take the first long sashing strip and sew to the top edge of the top horizontal block, placing the seam in the middle of the block. Do same with next 2 horizontal blocks, and sew final sashing strip to lower edge of bottom horizontal block.


14. Sew middle block to top block along top edge of sashing & bottom edge of pieced block. Follow suit with lower & middle blocks.


15. Trim any excess sashing fabric from edges. Your quilt top is now finished! You will need to press all seams very carefully and trim any stray threads from the raw edges on the wrong side so that they don't show through your white sashing fabric when you start to quilt.


Backing & Basting:


Piece your backing fabric, if you desire. Once it is ready, lay out on a clean floor and, using masking tape, tape to the floor around all the edges, pulling fabric taut but not stretching it. Next, lay your batting down over this and smooth out the surface to lie completely flat. Your batting and backing should be at least 2” wider than your quilt top on all sides. Finally, lay your pressed quilt on top of the batting and take great care to ensure that it is smoothed out.  You will need to crawl around the quilt to get this right, but it’s worth taking the time. You will then need to baste the quilt using your preferred method. I used curved safety pins for quilting; they are much easier to work with than regular straight ones. I start at the middle of the quilt and work outward in a circular fashion, smoothing out any last wrinkles etc as I go. I pin approx every 4-6 inches. Once you are done, remove the masking tape carefully and check that the back has remained smooth and wrinkle free. It is now ready to be quilted!

Quilting:


I quilted the PictureBox with wonky straight lines, but I think it would also look great free motion quilted. It would also look good quilted in wider straight lines.

If you want to do the wonky straight lines, I started by marking a line down the centre of the quilt using a quilt marking tool, or you could use masking tape as a guide. Use your walking foot to ensure even feed of fabric (mine is integrated in my Pfaff machine and works with most of my presser feet). I quilted down the centre line and then used the outside of the widest presser foot I had as a guide for the remaining lines, working out from the centre, and working up and down the quilt in alternate lines. I varied the width of the lines, moving the needle position to get maximum width and allowed the presser foot to vary the line and wobble in and out in places to give the wonky effect. If you're doing this, use the straight seams to ensure you're not going totally "off track" and even things up a little; wonky is good, completely crooked and out of line just looks shoddy. If you want to free motion quilt, you will need to attach the correct foot and lower your feed dogs.

When you are finished quilting, use your rotary cutter and quilting ruler to trim the excess backing and batting from your quilt, and check your lines are straight.


Binding:


If you need detailed binding instructions check out these great, detailed tutorials: Oh, Fransson! or Jaybird Quilts

I use straight grain, double fold binding, but use whatever you prefer. This is how I do mine:

Measure around your quilt to get your total binding length needed and add on at least 10 inches for corners and to give you some spare. Cut enough strips from your binding fabrics to give you the total length, making provision for your seam allowances at the joins – 2.5” is a good width for binding, but you might want to go narrower or wider depending on your taste. Attach the strips to each other, right sides together using a quarter inch seam. I usually use a smaller stitch length here to strengthen the seam. Then fold the long strip in half, wrong side together, and iron the fold the whole length of the binding strip to give a nice sharp crease.

Return to your quilt, pin to your quilt top matching raw edges, making provision for mitred corners and join the ends carefully. Machine sew to the quilt using quarter inch seam. Fold over the binding and sew to back of quilt in whichever method you prefer. I love the look of a machine stitched binding but I know most people prefer it handstitched. Trim any stray threads.

The quilt is now done! Throw it in the washing machine, let it dry and enjoy its lovely crinkly texture. 

Sunday, February 27, 2011

PictureBox quilt!


The PictureBox quilt is finished! (*Jumps up and down with excitement*)

I'm really so thrilled with how this quilt turned out. The 3 people who've seen it in "real life" thought it was lovely too so that eased the nerves a little about it!

This quilt is all out of my own head. Its inspiration came from the idea of an I Spy quilt but I had some fabrics with large prints which I wanted to use for it and I jumped from there to the idea of framed pictures - my son has some jungle prints framed on his wall which were part of the inspiration.


As I've said in a previous post, the panels on either side of the centre were inspired by those long photo frames holding 3-4 pictures vertically.


This quilt is made for a baby boy and is part of a two quilt set - the other being for his sister. I quilted the Sophie's Dreams quilt with wonky straight lines and after a LOT of thought I decided to stick with that approach for this one too. I threw around a number of other quilting techniques in my head - it wasn't an easy decision - but I wanted to keep some consistency between the quilts as they're quite different design wise. Plus, I do love the effect of the wonky straight lines, they give a lovely texture to the quilt.


The foundation of the design is 3 large fabric panels. Each one measures approx 10" x 15" and is framed with a 1 inch strip of a calm blue/green print, and then 3" wide strips of fabric in varying prints and colours. I tried to keep the scrappy border prints to geometrical type designs, rather than featuring more animals although I made a couple of exceptions to bring in some prints from the sister quilt.


The 3 main panels are (from top to bottom) Lesley Grainger's Wild Friends - Jungle Animals, Riley Blake's Hooty Hoot - Kangaroo and Ann Kelle's Urban Zoologie Owls. Like the Sophie's Dreams quilt, this quilt is made to be midway between cot bed and twin bed size so that it can be used straight away on baby's cot, and then layered up over other covers on his bed when he gets older, or used as a throw. The quilt sits nicely on a twin bed:


I decided that a solid colour binding would work best on this quilt as there's so much going on in the quilt. I went for a lovely soft blue cotton and it frames the quilt really nicely.


The backing is a white with a blue polka dot and is a single piece of fabric. The little boy's full name is appliqued in the centre of the quilt using some of the navy fabric used in the quilt and raw edge applique.


All in all, I'm really happy with it. The white space created by the sashing makes the design pattern stand out and there's lots of interest there for any little boy - jungle animals, elephants, owls, whales, kangaroos, koalas and more, along with some cars and lots of colour and texture too! 


I was pretty pleased when I put the two quilts together this morning, side by side. I made a conscious effort to try and use some of the same fabrics in the quilts in order to link them, as well as making them the same size and using the same straight line quilting. This is the Sophie's Dreams quilt - you can see the continuity of fabrics and quilting:


Here they are, jumbled together and you can see they work well together:


I brought them outside and draped them across a couple of chairs in the garden, I really like the effect:


Now all I need to do is wash and dry the PictureBox one to give it that lovely crinkly effect!


I'll be linking this up to


- also - Sew Modern Monday, Fabric Tuesday on QuiltStory and some other great sites - have a look at my sidebar buttons to see more!

I'm happy to share the measurements/pattern for this quilt if anyone is interested (I think some of you were when I posted the pic of the quilt top earlier this month). I don't have enough pics to do a full tutorial but just let me know in a comment or drop me an email and I can write up and post the pattern in a couple of week's time.