Wednesday, August 10, 2011

Fabric love..

After yesterday's craft fail, my spirits were lifted by waking up to all the fab comments you left me - thanks so much everyone, you had great ideas and advice and there were so many possible solutions that I'm going to mull it over before deciding which to go with and keep for myself. I'll try version 2 later on in the week!

Then the postman came and they lifted even further when I opened my package to find my Kona solids for the For the Love of Solids swap. I wanted a range of blues and some orange for contrast (plus some greys). I ordered these from River Fabrics which is based in Co. Down, not too far away from me at all, and I'll definitely be going back to Janette for more fabric, her customer service was fab! I asked her for help choosing some blues because of how hard it can be to tell the minute shade variations on screen, told her I was looking for a cascade of shades and she came up trumps with this combo - isn't it fab? I think the oranges look great with the blues.


But I also ordered some pomegranate on a whim and I think it also looks great with the blues!


We'll see what my partner decides!!


Link
I then went and pulled these lovely Just Wing It FQs from my stash. Yum yum!!! Want to see what I'm thinking of them for? Check back Monday!!


Tuesday, August 9, 2011

Craft Fail: When at first you don't succeed.....

Listen to your body and your tired little mind and STOP!!

I kinda wish I had read that sentence a few hours ago to be honest. Let's just call this a cautionary tale in which a viable idea got destroyed because I couldn't just leave the sewing alone and go sit on the sofa!! Want to see my craft fail?

Well, it starts with this pretty little layout for my scrappy mug rug swap. Perfect little hexies thanks to the Go! Baby.


I'm pretty sure my partner likes this whole vibe, so decided to get sewing up the hexies last night. I machine pieced them, but didn't feel I did a great job - some of the seams are a little bulky and because I found turning on the corners a little tricky, I think some of my hexie shapes are not as perfect as I would like...eeek. That's without even mentioning the number of times I had to rip back the hexies.... I debated just starting over, but I hate giving up on a project.


I decided that the quilting might even out some of those problems so decided to press on tonight with the backing. See this nice, simple little backing?


Looks very straightforward, right? You would think so...but no. This was the 3rd attempt at making a backing on this tiny little mug rug. My brain was so tired after a rotten day at work that I couldn't figure out my measurements on the first. And the second. Then I messed up the cutting. I really should have thrown in the towel at that stage. But remeber that sentence back up there - you know, hating giving up on a project, you see, I just couldn't let it go. So I got this done at last and was happy with it...and got a rush of blood to the head, deciding (foolishly) to keep going.

I FMQ'd it (obviously, without pinning because it was so small, and you know, things were going so well for me at that stage ...) and I knew when I turned it over it wasn't good. So I decided to trim...to make it look better... and fell foul of the classic cutting-your-kids-hair trap (you've never done that? really? ) trimming off little bit after little bit to even it up and realising too late that I'd gone too far. Except here, there is no hairdressing equivalent of a quilter to fix my stupid mistake. The top hexie is too close to the edge for me to do a proper binding.......


And the back is crooked...but not crooked enough to make it look properly, intentionally wonky......


So its a bit fat fail for me... and back to the drawing board on the mug rug.

So, my wise friends, other than your virtual sympathy, could I have your opinions please. I have plenty of fabric to recut the hexies and start over. What do you think, will I give it another go? Should I handsew the hexies this time? Any other advice?

And is there anything I could do to retrieve this one? (Remember the whole never giving up business I mentioned? Lol!!) I do think its quite cute and if I could fix it a little bit I would happily keep and use myself despite its imperfections.

On another happier note....next Monday is my 1st year blogiversary and I have a really exciting project to announce that day!! It involves a good friend and lovely fabric and I hope you'll be as excited as I will be about it.... Plus I'll have a little follower giveaway later on in the week!

Monday, August 8, 2011

Fabric Covered Button Tutorial

I'm really thrilled to welcome Fiona to my blog today! Fi is a fellow Irish blogger, blogging over at Patchwork Delights and hers is one of the first blogs I started to follow last year. Better still, we have been lucky enough to actually meet up in real life, after discovering that she lives only 5 minutes from my mother!! We have a lot in common, sharing a love of patchwork, modern quilting, fabric....and both of us holding down busy jobs as well as looking after our family. So, I hope you enjoy her great tute... Fi kindly sent me some of her lovely buttons earlier this year and they are totally gorgeous.

Fabric Covered Button – A Tutorial by PatchworkDelights


First things first, I would like to thank Sarah for arranging this tutorial swap! Thanks Sarah x! You will find Sarah’s tutorial running concurrently on my blog here on making your own bunting, so why not go and check it out?

Fabric covered buttons are very straightforward to make and very little is required to make them. You can make small to very large buttons with plain backs or with wire backs (for sewing onto garments). You can make push pins, fridge magnets, bookmarks, the imagination is the limit!

Let’s get down to business shall we?

Getting started
Button covering kit. – you can get them in your local habedashery shop or online.
Fabric, scraps are perfect for this project.


What’s Next?


Well now you can start making buttons!

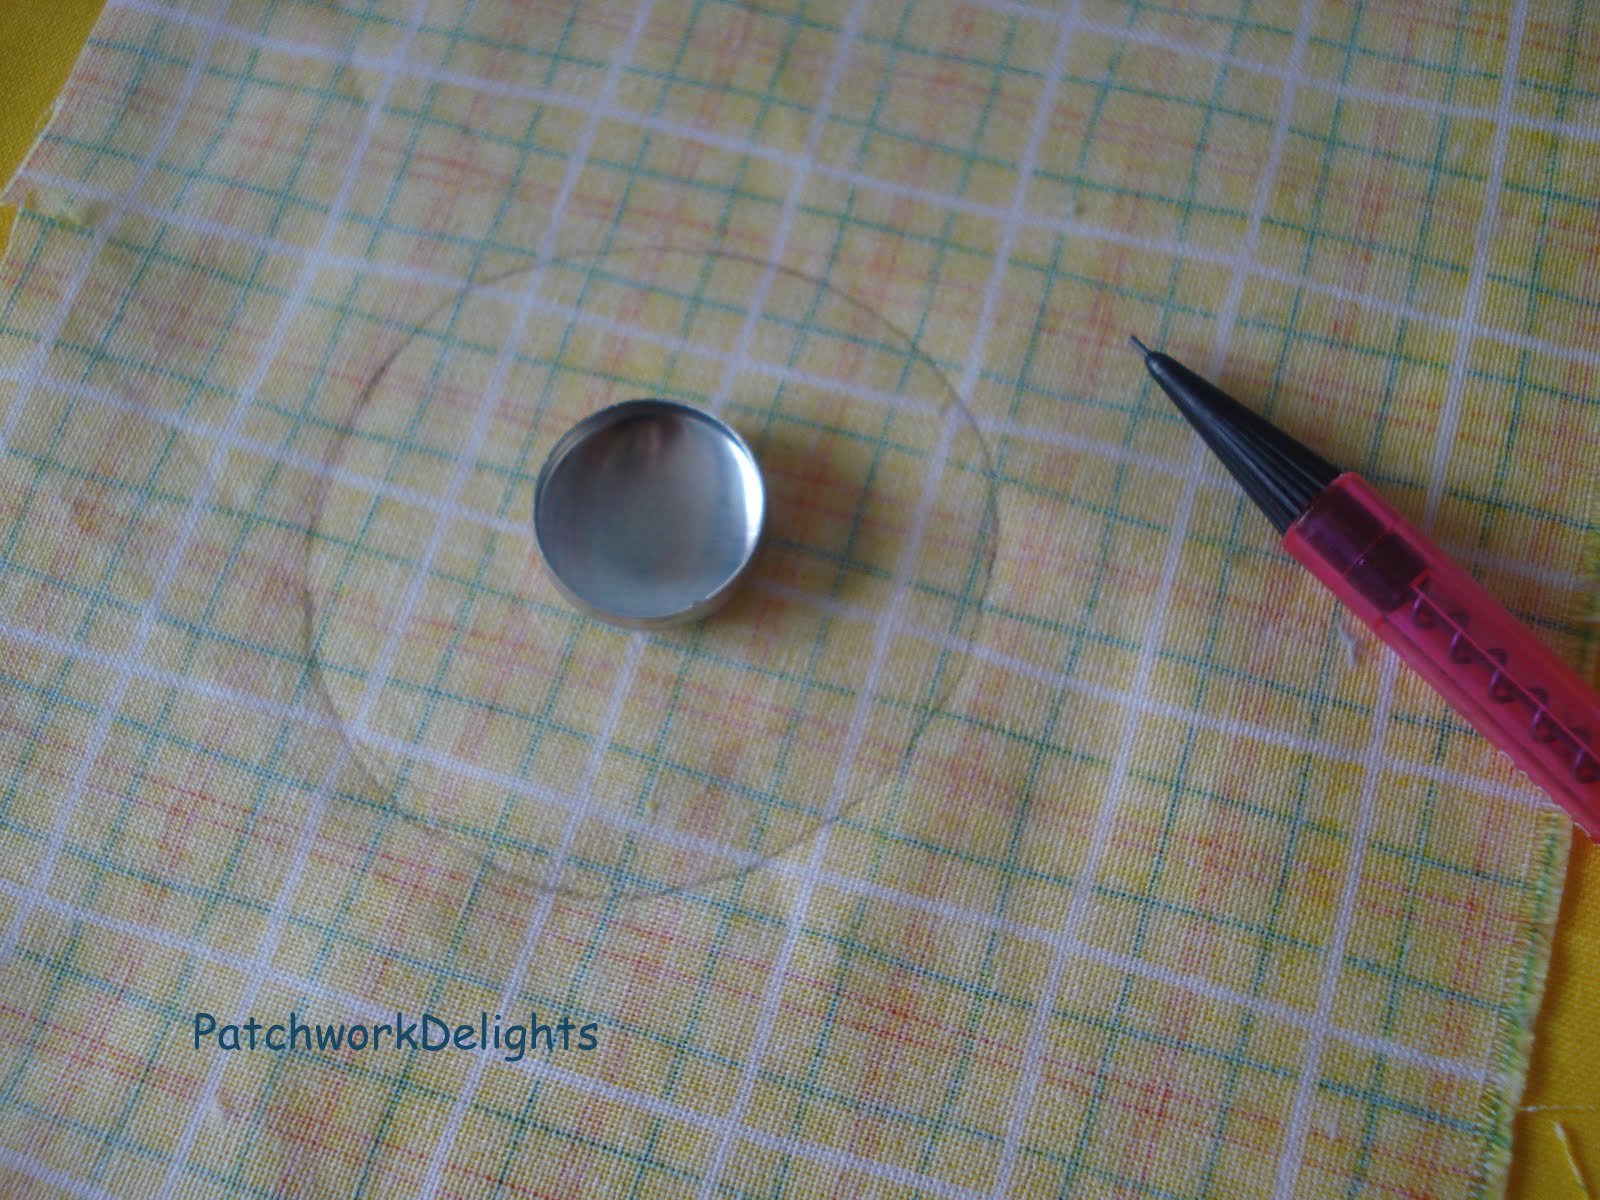
Get your scrap of fabric (now at this point when you buy a kit they include a measuring template type of thing, you can cut this out and perhaps put it on cardboard and use this to measure out your circle of fabric). I made my own for my larger buttons.

Get your fabric and cut out a circle.


Get the white part of your kit and place the circular piece of fabric (right side facing down) on top of the white thingy.

Then place the button top face down on top of the fabric. You will notice I trimmed mine slightly I was judging with my eye.


Push the button down into the fabric with your finger and of course this will push down into the white part of the tool kit.

This is the tiny bit fiddly part but nonetheless straightforward part. Tuck the fabric into the well of the button until it is all neatly tucked in.


Place the button back on top of this.


Get the blue little cap and place it on the button back and press firmly.


Now ideally you don’t want to pack in loads of fabric into this well but if you find the fabric is slightly on the thicker side then I sometimes use a hammer and with one tap get the button back in firmly and flatly, but this is only the odd time.

Now simply pop out your gorgeous button!


Finished!


My 8 yr old has made loads of my buttons so if he can do it..it’s so simple it’s child’s play and what’s more great fun!


You can choose animal prints, different toning colours, different sizes of buttons, you can embroider them or you can bead them!
I hope you try them, they are great fun and very simple to make!

Any questions don’t hesitate to contact me at patchworkdelights@gmail.com

Thanks again Sarah for arranging this tutorial swap!

Sunday, August 7, 2011

Skittles Quilt Top

In between the raindrops this morning I managed to get some pictures of my Skittles quilt top which I finished up this week. See that bit of clear sky? It was there for approximately 3 minutes and its gone again, the rain is back to pelting down :-( Seriously, its like November out there. Sorry this pic is so dark, its the best I could get. You'll get a better idea of the colours further down in the indoor pics!


It feels like I have been making this quilt top forever but in fact, its actually a very quick make. I just did bits and pieces of it here and there over a few months, but if you sat down to make it you'd have the top pieced in no time. I used Kate Conklin's pattern and it uses the "stack and slash" method which is very quick and lots of fun. It really suits a quilter like me who is looking for low stress quilting rather than needing to have pinpoint accuracy in blocks. It's also incredibly economic in terms of fabric usage - because of the way the blocks are constructed, you are Linkslashing across big blocks rather than cutting squares/rectangles etc from fat quarters, so there is really suprisingly little waste. So, if you like this kind of look, which I do, I would definitely recommend checking out this pattern. It includes a second pattern along similar lines and measurements for both lap and baby size.

The first stack of blocks I "slashed", I made my cuts quite evenly - but after that, I made them really randomly, going in the same and then different directions and I love the randomness and unevenness of how they work:


I used some of the purple and blue fabrics from the Central Park line and am totally delighted with how they worked together. The original pattern is in a purple colourway too which I think influenced my choices here, but as soon as I saw those trees and the big flowers in Central Park, I knew they were made for this :-)

Next decision is how to quilt this one. I could outline quilt the blocks and handquilt around each fabric slash as in the original pattern. But I've never handquilted before so I would be a bit nervous about it. And I would need to source some perle cotton somewhere. Or I could FMQ it which I'm leaning towards as I love the texture. One way or the other, I still have to piece a backing for this one before I can cross that bridge so I'll keep mulling it over - but let me know if you have an opinion, as always!

Linking up to:


{Sew} Modern Monday at Canoe Ridge Creations Fresh Poppy Design Sew Happy Geek

Saturday, August 6, 2011

Accuquilt Go! Baby Winner

Drumroll please........


The winner of the fabulous Go! Baby fabric cutter picked by the Random number generator is

Link
who is Fiona Roche. Congratulations Fiona, I have emailed you!

Thanks so much to everyone who took part, I couldn't possibly reply to all the comments you left, but I did read them. A huge welcome to my new followers, I hope you have a little look around my blog & join in the fun! Thanks also to AccuQuilt for sponsoring such a great giveaway :-)

I have lots of interesting projects in the pipeline which I think some of you will be really interested in. Not least the fact that my 1st "blogiversary" is coming up very, very soon...and you know what that means...... Plus a super, fun project that I think some of you will love!!!

Tuesday, August 2, 2011

AccuQuilt GO! Baby Giveaway!!!

********Giveaway now closed, winner will be announced Sunday morning.********


Love it? Want it? Need it? Here it is, the great AccuQuilt GO! Baby Giveaway. Are you ready???

The lovely people at Accuquilt have kindly offered a GO! Baby & 3 cutting dies for me to give away to one lucky winner. A really great prize :-) Get yourself over to AccuQuilt and start eyeing up the GO! Baby details and cutting dies in anticipation!

Ok, so, for the important stuff - there are 3 ways to enter, leave a separate comment for each one below:

1. Become a follower of my blog (through Google Friend Connect/in a Reader/by email subscription etc) or tell me if you already are - 1 entry.

2. Sign up for AccuQuilt's newsletter - and get 22 free patterns into the bargain! - then come back and tell me - 1 entry.

22 Free Patterns - Download Now

3. Blog/Facebook/Tweet this giveaway, then come back and tell me with the link - 1 entry.

This giveaway will be open until 6pm (Irish time) Saturday 6th August. I will draw the winner at random on Sunday. International entries are welcome!

The Small Print:

I am sorry but I cannot accept entries via email or as comments on my Facebook page - blog comments only will be counted on this one, I hope you understand! You must have an email address associated with your profile (read more here about "no-reply" bloggers) or leave your email address in your comment to be considered. If I cannot contact the winner, I will redraw.

Well.....what are you waiting for?? Get commenting!

Monday, August 1, 2011

Chunky ZigZag Pillow Tutorial

My Bliss pillow/cushion campaign continues this week with another pretty one to add to my sofa!

Here it is, in all its chunky zig-zaggy lovelieness:

I made this in super fast time using my Accuquilt GO! Baby to cut the pieces. When it arrived earlier in the week, I couldn't wait to try it out, having seen it and coveted it so much on blogs lately. And it didn't disappoint!

I got 3 dies - the Diamond, the Drunkards Path and the Hexagons - all shapes that can be a little bit tricky to cut accurately in the more traditional way and certainly very time consuming. I just loved how quickly I could turn out the pieces on the GO! Baby and had all the diamonds cut for this pillow in probably about 10 minutes, including trimming my scrap pieces for the die. I found it very efficient and the only issue I encountered was threads occasionally getting caught in the corners of the die, which a sharp pair of nail scissors beside me solved with a minimum of fuss! As someone who struggles with cutting the more "complex" shapes accurately, I am totally thrilled with the GO! Baby and can certainly see myself using it quite a bit. It's pretty compact too which is important for me as I have no dedicated sewing space and it needs to fit into my very limited shelving with the rest of my sewing things.

Want to make this pillow? Here's the super easy tutorial!


I used the 4 x 4" diamonds die for my GO! Baby which cuts 2 diamonds in each layer of fabric. You can do up to 6 layers at a time through it which makes for super fast cutting - 12 diamonds at a time in this case once I had my Bliss scraps prepped. I soon had lots and lots of lovely diamonds, precisely cut. See how perfect they look!


Next, I played around with the layout until I was happy with it - the fun part! I used a cream solid to contrast my zig zaggy Bliss rows. It's helpful to take a quick snap with your camera or phone so that you can refer back to it if you get pieces mixed up as you sew. Or if you have pre-school helpers standing by to "assist"!


Then, make a little stack of the diamond pieces for each vertical column in the order you have laid them out.


Take your 1st stack of diamond pieces and using a small square cutting ruler or measuring tape, and a water soluble pen or pencil, make a tiny mark 1/4" in from your top and bottom edges on the side edge.


Do this on all pieces. This will help you line up your seams correctly. You can, of course, eyeball it if you're confident in what you're doing but if you're a little challenged by spatial stuff like I am, its worth taking the minute required to mark each piece before you sew the column.


Sew your first 2 pieces right side together, matching up your dots and your edges. You will end up with little "dog ears" sticking out on either side.


Sew the remaining pieces in the right order and press your seams on the column to one side (all in the same direction).


Then sew the pieces for each remaining column together and press your seams so that they are going in alternating directions on each column to make sewing your column seams together easier.

Next, sew your columns together in pairs, and join the 3 paired columns to make your pillow top. I trimmed off the top and bottom to make quilting it a little easier.


I then grabbed a batting scrap and quilted the pillow top following the zig zags in the pattern. I quilted 1 line inside the seams for each of the colour zig zags, and then quilted lots of zig zag lines 3/8" apart in the cream solid, to make the colours pop even more.


Trim your pillow top and then sew on the back in whatever style you want - you could do an envelope back if you want to keep it simple. I put a zip in the bottom seam of this one. Put in your pillow form (mine was from a tired old ugly pillow in my playroom which I upcycled), place on your sofa and admire!! This pillow will join my other Bliss pillows and quilt on my living room sofa.


So, of course, you know what's coming up next by now......Keep your eyes peeled for the giveaway post coming soon!