So it's on to the last tutorial. For this tutorial, I am re-posting a tutorial I wrote for Karen earlier in the year but haven't published on my own blog. This finishes the {Sew} Get Started: Beginner Sewing Tutorials series.
For more information on previous tutorials, and links to each one, please click on the button to take you to the master page.
Today I have a quick and easy tute for you to help you bring a little handmade touch your interior decor. Have you ever made a hoop to hang on the wall? They are quick, easy and versatile - they can be as simple as stretching a favourite piece of fabric in the hoop or free embroidering a little picture or design. You can embellish them with buttons, beads, ric rac, ribbon etc - really, they are an endless source of entertainment!
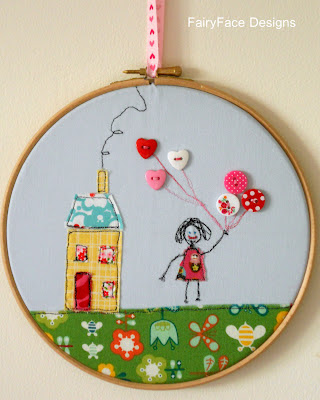
This tutorial however shows you how to make one using freestyle machine embroidery - a technique that is really useful and can be used to embellish all sorts of items. If you've never done freestyle embroidery on your machine before, you might want to do a test piece to practice before you try the real one, so you can get the hang of stitching freestyle. This hoop was made to replace a more babyish picture on my daughter's bedroom wall and so I put it together with her in mind.
Here's what you need for something similar:
1 embroidery hoop - size up to you!
Piece of solid fabric for background (I used a very light blue)
Fabric scraps
Ribbon
Buttons
Fabric glue
Small piece of fusible web (I used the stuff for repairing hems, it was perfect) and a piece of tear-away stabilizer (I used Vlieseline Stickvlies). If you have a fabric gluestick you could use instead of the fusible web.

To Make:
1. Decide what picture you want to make and how you will compose it. My daughter loves balloons so I decided to do a little picture of her outside a house with lots of balloons in her hand. If it is a complicated one, you might want to draw a sketch first - for this I didn't need to.
2. Press your fabric, then press the stablizer to the back of it (it will "stick" to your fabric but is not permanent)
3. Take your interior hoop and lay it on the fabric and trace around the outside edge to give you a guide. I used a Hera marking tool, you could use the blunt edge of a scisssors, a water soluble pen or a light coloured pencil.
4. Now take your fabric and scraps over to your ironing board, lay your fabric flat and cut and arrange your scraps as you want them. Be sure to include any embellishments you are using.
5. Once you are happy, cut tiny bits of the fusible web, place on the back of your fabric scraps and press with an iron to fix your scraps in place with it, I just put a dot in the centre of each piece, enough to stop it moving when I was sewing it. (If you are using a gluestick, this is where you use it to fix your pieces).
6. Mark where any buttons/beads will go with a pencil dot and then set them aside for the moment.
7. Put your free motion foot on your machine and drop your feed dogs. Technically you should adjust your stitch length to 0 - I don't find the stitch length makes much of a difference on my machine, but see what works for you. Using a black thread, sew around each of the scraps to outline each part. This is supposed to look a bit wonky and quirky so crooked lines etc are fine! (If you are doing a practice run first, you are trying to get your stitches reasonably consistent in length - as you can see above, mine are very tiny which is not perfect, but better than a very long stitch length which won't secure your fabric as thoroughly as you would like.) I added a spiral line of smoke to my chimney. I then used my machine to "draw" legs and arms, a head and some hair for my little girl figure. I changed thread to do the balloon strings. Remember to backstitch to secure your lines of stitching at the start and end each time. Leave a decent tail of thread each time you stop to make it easier to sew in your threads, it will look very messy before it is done! (I forgot to get a picture of this bit, but just imagine the picture above with lots of thread tails hanging out everywhere I stopped sewing!) Be careful to move them aside when you are sewing each bit so as not to get them caught up in the line you are stitching.
9. Sew in your buttons and any embellishments. I added eyes and a mouth to my girl's face using perle cotton. The mouth was a little bigger than I intended so just go slowly and carefully and check regularly to see when you are done.
10. Place your fabric over the interior hoop and then put the exterior hoop over and tighten closed. Make sure your fabric is stretched nice and taute, but not distorted. I left my stabilizer on the back of my fabric - you could tear away if you wanted, but it helps stop any threads at the back showing through a light coloured solid.
11. Trim around the hoop - enough that you can glue it to the inside of the hoop, but not have it wider than the hoop itself. Then trim the stablizer right back to the hoop to reduce the bulk, being careful not to cut your fabric.
12. Using fabric glue, carefully glue the raw edges to the inside of the hoop, you will get a bit messy doing this and might need to hold in place for a minute or two to get it to stick.
As I was making this for my own house and it would be hung on the wall, I didn't bother covering the threads at the back. However, if you were giving it as a gift and wanted the back to be nice and tidy, cut a piece of felt or fabric to fit inside the hoop and just covering the raw edges that you have stuck down and use a little glue to fix in place.
13. Add a ribbon tie and ta dah! Your hoop is done. Hang and admire :-)
As I said, you can do lots of different things with hoops - just to get you thinking and planning, here are a few more I made last year.
This was made with appliqued circles, and hand stitched with perle cotton:
And this very simple Christmas hoop was made with a few scraps of fabric and some hand stitching:
I hope you enjoyed this tutorial and if you make any hoops, please add to the Flickr group. Thanks once again for following my series of tutorials and happy sewing!


11 comments:
Cute hoops Sarah!
Your series was a complete triumph Sarah and I thank you for the opportunity you gave me to take part in it.
I adore the applique circle with perle... may have to try it myself :O) what size hoops do u use ?
Very cute, I can see the family resemblence ;o)
I really love these :-) Thank YOU missus for such a comprehensive, enjoyable series!! Thanks for letting me take part.
I'll just let 'others' make them for me!! xxx
Lovely, I liked so much!
kisses from Barcelona, Spain
Such a cute project! Can't believe it'll be the last in the series! =D
These are gorgeous - makes me want to do some. I'll add it to the list!!
I love these! X
Thank so my for the Sew Get Started series. I started sewing in January and it was that which got me inspired, I made the pin cushion, (then went off on all kinds of tangents!), but I've come back to your site as it is one of my favouries and passed on the link to the tutorials to lots of others. Thanks again. i am back this evening because I saw you mention a bag tutorial a few days ago.
Post a Comment