Sunday, September 18, 2011

More goodie swap sewing!


This week has not been good for sewing. I feel like I managed to get hardly anything done, a combination of work, kids and still feeling under the weather. Plus feeling quite lethargic about it all! But yesterday evening I decided I had had enough of feeling uninspired, sewing-wise, and knew that the only way to "cure" myself was to go and do a small, fun project. I've been mulling over my mug rug for Partner no 1 in the Goodie Swap for a few weeks now and after seeing Judith and Fi both turn Lee's great block tute into a mug rug, I decided that was the way to go. I really really love Lee's tute and this block is a strong contender for my month in Sew Bee Blissful. My partner's colour are a little different from the sort of palette I normally like but I just love how they go together.  I mixed in some solids as I had them in the right shades, and I used lots of fabrics in this one - Kate Spain (Fandango and Central Park) more Aviary II, Loulouthi and more! I felt it needed a neutral border so added on a strip of Kona Ash and think it finishes it off nicely although this is measuring up as a very,very big mug rug!! Oh well, I don't think my partner will mind.


After finishing binding it, I decided to break out my new Perle Cotton which I had in an Iris/purple variegated colourway and did a little hand quilting in the Ash border - a line of small stitches on the inside and longer stitches on the outside. I like the effect although I wish my stitches were more even!


So, partner no 1 is now done. I think and hope she will be pleased with her package when it arrives!

I moved on then to Partner No 2. Now, I feel I know partner no 2's taste reasonably well and she has been very active commenting in the Flickr group which is always a help. I I know exactly what I am doing for her mug rug although I won't get to it till later in the week. I've been mulling over her goodies and I know that she would probably like the needle case I made for partner no 1 too. But one of the things I love about this swap is the opportunity to do different things for different people and work with separate colour schemes. So I have been looking for an opportunity to use Ayumi's patchwork wristlet tutorial for a while and decided Partner 2 would like this.

I used Kona Ash to make my feature fabrics stand out more and I think it has a fresh clean look that I love! This is the back - don't you love those seahorses?


And this is part of the front - I'm afraid that one of the feature fabrics will just make it too obvious to my partner so I'm not showing the whole thing!

This is a really practical little pouch. It has a wrist strap (matching the interior lining) and would be perfect to hold a few small things if you don't want or need to bring your handbag out with you. Its lined with some Modern Meadow fabric, with a pocket made from Kona Ochre. The pocket is divided and easily holds some cards, notes and a lipstick. Plus your phone and keys would fit easily in there too.


So partner no 2 - I hope you like it! More on the way for you - I have another (little) goodie in mind for you as well as your mug rug. Keep watching :-)

PS. If you're looking for my Kona solid giveaway for 5 half metres of Kona cottons, pop over here to enter! It closes tomorrow evening so don't miss out!

Linking up to:

{Sew} Modern Monday at Canoe Ridge Creations

Thursday, September 15, 2011

Piecing your Back Cross Blocks : Across the Sea QAL


Hi everyone, we are moving on today to piece the small number of cross blocks for the quilt back. If you're looking for the Kona solids giveaway it's here. The cross blocks for the back are very straightforward so lets get working!

First grab your fabric for each block:


Take your Block 1 fabric and make up as per the cross blocks for the front of the quilt, and trim back to 12.5" square.


The fabric for Blocks 2 & 3 each contain 4 longer strips from the background fabric. For each block, set aside the longer strips and make up crosses as per the method for the first cross block, again using scant quarter inch seams. Block 2 will make up to 6.5" square, and Block 3 to 9.5" square. Once you have each of the inner blocks completed, add on your background sashing strips to bring the squares up to 13". Add the shorter strips to each side first and press your seams, before adding the final strips. (For people making the lap size quilt, you will need to make an extra Block 2)


 Each block should then be trimmed back to 12.5" square.

 
Last we need to make the bordered cross block. This block makes up to 12.5" square, not 13" so it is important to piece this accurately. Please make sure you use a scant quarter inch seam - this is really important, it comes out exactly right if you do. Also, on this block, your seams should all be pressed open.

Firstly, divide out your fabric pieces so you can see clearly what you have.


Start by sewing your cross arm pieces together. First sew your 4.5" x 1.5" background and border fabric pieces together along the long edge, then sew your cross arm piece to these:


Do this for all 4 cross arms. Next, piece two of your "arm blocks" to the central piece to give your central row.


So far, so good, right? Next are the corner blocks.

Start by chain piecing all the pieces as follows.

Take your set of 2.5" x 1.5" pieces (12 border fabric pieces, 12 background pieces) and piece 4 sets together, short ends together as on the left of the picture below. Then sew the other 8 sets together long sides together as on the right of the picture.


Then take the 1.5" square border pieces and piece each to one of the 3.5" x 1.5" background pieces, as in the picture below. (I swear, that seam is straight its just the way the fabric is lying underneath!!)


Press all your seams open, they layout your pieces to assemble your corner blocks as follows:


First, sew together the two central pieces as shown below:


Then, sew the top strip to the central piece, right sides together. It's important that your seams are matched here. I like to match the seams, then pin very close on either side. I leave the pins in when I'm sewing so it doesn't shift at all. 3 years of sewing over pins and I've only broken a needle once!


Now, sew the bottom strip on to the other side of the central piece and hey presto, you have a nice little corner block!! Repeat this for the other 3 corner blocks.


Iron all your seams open. You are now ready to assemble your block!

Sew together the corner blocks to the middle "cross arm" blocks on each of the top and bottom rows. Match your seams carefully when doing this. I normally don't pin much when I am piecing, but you do need to pin these seams carefully to make sure the fabric doesn't shift around.


Finally, sew all three rows together. Again make sure to match your seams and pin carefully before sewing. Take your time and make sure your seams are lying flat as you sew. Ta dah! Your bordered cross block is done. Isn't it cute? If you're making the lap size one, go make a second one now :-)


Have fun and I'll see you Monday when we'll assemble our rows to finish our quilt backing. Woohoo!!

If anything is not clear, please let me know in the comments or email me to fairyfacedesigns@gmail.com

Wednesday, September 14, 2011

Kona Solids Giveaway sponsored by River Fabrics!


Hot on the heels of me sending off my swap items in the For the Love of Solids swap, I'm really thrilled to announce that Janette from River Fabrics has kindly offered to sponsor a fantastic giveaway of Kona solids this week.

River Fabrics is a small business based in Co. Down in Northern Ireland which stocks simply fantastic fabrics, and, better still, Janette is a dream to order from. I've only recently come across her online shop, but am a convert :-) I really love that I can order such a great range of designer fabrics from a local business, a and that I don't have to wait for over a week for it to arrive to me here in the southern tip of Ireland - the orders that I have placed with Janette have all arrived within 2 days, which is amazingly fast from the North to here. For UK peeps, postage is as normal with a maximum postage rate of £2.95, but the big bonus for us Irish peeps is that for bigger orders Janette has a Irish carrier so the maximum postage we will pay no matter what size the order is £5.70. Pretty good, right?

If you haven't heard of River Fabrics before, you should pop over and check out here store. Janette stocks a great range of designer fabrics - like this gorgeous Aviary 2 fabric I picked up recently for my Goodie Swap partner.


I made this cute little needlecase and pincushion with it which I know she loves, even though she doesn't know its for her :-)


- or the wonderful LouLouthi fabrics which are amazingly popular right now. I just love this print! She sells yardage and precuts too.


Janette also has a super range of Kona solids. I just love these fabrics - I love the range of shades available (over 100!!) and the quality of the fabric too - you will find a shade to suit just about anything. I bought my Kona solids from Janette for my For the Love of Solids swap items. I wanted blues and greys and a pop of a different colour and I got a brilliant range of shades from River Fabrics. I've already been back to stock up on more greys :-) This swap introduced me to the possibilities of working solely with solids and made me think about colour in a different way. I made a mini quilt and a mug rug for my secret swap partner. My package is still in transit so I'll give you a sneaky preview of the mini quilt (come back later in the week for the full reveal, there's a crucial element missing in this pic!):


And this hand quilted mug rug also:
 

I really loved making these and the design challenges were so much fun. I'll definitely be doing more solid projects in future. If you haven't tried a solids only project before, I can only recommend that you try it! It will give you a different perspective on colour and design.

Ok, so here is the best bit. Janette is going to giveaway 5 (yes, 5!!) half metres of Kona Solids. You're interested, right? So here's how you enter, you have 4 chances to win. I would love if you followed me to enter if you don't already, and please leave your email address in your comment unless you are absolutely sure there is one attached to your profile.

1. Pop over and check out River Fabric's great selection of Kona colours and tell me in a comment which 5 you would choose if you win.
2. Like River Fabrics on Facebook
3. Sign up for River Fabrics newsletter
4. Blog/Facebook/Tweet this giveaway

Leave a separate comment for each entry.

The giveaway will run until Monday 19th September at 9pm Irish time. I will chose the winner using the Random number generator and announce on Tuesday next week.

The small print:
Entries only by blog comments. The winner's choice of fabric will be subject to availability. International entries welcome. Duplicate entries will be deleted by me!

Monday, September 12, 2011

Cutting your Backing Fabric : Across the Sea QAL


OK!!! We're moving on to the back of the quilt today! Exciting times. I hope by now you are totally in love with your quilt top and just can't wait to get started on the back.

This back is based on the concept of crosses arranged randomly to give a floating effect. It might look a little bit tricky for a beginner but I promise you its not! I've done all the Maths on it (for those of you who know me and are laughing at that statement, you will no doubt have already guessed that it took a whole weekend and my brain coming close to imploding, lol!) and will walk you through it. There is piecing, but it is in big, wide strips and should come together quite quickly. The only fiddly bit is the bordered cross block which is straightforward really, it just needs a little bit of extra care when piecing because the pieces are small. And its only 1 block (or two for the lap size) so its definitely worth the extra bit of work for that nice effect.

So, lets get started, will we?  Please read this post fully before starting to cut!!

Cutting Instructions:

For the large backing fabric strips cut as follows. All the strips are cut Width of Fabric (WOF), as the amount of fabric required for continuous strips would be very high. Also, I don't mind seams in my strips as they disappear once they are quilted. However, if you wish to have continuous strips, and have sufficient fabric, please follow Jennifer's directions for how to cut long continous strips. My instructions assume that your fabric is 43" wide (excluding selvedges). If it is less than this you will need to cut more strips.

Prepare your fabric for cutting. I strongly recommend reading this tutorial before starting. You might even want to cut a small test strip first to make sure your lines are straight. I used an extra wide fabric, so I needed to fold it twice. However, for standard width fabric, you only need fold it once. Line up your selvedges and your raw & folded edges against your lines on your cutting board.


Cut for a straight edge, then cut:

Baby size:
4 x 12.5" strips
3 x 9.5" strips

Lap size:
7 x 12.5" strips
3 x 9.5" strips


As my ruler is 6.5" wide, I use the cutting board measuring lines for my measurements. To get an accurate half inch cut, I line up the half inch line on my ruler with the relevant line on my cutting board. This gives me an accurate cut of the last half inch.


I know you all are aware of this but I feel I need to make sure you can hear your mother/grandmother/home economics teacher's advice ringing in your ears: Measure TWICE, cut once! These strips are so wide, its easy to make a mistake!!!!

Next we will cross cut the WOF strips to give our backing pieces.

Baby Size

Take 3 of your 12.5" WOF strips and carefully cut the selvedges off. Then measure and cross cut the first strip at 9.5". This should leave you with a 9.5" piece, and a 33.5" strip. (If your fabric is wider than 43", trim the longer piece to 33.5".) Repeat this twice more, which will leave you with 3 x 33.5" strips and 3 x 9.5" strips.


Take the last 12.5" WOF strip and lay flat. Cut off your selvedges. Measure 21.5" from your cut edge and cut giving you 2 x 21.5" strips.

Set aside these pieces. Next, take your 9.5" WOF strips and cut the selvedges off. Take one of the strips and cross cut 2 pieces 12" each. These two pieces will be sewn to each of your WOF strips to give you 2 long strips measuring 54.5".


* If you have extra wide fabric, or sufficient quantity to cut continuous lengths, you use the technique in Jennifer's post to cut your fabric in a different way, once you end up with the required pieces above.


Lap Size

Take 2 of your 12.5" WOF strips and carefully cut the selvedges off. Then measure and cross cut the strips at 9.5". This should leave you with a 9.5" piece, and a 33.5" strip from each WOF strip. (If your fabric is wider than 43", trim the longer piece to 33.5".)

Take the next 12.5" WOF strip and lay flat. Cut off your selvedges. Measure 21.5" from your cut edge and cut giving you 2 x 21.5" strips.

For your next 12.5" WOF strip, cross cut a 24.5" strip and a 9.5" strip from it. Then make two further cross cuts to give you two 3" strips. Each 3" piece will be joined to a WOF strip to give you 2 x 45.5" strips (the join will not appear in your quilt back but is needed in order for the strips to line up properly).

Lastly, from the 5th 12.5" WOF strip cross cut a 9.5" piece. Set aside the rest of this strip to use in a moment.

The final two 12.5" WOF strips just need the selvedges cut off leaving 2 x 43" strips.

Next, take your three 9.5" WOF strips and cut the selvedges off. Take one of the strips and cross cut a piece 24" long.  Then take the leftover part of the 5th 12.5" wide strip above, and trim it to a width of 9.5" to match the 3 pieces you have cut. Then cross cut your new 9.5" wide strip to 24". This will leave you with 2 strips measuring 9.5" x 24" .These two pieces will be sewn to each of your WOF strips to give you 2 long strips measuring 66.5".


* If you have extra wide fabric, or sufficient quantity to cut continuous lengths, you use the technique in Jennifer's post to cut your fabric in a different way, once you end up with the required pieces above.


Set aside your backing strips and move on to cut your fabric for your cross blocks.

For these crosses, I used some of the same fabric I had used on the front crosses, with a some new fabric mixed in. Whether you want to repeat, or go for new fabrics is totally up to you! By now you'll be familiar with how to cut these, so I am going to give the measurements only. If you need help with cutting, just drop me an email.


We are making 4 different cross blocks.
If you are making the baby size, cut 1 of each size.
If you are making the lap size, you will need to cut one of each size, plus an extra Block 2 and an extra Block 4, giving 6 cross blocks in total.

For these blocks, because there are so many pieces in similar sizes, particularly for the background fabric, I recommend separating each block out clearly while you are cutting. I put all my pieces for each block into small ziploc bags as I cut so I can't mix them up.


Block 1: Same as cross block for quilt front.
Cross fabric - 1 piece (4.5" x 4.5"), 4 pieces of (4.5" x 2.5")
Background fabric - 4 pieces of (4.75" x 4.75"), 4 pieces of (4.5" x 2.75")

Block 2:
Cross Fabric - 1 piece (2.5" x 2.5"), 4 pieces (2.5" x 1.5")
Background Fabric - 4 pieces (2.5" x 2.5"), 4 pieces (2.5" x 1.5"), 2 pieces (6.5" x 3.75") and 2 pieces (13" x 3.75")

Block 3:
Cross Fabric - 1 piece (3.5" x 3.5"), 4 pieces (2" x 3.5")
Background Fabric - 4 pieces (2" x 3.5"), 4 pieces (3.5" x 3.5"), 2 pieces (13" x 2.25"), 2 pieces (9.5" x 2.25")


Block 4: (Bordered Cross Block)
Cross Fabric - 1 piece (4.5" x 4.5"), 4 pieces (4.5" x 2.5")
Border Fabric - 4 pieces (1.5" x 4.5"), 12 pieces (2.5" x 1.5"), 4 pieces (1.5" x 1.5")
Background Fabric - 4 pieces, (1.5" x 4.5"), 12 pieces (2.5" x 1.5"), 4 pieces (3.5" x 1.5")

Note re: Bordered Cross Block:

When you are cutting the fabric for your cross "border", its up to you if you want to go scrappy, or keep it all the same fabric, and whether to contrast or compliment the cross fabric. I went with contrasting. The only thing that is important is not to use a directional fabric print for the cross borders as it will make it really difficult to figure out the placement of the fabric.


Ok, have you got all that? I hope it makes sense, if not, leave me a comment. We'll be piecing the cross blocks on Thursday, and then assmbling it all next Monday!

And, remember to check back Wednesday when I have a great Kona giveaway coming up!

Sunday, September 11, 2011

Goodie Swap sewing!


So, because I really have nothing else on my agenda at the moment (la la la, fingers in the ears, not thinking about my mammoth to-do list!!!) I decided to take part in Cindy's Goodie Swap 2011. I blame Cindy for thinking up such a great swap, but she is not alone. I blame Judith, Hadley and Susan too. Yes, it is ALL your fault that I couldn't resist. As Judith so eloquently put it a few weeks ago, I am a SUCKER!!

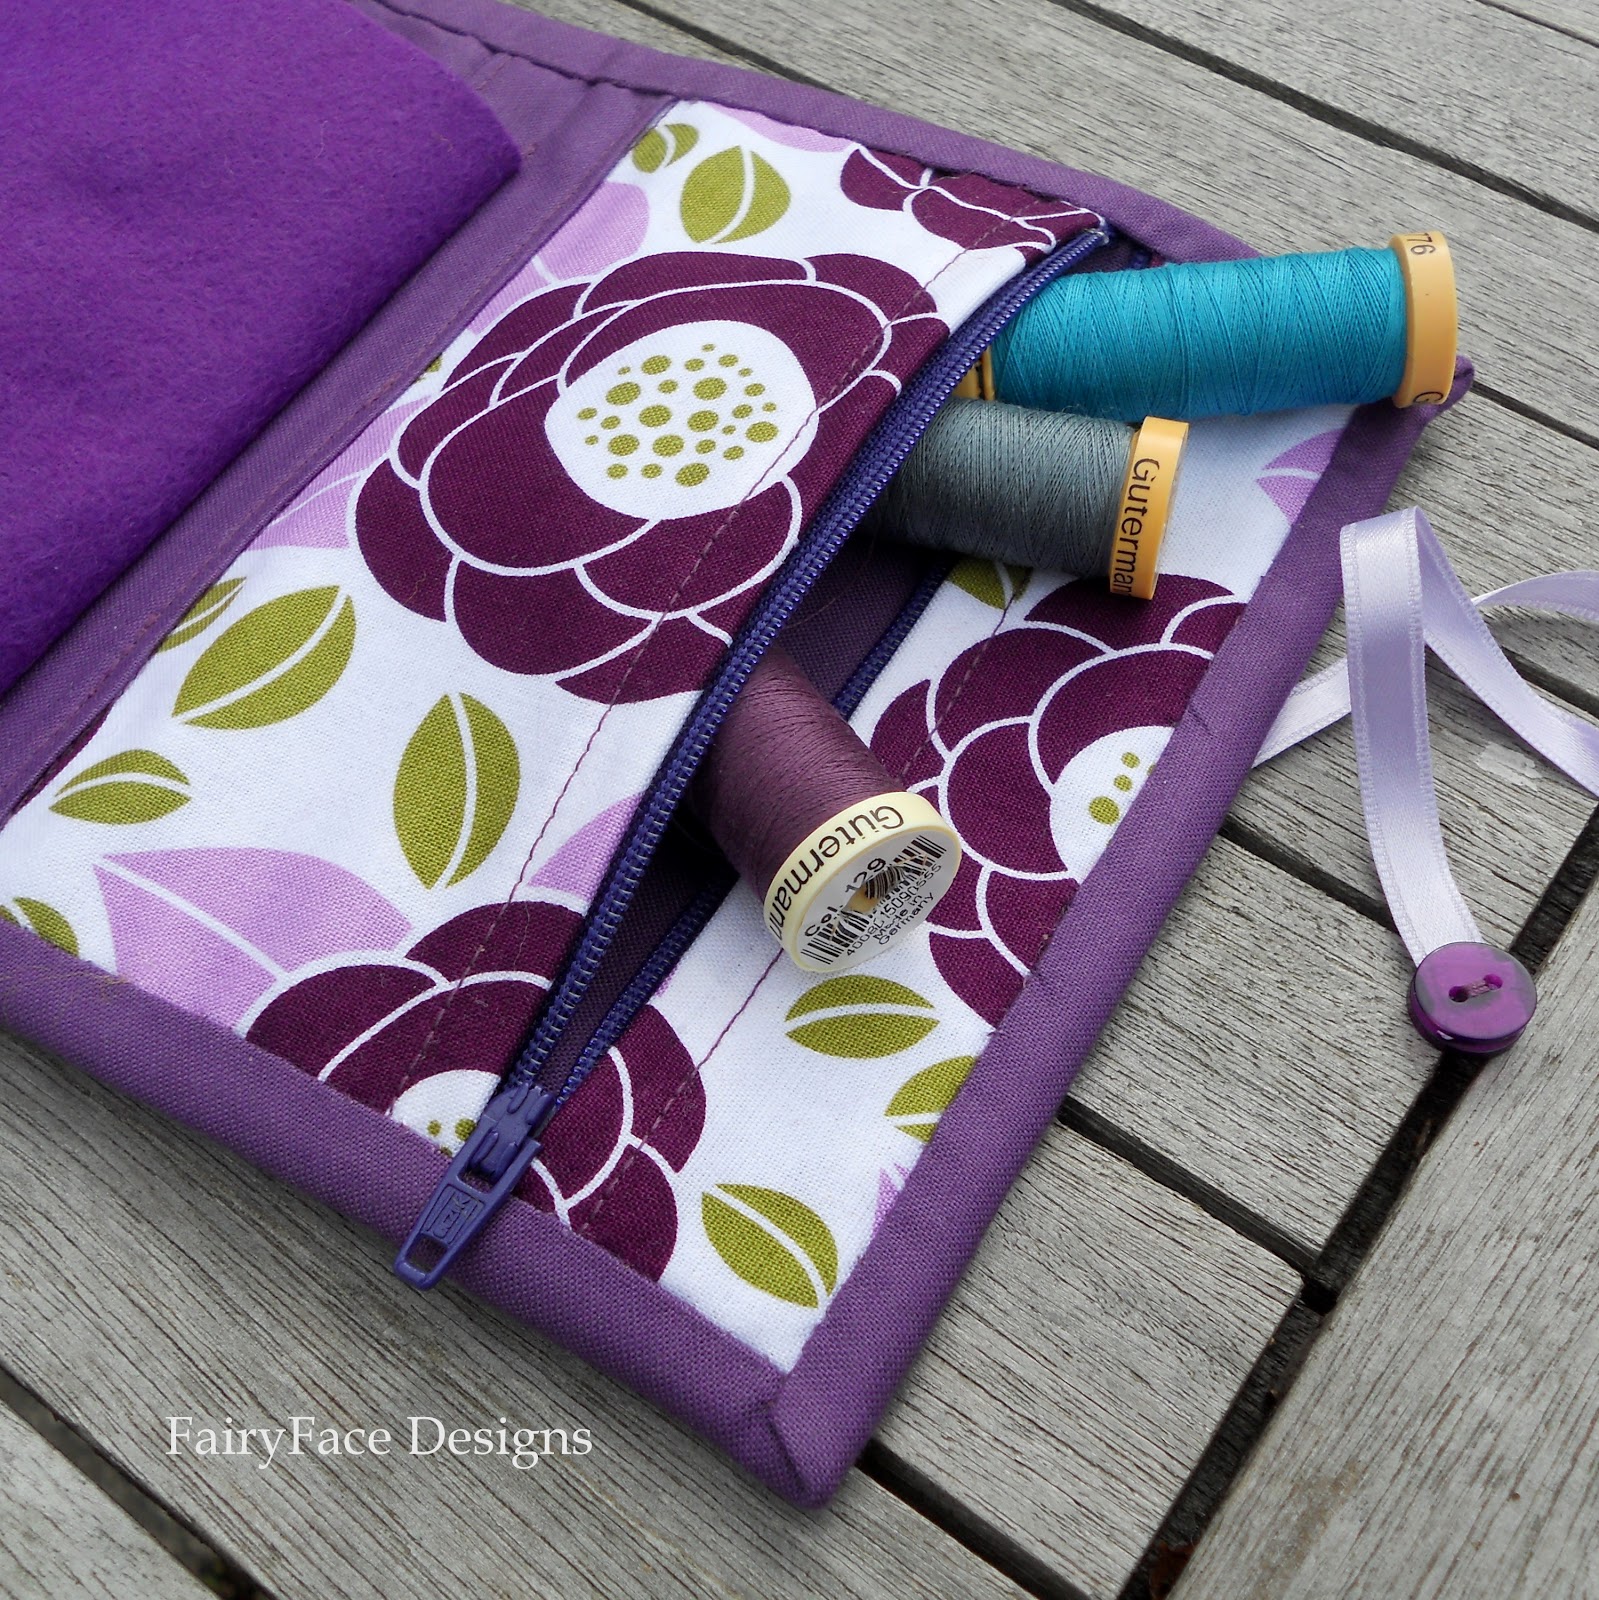
Anyway, now that I have my little blame game out there in the open I have to say I got 2 of the best partners ever. I was so thrilled and just hope they like what I make for them. Being all quilted out trying to write up my Across the Sea QAL tutes for the back this week, and coming down with a nasty flu type bug at the end of the week, I wasn't in the humour for anything too major in the way of sewing, so yesterday afternoon when I felt human again, I took out some of the lovely Aviary 2 fabrics that I got from River Fabrics (swoon!) and decided to make a little something for partner 1. I thought she might like a needlecase so of course, without any pattern, I just sketched a few lines out on graph paper, decided not to overthink it and just went for it! It turned out pretty good although my seam ripper got used a little bit :-)

I put in a little pocket and some tabs on one side:


And a zipped pocket on the other side for thread and measuring taper or any other little bits that might fall out!


Both fabrics are from the Aviary 2 line and I added a plum solid to compliment them. I put in two sheets of wool mix felt for needles and pins - luckily I had the right colour in my felt box! 

On the outside, I fussy cut the fabric to give me the bird on the front, and I covered a button with the inside fabric for the closure. I used a little bit of lavender coloured ribbon as the tie, and finished it with some purple buttons I found in my button box.


On the front, I quilted a little box around the bird and I quilted straight lines on the back. Lastly I decided it needed a little pincushion to finish it off and I had a perfect off cut from my fabric cutting to use - I decided to make another bigger cover button as the feature on this - I'm addicted to these lately!


So, I really hope my partner likes this. If she doesn't I will quite happily keep for myself!!
Linking up to:


Sew Happy Geek
{Sew} Modern Monday at Canoe Ridge Creations                                    and

Saturday, September 10, 2011

Christmas Design Competition


Fancy winning a Memory Craft 5900QC (RRP £799) and having your tutorial published in Cloth Magazine?

Fiona over at the Sewing Directory has a fantastic competition running at the moment which is really worth checking out if you like to come up with your own designs/tutorials for your projects.

All you need to do is to submit a unique tutorial or pattern for making something related to Christmas, whether it is a Christmas decoration, stocking, advent calendar or something that could be given as a Christmas present.

All the info is available here. With the wintery start to September and my kids already busy writing their Santa list (what is that about???), this competition is a very timely one for me....... So, my creative buddies, get your pencils out and get working on your entry! Entries are open internationally although some of the prizes are only available to peeps in the UK and Ireland, and the deadline is 20th October 2011.
Have fun!!!!

Thursday, September 8, 2011

Progress Review: Across the Sea QAL

How are you all doing with your quilt tops? Are you done yet?

These are the last few days for finishing up your top, as we will move on to cutting and assembling the back next week. I just can't wait!!

Have you been contributing over in the Flickr group? Its really great seeing the different interpretations people have of the design....so many different perspectives, I already want to make another quilt using different fabrics and giving it a totally different look!

Here are some of my faves from the Flickr group. I just couldn't fit them all in but if you're interested, pop over and have a browse through!!

ATS faves 

So, see you Monday when we'll start on the back!!