Sunday, May 27, 2012

Have you got the Dress Factor?

 Have you seen the great new competition running over at The Sewing Directory?


If you've ever fancied yourself as a designer, now is your chance! The Sewing Directory, Abakhan Fabrics,
Hobby & Home & Janome have teamed up to run a summer design competition with fabulous prizes.

All you need to do is to come up with an original, design for a summer themed garment, bag or accessory. This is a great opportunity to have a little bit of fun putting together a design idea, with the chance to win a brilliant prize!


Five of the designers will be chosen to make up their designs with free fabrics from the Abakhan
fabrics website. The winner will get a brilliant Janome Memory Craft 5900QC (RRP. £799) and the 4
runners up each get a £50 Abakhan Fabrics voucher.

For more details pop over and have a look at  http://www.thesewingdirectory.co.uk/dress-factor/ and get your thinking caps on!


Friday, May 18, 2012

Fluffy Sheep Giveaway Winner!

Thanks again to the wonderful Fluffy Sheep Quilting for a great giveaway! I'm so glad so many people visited Cindy to see the fabric goodies she has on offer!

Without further ado, here are the details for the winner:


And comment 101 was Mary Jo:


Congratulations Mary Jo, I will be in touch with you!

Thursday, May 17, 2012

{Sew} Get Started: Freestyle Embroidery Hoop

I can't believe that we have reached the final tutorial in the {Sew} Get Started series. It seems like a long time since I started them in January and I know from the comments and emails I have received that there are a few people who have gone from complete beginners to accomplished sewists over the last 5 months, which makes me very happy. This series would not have been possible without the generosity of my wonderful bloggy friends, so many of who gave their time to put together great tutorials to share with you. I want to thank each one of them very sincerely for all their time and for sharing their talent.


So it's on to the last tutorial. For this tutorial, I am re-posting a tutorial I wrote for Karen earlier in the year but haven't published on my own blog. This finishes the {Sew} Get Started: Beginner Sewing Tutorials series.

For more information on previous tutorials, and links to each one, please click on the button to take you to the master page.

FairyFace Designs

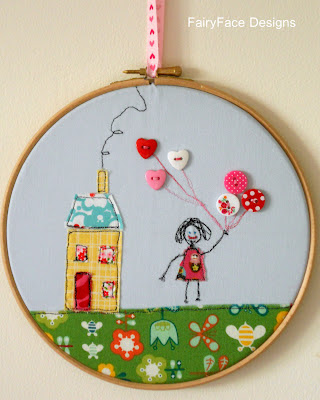
 Today I have a quick and easy tute for you to help you bring a little handmade touch your interior decor. Have you ever made a hoop to hang on the wall? They are quick, easy and versatile - they can be as simple as stretching a favourite piece of fabric in the hoop or free embroidering a little picture or design. You can embellish them with buttons, beads, ric rac, ribbon etc - really, they are an endless source of entertainment!

This tutorial however shows you how to make one using freestyle machine embroidery - a technique that is really useful and can be used to embellish all sorts of items. If you've never done freestyle embroidery on your machine before, you might want to do a test piece to practice before you try the real one, so you can get the hang of stitching freestyle. This hoop was made to replace a more babyish picture on my daughter's bedroom wall and so I put it together with her in mind.

Here's what you need for something similar:


1 embroidery hoop - size up to you!
Piece of solid fabric for background (I used a very light blue)
Fabric scraps
Ribbon
Buttons
Fabric glue

Small piece of fusible web (I used the stuff for repairing hems, it was perfect) and a piece of tear-away stabilizer (I used Vlieseline Stickvlies). If you have a fabric gluestick you could use instead of the fusible web.


To Make:

1. Decide what picture you want to make and how you will compose it. My daughter loves balloons so I decided to do a little picture of her outside a house with lots of balloons in her hand. If it is a complicated one, you might want to draw a sketch first - for this I didn't need to.

2. Press your fabric, then press the stablizer to the back of it (it will "stick" to your fabric but is not permanent)

3. Take your interior hoop and lay it on the fabric and trace around the outside edge to give you a guide. I used a Hera marking tool, you could use the blunt edge of a scisssors, a water soluble pen or a light coloured pencil.


4. Now take your fabric and scraps over to your ironing board, lay your fabric flat and cut and arrange your scraps as you want them. Be sure to include any embellishments you are using.

5. Once you are happy, cut tiny bits of the fusible web, place on the back of your fabric scraps and press with an iron to fix your scraps in place with it, I just put a dot in the centre of each piece, enough to stop it moving when I was sewing it. (If you are using a gluestick, this is where you use it to fix your pieces).

6. Mark where any buttons/beads will go with a pencil dot and then set them aside for the moment.


7. Put your free motion foot on your machine and drop your feed dogs. Technically you should adjust your stitch length to 0 - I don't find the stitch length makes much of a difference on my machine, but see what works for you. Using a black thread, sew around each of the scraps to outline each part. This is supposed to look a bit wonky and quirky so crooked lines etc are fine! (If you are doing a practice run first, you are trying to get your stitches reasonably consistent in length - as you can see above, mine are very tiny which is not perfect, but better than a very long stitch length which won't secure your fabric as thoroughly as you would like.)  I added a spiral line of smoke to my chimney. I then used my machine to "draw" legs and arms, a head and some hair for my little girl figure. I changed thread to do the balloon strings. Remember to backstitch to secure your lines of stitching at the start and end each time. Leave a decent tail of thread each time you stop to make it easier to sew in your threads, it will look very messy before it is done! (I forgot to get a picture of this bit, but just imagine the picture above with lots of thread tails hanging out everywhere I stopped sewing!) Be careful to move them aside when you are sewing each bit so as not to get them caught up in the line you are stitching.

8. Once you are done with the outlining, take a hand sewing needle and bring all your thread tails through to the back of your piece. I then knotted my threads to secure and snipped them close to the knot. You can see this in the picture further down.


9. Sew in your buttons and any embellishments. I added eyes and a mouth to my girl's face using perle cotton. The mouth was a little bigger than I intended so just go slowly and carefully and check regularly to see when you are done.

10. Place your fabric over the interior hoop and then put the exterior hoop over and tighten closed. Make sure your fabric is stretched nice and taute, but not distorted. I left my stabilizer on the back of my fabric - you could tear away if you wanted, but it helps stop any threads at the back showing through a light coloured solid.


11. Trim around the hoop - enough that you can glue it to the inside of the hoop, but not have it wider than the hoop itself. Then trim the stablizer right back to the hoop to reduce the bulk, being careful not to cut your fabric.


12. Using fabric glue, carefully glue the raw edges to the inside of the hoop, you will get a bit messy doing this and might need to hold in place for a minute or two to get it to stick.


As I was making this for my own house and it would be hung on the wall, I didn't bother covering the threads at the back. However, if you were giving it as a gift and wanted the back to be nice and tidy, cut a piece of felt or fabric to fit inside the hoop and just covering the raw edges that you have stuck down and use a little glue to fix in place.

13. Add a ribbon tie and ta dah! Your hoop is done. Hang and admire :-)


As I said, you can do lots of different things with hoops - just to get you thinking and planning, here are a few more I made last year.

This was made with appliqued circles, and hand stitched with perle cotton:


And this very simple Christmas hoop was made with a few scraps of fabric and some hand stitching:


I hope you enjoyed this tutorial and if you make any hoops, please add to the Flickr group. Thanks once again for following my series of tutorials and happy sewing!

Monday, May 14, 2012

A Launch and a Giveaway, Fluffy Sheep Style!!


Today I am totally excited to be finally able to tell you about my great buddy Cindy's fantastic new fabric shop.

Yes! You read that right! Fluffy Sheep Quilting now has an online fabric shop and I am really thrilled to be one of the people to tell you about it. Those of you in Ireland will know that local shops selling gorgeous modern quilting fabric are few and far between, and can be very very pricey. So Cindy had the genius idea to set up her own and today is the big launch! Excited now? I thought so! See, now you can order the fabric and have it on your doorstep in a couple of days. I LOVE that.  Of course, her sales are not limited to us Irish ladies, and Fluffy Sheep Quilting is set up to operate in euro, sterling or dollars, depending on where you are ordering from.


So, I am one of the lucky peeps who has had a little preview of her site, and I think you will find it fun and easy to navigate around, with lots to tempt you there. In addition to lots of crisp, yummy, scrummy modern fabric in stock, and more arriving all the time, Fluffy Sheep Quilting has a fantastic selection of Kona Solids. Cindy also is stocking Aurifil thread - at the moment her selection is the essential colours but the range is going to grow by leaps and bounds in the next few weeks.


So what are you waiting for? Get over there and have a look around. Don't forget to sign up for the newsletter, and to follow the shop on Twitter and Facebook so you can keep up to date with new fabric arriving and other updates. There is a great customer loyalty programme giving you points for every purchase to use against future purchases (you will need to register to accumulate points). Plus, Cindy is really open to suggestions and comments too - so if you're looking for something in particular, or if you want to suggest new Kona colours etc you can just let her know.

And, in case you needed another incentive, Cindy is offering a special launch week discount for all orders over €20. The coupon code is Launch10% This will give you10% off any order of 20 euro or more.  The coupon is good from 14 May (Monday) to 21 May (Monday) on anything in the shop.  You can use it as many times as you like!  You don't have to login to use the coupon, but those not creating an account will be ineligible for the customer rewards program.


So, to celebrate the launch of her lovely shop, Cindy is sponsoring a rather brilliant little round of giveaways today and I am delighted to be hosting one of them. One of the things I talked to Cindy about when she was setting up the shop was how I love to put together my own FQ bundles. I'm looking forward to doing some browsing to put together one myself later today. But in the meantime, Cindy has a FQ bundle to give away to one lucky winner of this giveaway. The winner can choose one of the bundles listed in the store (some of which you can see in this post's pictures), or put together their own from 5 FQs of their own choice.


You have 3 chances to enter:

1. Visit Fluffy Sheep Quilting, have a little browse around and then come back and tell me what your favourite fabric is in a comment.
2. Sign up for the newsletter (you'll find the signup box on the bottom right hand corner of the shop page) and let me know in a separate comment
3. Like Fluffy Sheep Quilting's Facebook page or follow on Twitter and let me know in a third comment.

****GIVEAWAY NOW CLOSED*******
The giveaway will close on Friday 18th May at 5pm Irish time and I will draw the winner some time after that using the random number generator. The lucky person will be sent their FQ bundle directly by Cindy.

This giveaway is open internationally. Please, please leave your email address in your comment unless you are 100% sure you can get replies via email to your comments. If I cannot get in touch with the winner via email I will redraw.

Lastly, don't forget to go visit Cindy, Hadley and Susan's blogs where there are other great Fluffy Sheep Quilting giveaways running today! Thanks so much Cindy for having me be part of your great launch and good luck with your exciting new venture :-)


Sunday, May 13, 2012

Featured on Sunday Sewing Space

If you're interested in finding out a bit more about my very multi-functional (read: really non-existent!) sewing space, pop over to Charlotte's where I am featured today!


Lawson and Lotti

Saturday, May 12, 2012

Circles Mug Rug

Last night I finished the binding on my second Circles mug rug, and the sun came out for some pictures this morning. I'd almost forgot what the sun looked like!


It feels like I haven't been finishing too many quilting projects here lately, so it feels really nice to have a ta-dah moment!


The circles are appliqued on, and I used a variegated perle cotton to hand quilt it. I still am in love with Rachel's pattern for this. This is the most fun to hand quilt and following the shapes of the interlocking circles makes it interesting to work on. The fabrics are a mix of scraps from my stash plus a tiny bit of FMF, and the binding is a Hope Valley print.


I got a little picture of my new label in action for you too. These are double sided.  I'm really happy with how they turned out, I got them here.


The mug rug is a present for one of  my best friends, so I'm hoping I get to meet up with her soon to give it to her.

Hope you're having a good weekend! I have a great giveaway on Monday, so don't forget to pop in to visit then.

Thursday, May 10, 2012

{Sew} Get Started: HST Mini Quilt tutorial


Can you believe this is the penultimate week of the {Sew} Get Started tutorials! No, me either! Today I am really pleased to welcome my lovely Australian friend Kirsten to FairyFace Designs. I first "met" Kirsten last year through Flickr and we chatted lots on email. Then, to my delight, I was her partner for the Solids swap last year, when she made me a beautiful sewing machine cover and HST mini quilt, both of which live permanently in my kitchen and make me smile every day. Kirsten blogs over at Gemini Stitches and you should definitely pop over and say hi - she makes the loveliest thing! I love the HST warm - cool mini quilt she made me so much that when it came to the tutorials, I asked Kirsten if she would do a tute for making one of these. Half Square triangles are so versatile and definitely an essential skill for quilters to have!


This is part of the {Sew} Get Started: Beginner Sewing Tutorials series. For more information and links to past tutorials please click on the button to link to the master page.

FairyFace Designs


So Kirsten, its over to you!


Hi everyone! I would really like to thank Sarah for inviting me to do this tutorial which uses half-square-triangles (HST's) to make  a mini-quilt which finishes up at about 16 inches square.


You will need: 
18 pieces of patterned fabric cut into 3.5 " squares (I have used a variety of red, green and blue fabrics)
18 pieces of a solid fabric cut into 3.5" squares
a piece of backing fabric approx 18 inches square
piece of wadding at least 17 inches square
fabric for binding


1. Lay a piece of patterned fabric on top of a solid square right sides together.


2. Using your ruler, draw a pencil line along the diagonal from corner to corner. Do this for all 18 pairs of patterned/solid squares.


3. Stitch 1/4" seam on each side of the drawn line.


4.Cut apart on the pencil line which is halfway between your 2 rows of stitching.


5. Press seams - you can press them toward the dark side or open.


6. Trim all of the HST's back to 3 inches square


7. You will get 2 HST's from each pair of patterned/solid fabrics so you should end up with 36 HST's.


8. Place the HST's in a 6x6 arrangement - I am doing a pattern similar to this :


There are many design ideas for HST's though - here are just a few other options using the same amount of HST's (36):


9. Once your HST's are laid out in the desired pattern, pin and sew the rows together using a 1/4 inch seam (refer to Sarahs post for more information).


10. Press seams to one side - alternating directions between rows. (ie. Press row 1 to the left, row 2 the right, row 3 to the left , row 4 to right, row 5 to left and row 6 to right).


11. Pin and sew the first 2 rows together - by pressing then seams to the left and right, you will be able to "nestle" your seams so they lie flatter.


12. Continue joining the next set of rows (3 and 4)  together, and then rows 5 and 6. Then sew the 3 pairs of rows together to complete the quilt. Press the seams to one side and trim the quilt top back to square - it should be almost 16" square.


14.  Making the quilt "sandwich" - place the backing fabric right side down (mine is navy so it is a bit hard to see here), and put the wadding on top.  Lay your quilt top right side up over this and smooth out any wrinkles.


15. Baste your quilt to keep the layers in place - I have used special quilting safety pins but you can also use spray. 


16. Quilt as desired - I have just done echo quilting along the edges of the patterned HST's.


17. Once it is quilted, trim back the edges of the wadding/backing and bind. Binding has already been covered in these tutorials so please refer to them here

18. Step back and admire your finished mini quilt! 


I made up a couple of minis in different designs - pinwheels for this one, quilted in straight lines:


And then Chevrons which I have handstitched in perle cotton:


I hope you have enjoyed this tutorial and if you have any questions please leave a comment and I will get back to you. 

Kirsten.


Thanks so much Kirsten! I juts love those minis...they are all gorgeous! If you make a HST mini quilt, please add to the Flickr group. And don't forget to pop back next Thursday for our last tutorial where I will show you have to do a little bit of freestyle embroidery to wrap up our series.