Showing posts with label Drunkards Path. Show all posts

Friday, September 20, 2013

Liberty Cushion Finish!

So pleased to be able to share a lovely Liberty finish with you today!
 

I've posted my progress on this a couple of times, so I'm not going to repeat myself again here! You can find the details in this post if you're interested in how I made it.


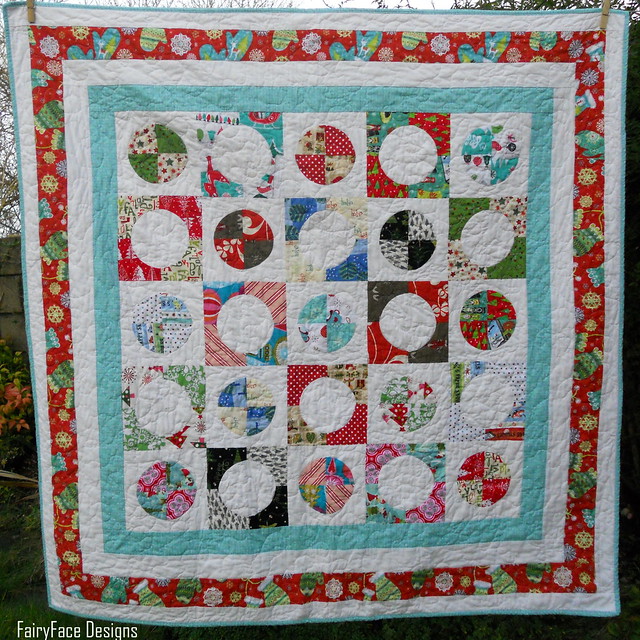
Suffice to say it was made with gorgeous Liberty lawn charms, which Ali of Very Berry Fabrics kindly sent me to play with, pieced by machine and handquilted with perle cotton.


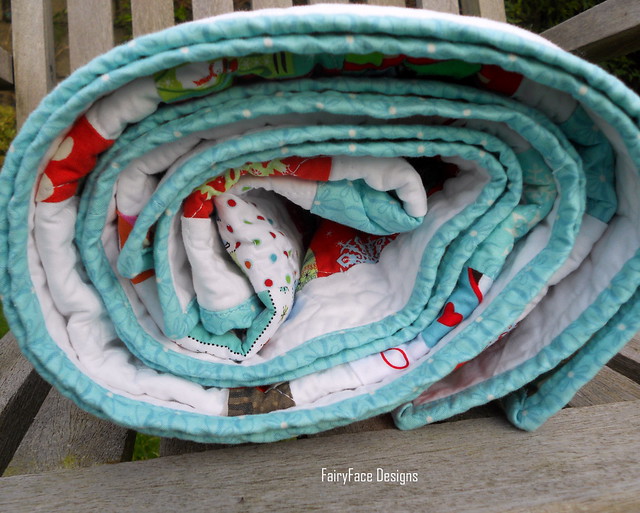
I finished it off by adding piping, my first time trying this technique. I'll be very honest - although it looks fine in the photos, I didn't find it easy, and its not entirely perfect, but overall it looks ok and I am pretty happy with how it turned out. Plus I learned a lot, and I'd love to try it again - I think I'd make a much better job of it 2nd time round.  I decided not to push the boat out too far, and used a simple envelope back with some Hope Valley which worked perfectly with the front.


I really love this cushion and seeing as I need some fresh cushions on my sofa, it will sit there very happily. I want to say a big thank you to Ali of Very Berry Fabrics for sending me the fabrics to try. The Liberty lawn is just beautiful fabric to work with - so soft and dreamy. Ali specialises in selling Liberty fabrics to quilters - she sells beautiful little bundles of Liberty lawn charm squares, scrap packs, die cut hexies etc for really great prices - the sort of money that you'd spend on a few takeaway coffees each week.  My new plan is to start buying a few packs every few weeks and gradually build up enough of a stash to make a quilt. If Liberty has been on your list of fabrics to try, you absolutely should pop over to her shop and say hi - I promise you you'll be sucked in!! You'll also find her on Facebook where it's well worth following her, as she often posts extra special offers there before they hit her shop :-)

Linking up with Finish It Up Friday at Crazy Mom Quilts.


Sunday, September 1, 2013

Liberty Circles Progress


Back a few weeks ago I was lucky enough to receive some Liberty fabric from Ali's lovely shop Very Berry Fabrics to play with. Ali sent me a selection of 6" charms in mostly greys and blues. I had already decided I wanted to do a Drunkards path pattern, but put off cutting them for a little while because I was too busy stroking their buttery softness. And slightly scared by how fine they were, fine generally equalling slippy and difficult to sew in my world.


But I finally got my courage together and used my Go! Baby to cut the blocks out. I still love my Go! Baby for cutting blocks like these (and hexies, of course).


Ali sent a little information sheet about sewing with Liberty lawn with the fabric and it was so helpful. I swapped out my needle for a size 10, took it nice and slow and my blocks came together just as easily as normal quilting cotton would. As always I used Leanne's great method for sewing curves.

Soon I had loads of little blocks all ready to play with. I find my blocks never look perfect when I'm laying them out but then they sew together nicely and I can't see the flaws any more!
There are so many possibilities with Drunkards path layouts:
Circles


Half circles


Bridges


And loads more! But in the end, for a small project like this - a cushion cover - I decided I liked the flower layout best as it was so self contained. I also decided to limit the fabrics to the blues and dark greys as I thought it was more striking like this. I'll use those pretty neutrals in something else in time.


Once I had it sewn up and a border round the edge, I was thrilled. I need to decide on quilting next. Hand quilting will definitely make an appearance, but I'm trying to figure out whether to add some machine quilting too.

I'll be back to Ali to start collecting a selection of her gorgeous Liberty charms because I imagine a whole quilt made with these would be so luxuriously soft - I can't resist! Check out her shop for more eye candy!

Tuesday, October 23, 2012

Quilted Tote Bag for Mouthy Stitches


The 2nd round of the Mouthy Stitches swap proved to be quite inspired!  Lovely swap mamas Cindy, Hadley and Susan picked a simple tote bag pattern which we all had to make to and it was so much fun. Such an interesting swap to take part in where everyone was following the same pattern.

Once I got my partner details I got down to a little bit of stalking. My mama chose well, because my partner's likes were quite close to my own.


I decided to go with a Drunkard's path pattern and a scrappy look and pulled out some of my brightest and prettiest scraps to work with. I played around quite a bit before settling on this layout which I mentally dubbed the "pacman" look - those incomplete circles really remind me of the game for some reason.


I then pondered how to quilt it, and what type of back to do. Eventually I decided to echo the circles on the back but to change it up a little, placing it within a scrappy square frame.


That decision about the back led me to the quilting decision for the back - echo quilting inside and outside the square, with some hand stitching around the circle. 


This in turn gave me my decision on the front quilting - I went with quilted circles travelling outward on the front.


When it came to putting it together, the dimensions worked out better than I could have hoped. The outer circles sat just on the corners on the front (its hard to see in the photo!), and the outer line of quilting on the back sat just on the back corners.


For the lining, I inserted a flush lined zip pocket (thanks again to The Bag Making Bible) using a strong teal fabric with contrast orange for the pocket lining. I carried the lining fabric through to the straps, to finish off the scrappy look for the exterior. All in all, I was pretty happy with this bag!


Last thing to be done was the little key fob. For this, I decided to do a mini circle in a circle and handquilt around. I found a scrap of one of my favourite prints and used a variegated perle cotton to finish it off.


The package is gone off in today's post and I'm hoping my partner will love it as much as I do....all that remains is to watch obsessively for the postman now to see what I get in return!

Saturday, March 24, 2012

Sewing Therapy


This week has been something of a blur for me, so I decided I needed some sewing therapy today! We were supposed to be away, at the wedding of one of my best friends, and for some quality time with my family up the country. But life, in the way of chicken pox, got in the way and sadly we ended up home all week minding our very sick little lady. Not only did she have a horrible dose of the pox, but she also developed a nasty little complication - nothing too serious, but incredibly sore - and she needed lots of TLC for the last few days. The only upside to dancing attendance on her was that most of her (and therefore my) time was spent on the sofa watching cartoons, so I got my hand quilting finished on my Skittles quilt, and  last night I got the binding sewn on. It's been washed and dried and photographed, so pop back tomorrow to see that!

By happy coincidence I found myself this afternoon with a couple of free hours - child no 1 was off playing at a  friend's house, and child 2 was out with her dad in the garden. I've been feeling guilty about not getting a handle on my doll quilt swap quilt, so out came my partners info, out came my fabric and I spent a very pleasant couple of hours putting together the top of it. Isn't it amazing how much better you feel after a few hours of making something with beautiful fabric? Or am I the only one who finds it totally therapeutic?

My partner's info told me she liked bright colours, so this is what I chose for her:


I had a silver grey solid that I picked up locally during the week - its very close to Ash but slightly lighter I think. This round of DQS has some requirements - you have to incorporate at least 6 of a choice of blocks, and you have to use a non-white solid in your quilt. There's lots to choose from in the blocks and I have been mulling over whether to go with flying geese, log cabins or drunkard's path, but in the end I decided to pull out my Accuquilt Go! Baby and cut some drunkard's path blocks.

I had a browse through some layouts on Flickr and loved this one - it reminds me of a flower. It came together really quickly and, thanks to Leanne's perfect curves tutorial, I am super happy with how my blocks lined up. This is the second time I've used her tutorial, and this time I didn't make the mistakes I did last time by ironing my perfect curves out of shape - these were pressed very carefully and it made all the difference. I took it out the back and got a great stained glass effect picture which I love!


This little baby is 16 x 16", and I just need to piece the back - a central circle in the solid, plus add a label (my first time doing one).  I am going to hand quilt it tonight on the sofa while watching tv - hand quilting is my new favourite thing, I am addicted! And here's why... a sneaky peak of the finished Skittles quilt!


I see lots more hand quilting in my future!

Wednesday, December 21, 2011

Merry Quiltmas!

Ta Dah! My Christmas quilt is done!

Christmas quilt closeup


This one is for snuggling under watching DVDs with the kids during the holiday season. It also adds nicely to our decorations in our living room.

I made this quilt with the modern Christmas charms from Emily's swap a few weeks back. I added some white solid and cut the pieces using my Drunkard's path die.

DSCN3818


After having some difficulty piecing them, I asked for advice and got tonnes of comments pointing me in the directions of great tutes, so thank you everyone, I really appreciated all your help.


I can't thank Leanne enough though - when she saw my cry for help, she went off and recorded a video tute and posted it on her blog - how fab was that? It made my day :-) And, better still, her method of piecing the drunkard's path is super quick, super easy and requires no pinning. After a few trial ones, I flew through them, piecing perfectly every time! Alas, I was a bit silly when pressing ironing the pieced squares and managed to distort more than a few by ironing rather than pressing. Still, I don't think they turned out too badly at all!

Christmas quilt on chair

The centre block was quite small when I was done, so I added some borders to bring it up to 50" x 50" - a nice size for the sofa and not too big!

It's backed with some Joel Dewberry Deer Valley, and I bound it with the same blue as one of the borders which I think works really well.

Christmas quilt draped on chair


I did a large scale stipple on this quilt and it was a pleasure to quilt something of a manageable size after a few big quilts.

Christmas quilt binding


Washed and dried, it is ready just in time, with my little lady finished up Montessori today for the holidays, and my little man finishing school tomorrow.

Christmas quilt finished

Wednesday, December 7, 2011

Help with a Drunkard Christmas ;-)

 
I've been turning over in my mind what to do with the Christmas charms I got from Emily's Christmas charm swap. I didn't need to use them in my table runner and didn't want to leave them there till next year. I have some other projects going on in the background but today I decided to try and start a Christmas quilt for snuggling under during the holidays. I also wanted to try something different to my usual square/straight line patterns and I have a Drunkard's Path die for my Accuquilt Go! Baby. I have been watching some great Drunkard's Path quilts turn up on blogs in the last few months, so decided to go with that.


I do love the Go! Baby. My pieces were cut in double quick time from the charms - and perfectly too. Then I started to piece but it did not go smoothly I must admit. I tried pinning just in the middle and at either end, but could not get my pieces as accurate as I wanted. So I started pinning all the way around and that did help. I also ran into some tension issues on the second half of each curve, I'm not sure if it was just a threading problem or if it was something to do with how I was matching the fabric. Yikes!


I was relieved to see once I pieced the 4 quarter circles together, it did look a little better than I anticipated, thanks to a little easing of the fabrics to get seams matching.  The blue and white one is not great. It seems off centre and the circles are not even, nor are the points matching. The red, green and white one is definitely better, but still not brilliant. When I squared off the block, it is at least presentable rather than disastrous. But I would hate to think that I can't improve on these. One or two like this will not be noticeable in an overall quilt, but a whole quilt of them - no way!


So at this stage I'm a little disheartened. Those of you who are experienced Drunkards, any advice? (I'll take advice from experienced drunks too!) Is it a flow thing with the curved piecing? Will practice make it quicker and easier? How can I speed it up because these 2 were VERY slow!! And as you can see above, I have lots of piecing to do.

All drunk and sober words of wisdom very welcome ;-)

PS - Don't forget to pop over to my Circa 1934 giveaway before Friday evening to enter!