
Lindsay's tutorial is all about how to use freezer paper which is a fantastic tool for sewing. In Ireland, there are a few places to source freezer paper, so if you need help to find it just drop me an email.
You might also like to pop over to the Modern Quilt Guild of Ireland blog today where I am the member profile :-)
This tutorial is part of the {Sew} Get Started: Beginner Sewing Tutorials series. To go to the master page with a full list of tutorials and links to past tutes, please click on the link.
So, over to Lindsay!
I visited a friend in Ireland once (before I met Sarah via her blog!), and she asked me if I could bring her a roll of freezer paper from the U.S. She said she wanted to use it for sewing, and at the time, I had no idea what this meant. Since then, I've discovered that freezer paper is a wonderful tool, although it can be hard to come by depending on your locale. It's available at many grocery stores in the U.S., some online shops. If you find it, I recommend buying the largest roll you can find! Freezer paper is similar to wax paper, but is only coated on one side. Its most special quality is that it can be ironed onto fabric and easily removed, which works great for cutting out freezer paper stencils or using freezer paper templates or patterns for your sewing.
Freezer Paper Stencils
To print text on fabric using freezer paper, cut out a square of paper, with the coated side facing down. Trace printed text with a pencil, then cut around letters using an exacto knife (or craft knife) on top of your
cutting mat.

The stencils can then be ironed to your fabric (again, with the coated or shiny side down). Iron for 10 seconds, and you'll notice the paper adheres to the fabric. Carefully arrange your inner letter parts (like the inside of the "D"s above) before ironing.

Use a foam brush to completely cover stencils and exposed areas with fabric paint. I've found that black paint covers really well, and you should only need one coat, or two at the most. Let paint dry overnight before peeling off your freezer paper stencils.

Voila! Here is my Remote Control Pillow. It's a great way to add text to fabric.

You can also use freezer paper to make custom painted tees.
Freezer Paper Patterns
I also like to use freezer paper to help me sew together patterns, whether that is for clothing, a purse or tiny projects, like individual quilt blocks!

The brown tissue paper that many patterns come printed on is not very durable. Transferring a pattern to freezer paper before cutting out is so helpful!

Roll out freezer paper to completely cover your printed sewing pattern. With the shiny side of the freezer paper facing down, use a pencil and ruler to trace the outline of your pattern on the freezer paper. Drawing on the matte (non-shiny) side, you will be able to faintly see the pattern lines through the freezer paper.

Transfer all of the marks from your sewing pattern to the non-shiny side of the paper, using a pen or pencil.

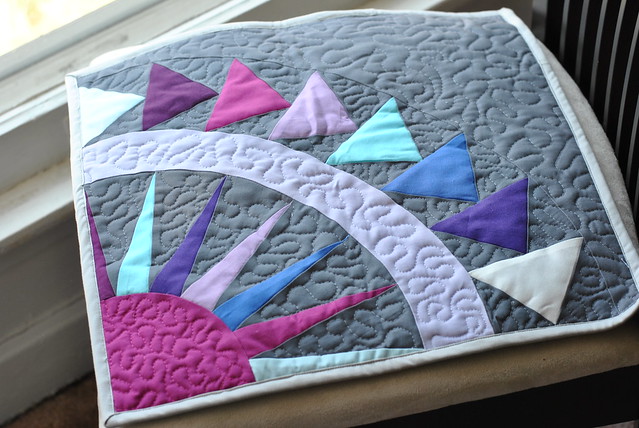
Once your freezer paper pieces are ready, iron each piece on your fabric (shiny side down). Press with iron for 10 to 15 seconds and remove. The freezer paper pattern is now temporarily adhered to the fabric and you can now cut around the pattern without it shifting. With this technique, I don't need to make any markings directly on the fabric. I like to use a rotary cutter and ruler to cut fabric quickly and accurately. I have also used freezer paper to cut out patterns for quilt blocks. As you can see below, I've cut out my pattern pieces from computer paper, then cut them out of freezer paper. I can then iron them directly on to fabric, and cut out my shapes accurately. This is especially helpful for making tricky patchwork!

And here's the Noel Paper-pieced Quilt Block I was able to create using these tiny pieces.

I hope you enjoyed this post on different ways to use freezer paper to help with your sewing projects, as well as the rest of Sarah's series!
Thanks so much Lindsay for a great tute! If you make anything using this tute, don't forget to add to the Flickr group. And pop back next week for Judith's Zip Back cushion/pillow. If you're scared of zips, you don't want to miss this one!
9 comments:
Great explanation of freezer paper which I have yet to use. Thank you!
Got to agree that it is mighty useful xxx
I think I'm a little bit addicted to freezer paper...
I use freezer paper quite extensively. I buy huge $50 rolls of it from U-Line. It's a great tool in quilting!
Great to find another cork girl addicted to quilting.
Leona
That is amazing! I knew you all have tricks you can't find in the books! thanks for telling :)
Great tips! I used it for the very first time the other day, and it was like a wee lightbulb went on!
I so appreciate this tut. I've heard others talk about using it but didn't understand the how. What a great clear and informative tut. Thanks.
Thanks for the awesome tutorial!
Post a Comment